


About using Graphedit to convert WMV to DivX
Here are a couple additional tips.
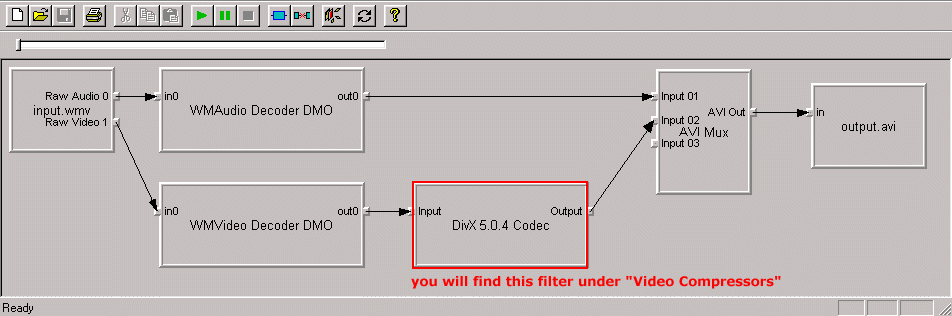
1)
To save a lot of hard drive space, you can insert the DivX 5 codec filter between the WMV video decoder output pin and the AVI Mux input pin. This filter is found under "Video Compressors" in the list of filters. The resultant avi will be about 40 times smaller.
There is a caveat to this method, however. The last frame will be corrupt. This does not seem to affect playback, but if you want to do additional processing on the avi, you will have to rebuild the index using DivFix or some similar tool before it will load in VirtualDub.
2)
You can set up a template in GraphEdit by saving as XML.
Once you have successfully run one pass, go to (File-->Save As XML...) and enter a filename such as WMV2AVI.XGR
Open this file in a TEXT editor (such as Notepad). It will look similar to the following:
You must remove the "data" parameter from the "File_writer" filter. Just remove this line entirely:Code:
Only remove this line for the "File_writer" filter. Leave the other "data" PARAMs as is.
Save the file.
Now, we need to associate XGR files with GraphEdit. Double-click the XGR file. An "Open With" window will appear. Click the "Other..." button in the lower right corner, browse to where you have installed GraphEdit, and highlight the "GraphEdt" or "GraphEdt.exe" program (depending on your settings). Click "Open", then make sure the box labeled "Always use this program to open this file" is CHECKED, then click "OK".
Now, each time you want to convert a WMV file to AVI, all you have to do is edit the template file: change the input path/filename and the output path/filename. Save it, double-click it, and then just push the play button in GraphEdit.
+ Reply to Thread
Results 1 to 1 of 1
 Quote
QuoteSimilar Threads
-
best software and guide for WMV-to-AVI..?
By snadge in forum Video ConversionReplies: 2Last Post: 26th Jul 2009, 17:24 -
WMV to Xvid or Divx
By glenn71x in forum Video ConversionReplies: 3Last Post: 15th Jul 2009, 15:27 -
Blueray to WMV-HD with 5.1 or Stereo Quick Guide
By DexterF in forum Blu-ray RippingReplies: 1Last Post: 18th Dec 2008, 18:51 -
Guide for creating Divx/Xvid DVD Rips Easily on a Mac?
By ehmjay in forum MacReplies: 4Last Post: 7th Oct 2008, 17:03 -
Converting HD (DivX/MOV/WMV etc) to DVD or DivX ???
By snadge in forum Video ConversionReplies: 32Last Post: 8th Jan 2008, 05:48