


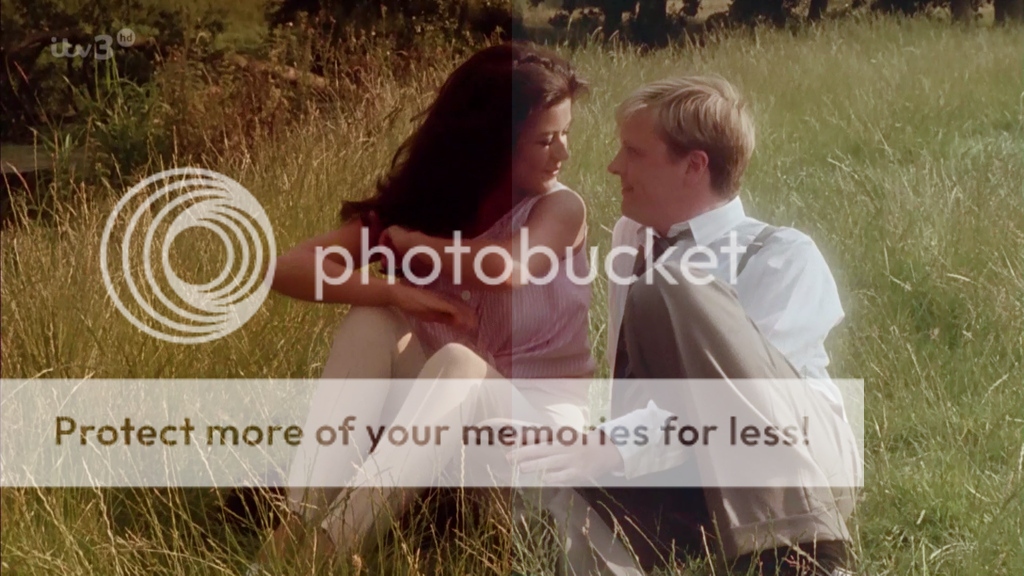
I've got a 1080i rebroadcast of a standard definition TV show. Clip is HERE. I got the video without re-encoding it. The show seems to have an intentional brown tint and there's a lack of colour. Any way to fix that please?
The show is set in rural 1950s Kent in England and it was made in 1991. I'm not interested in making shot by shot adjustments. Just looking for a script I can use on the whole video preferably with Avisynth and preferably without Virtualdub.
Try StreamFab Downloader and download from Netflix, Amazon, Youtube! Or Try DVDFab and copy Blu-rays! or rip iTunes movies!
+ Reply to Thread
Results 1 to 23 of 23
Thread
-
Last edited by VideoFanatic; 26th Jun 2017 at 12:50.
-
It actually looks pretty good to me. It does have a "warm" cast, similar to good old Kodachrome. I see no huge problem and in fact I see all the main colors: blue sky; the woman's green hat; the woman's red lipstick. So there is no faded color layer.
If you want to "time" your color (i.e., color grading), you could open it in VirtualDub and use the Colormill plugin. If you have an NLE that includes good color grading plugins, then use one of those.
If it were me, I'd just diminish the red color channel (in RGB colorspace) just a little. I don't think it would take much. Also, I always recommend balancing the shadows, midtones, and highlights separately, if your software lets you do that.
If you want the colors to be more "intense" and more garish, there are dozens of plugins that can do that. -
Looks as if it's gone from YUV to RGB and been re-encoded several times. You'd have to correct each shot individually to get what you want, which I assume would be something more "neutral" in each shot. But I think the producers had different ideas. Some of this looks like sloppy processing, some of it looks like intentional color engineering in the original production.
You'll need filters like curves, YUV and RGB color wheels, levels controls, individual channel saturation adjustments, histograms, vectorscopes, and pixel samplers. A combination of Avisynth and Virtualdub would have all of these. So would "Pro" NLE's like Adobe Premiere Pro or Vegas Pro and whatnot, so if you've put up big bucks for apps like those you may as well learn to use what you paid for. But frankly with all the abuse this video has gone through so far, I'd say leave it alone.- My sister Ann's brother -
Just a quick hack:
But isn't the color tint intentional? To give the video sepia tones to make it look old?Code:LWLibavVideoSource("Darling Buds of May Brown & Colourless Sample.mkv") ConvertToRGB(matrix="rec709") RGBAdjust(rg=0.90, bg=1.05) -
No, my reply isn't exactly a complete answer, is it? For what it's worth......
There are 5 camera shots in the sample. Each has different problems, with shot #3 (the couple watching the sunset) the worst. Shots 1 & 2 look about the same, so I used the same filters for 1 & 2. Shot #3 is really out of whack, I have a feeling the director wanted it warmish, but I think what's there is really too much. Shot #4 of the ladies and kids has levels and color problems -- it's a lot like the first two shots, but needs slightly different tweaking. Shot #5 isn't so bad, so the filter is milder. Whoever worked this video crushed (i.e, destroyed) dark green and dark blue data in the first three shots, so effectively shadows in the first 3 shots lack some detail and always look rather reddish. The color imbalance you mention is red, not brown.
I used two VirtualDub filters, which were gradation curves and ColorMill. You can do the same thing with curves and color wheels in an advanced NLE like Adobe Premiere Pro. The VirtualDub .vcf files with the settings and two filters I used are attached as a .zip. There are four vcf's, one for shots 1 & 2, and one each for shots 3, 4, and 5. Load them up with the .vcfs for each scene and look them over to see what was changed. I filtered each scene separately and joined them in Virtualdub. These were done quickly, but you'll get the idea and can tweak to suit.- My sister Ann's brother -
Double post.
Last edited by LMotlow; 26th Jun 2017 at 11:23.
- My sister Ann's brother -
Triplicate post!. Did I lean on the keyboard?
Last edited by LMotlow; 26th Jun 2017 at 11:23.
- My sister Ann's brother -
It's obviously intended to have that warmish British tint seen in so many films like this one. But looks like some processing of the mkv overdid it in some shots. Of course if it looks OK to the owner as-is, leave it alone. But some of those crushed darks looks pretty ugly to me. They don't look intentional.Originally Posted by jagabo

Looks like the setting is the 1930's. Folks liked warmer color back then.- My sister Ann's brother -
The movie was made in 1991.Originally Posted by LMotlow
I agree the darks are too dark in some shots. But the OP didn't ask about that. A little Y channel gamma adjustment can help with that. I doubt the OP is interested in making adjustments shot-by-shot.Last edited by jagabo; 26th Jun 2017 at 12:11.
-
If the OP doesn't adjust scene-by-scene, then the results won't be very good. LMotlow gave the reasons: each scene has different color. In the parlance of the movie trade, someone did a lousy job with the color timing.
I did some correction on the first scene and ended up with this:
The left side is the original, and the right side is corrected. I also did a little gamma adjustment because the black point appeared to be too low.
I did not apply any of the filters I have which produce more intense colors.Last edited by johnmeyer; 26th Jun 2017 at 17:06. Reason: typo
-
FWIW, this shows the results, from some work I did a year ago on some drone footage taken in Iceland by a professional drone operator. I am posting it because it shows what can be done with some fairly advanced color correction tools that do more than simply bump up saturation. Note how haze has been reduced; far more detail is apparent; and the colors are much more intense.
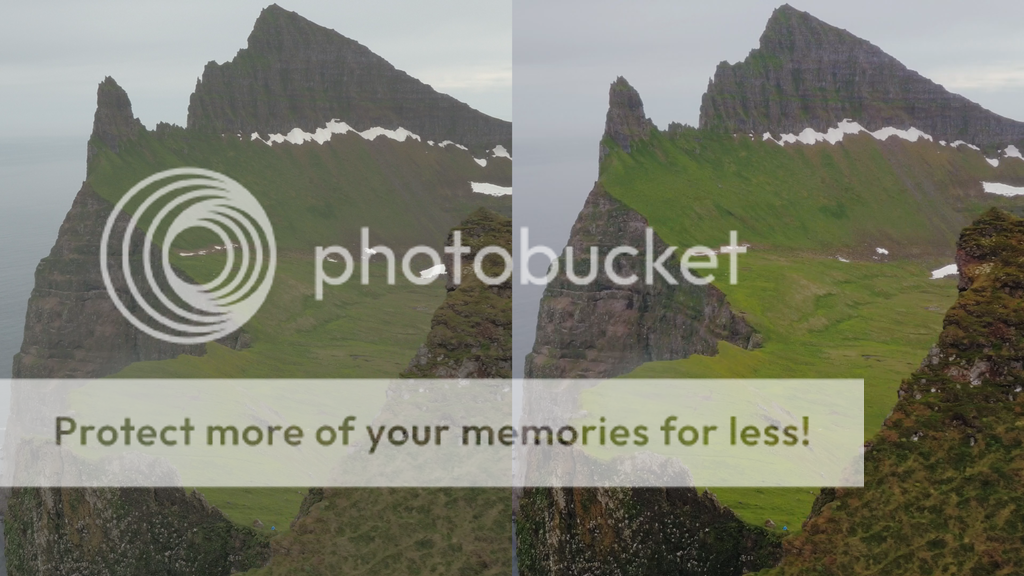
Last edited by johnmeyer; 26th Jun 2017 at 17:07. Reason: added last sentence
-
I didn't make massive corrections for that mkv demo. Four of the shots didn't need very much (wish they hadn't crushed dark colors in the first three shots, though). It's that third shot looking at the sunset that bothered me. In the original you can hardly see the girl's face it's so dark. I realize the movie has a warm motif, but the sunset shot doesn't look like something the lighting crew should have been paid for.
Original:

You can make it cooler as in the mkv demo (or not) but you oughtta be able to see the girl:

Or you can aim for somewhere in the middle:

But that original looks kinda dank to me.
VideoFanatic used the term "colorless", I don't agree. Plenty of color, just not quite "right". Could've spent a little more time tweaking the midtone and brights here, but everyone has their druthers with the details.- My sister Ann's brother -
I like the brightening of her face, especially in the second of your two examples. The color in the second one looks a little "pink" to my eye (look at the wrinkle running down his left shoulder), but the exposure is quite nice.
Last edited by johnmeyer; 26th Jun 2017 at 17:09. Reason: added parenthetical
-
I read somewhere that the rule of thumb for coloring is to keep working until it looks right, then rest up. 24 hours later it will look completely different.
- My sister Ann's brother -
I never heard that, but I agree. In that respect, it is like writing: come back a day later and you'll be amazed at how bad your writing has become. A fresh look reveals all the mistakes.Originally Posted by LMotlow
-
That shot with is set at sunset. I think it is intended to have a reddish tint and be a bit dark -- though not as much as in this clip. It's funny, in the dialog they say they're watching the sun set but the light is coming from behind and to the left of them, not where they're looking!
-
Yep, I thought the direction of the light was a little, uh, odd. I guess one needs to see more of the scene to put it ll together. And it would probably be colored differently.
I know I saw this movie way back then. Don't remember anything about it. But I remember where I saw it.- My sister Ann's brother -
Thanks everyone. A lot for me to think about. Don't have the time to do manual adjustments for every scene as I have loads of videos like that. Is there a script I could use on the whole video please?
-
You might get some use out of this script which is designed to auto-correct color on old film:
GamMac, Gamma Machine
Make sure you get the latest version because the initial version was not fully developed. -
Try this as a compromise setting:
Code:ColorYUV(gamma_y=40, off_y=-3) # bring out shadow detail ConvertToRGB(matrix="rec709") RGBAdjust(rg=0.95, bg=1.04) # reduce midtone red, increase midtone blue ConvertToYV12(matrix="rec709")
-
Originally Posted by johnmeyer
Personally I think that turned out really nice and I like it!!
Advanced color correction tools?
Can that not be achieved simply by reducing the brightness some to lessen the white tint/haze and then give a small saturation/levels increase? -
With the video downloaded in post #1, No. Try it and post your results. Others have done so.Originally Posted by killerteengohan
- My sister Ann's brother
-
There is a LOT more going on in that before/after than brightness and saturation.Originally Posted by killerteengohan
You have to use some of the advanced plugins that are available for various NLEs to fully appreciate the range of things that can be done, and what is actually getting changed. If you are serious about doing professional color correction, you definitely need to use the advanced tools.
 Quote
Quote
Similar Threads
-
Fixing a Major Hue/Tint Error
By Jag12 in forum RestorationReplies: 10Last Post: 10th Jun 2016, 22:38 -
Huffyuv & colour spaces
By VideoFanatic in forum RestorationReplies: 27Last Post: 18th Aug 2013, 21:28 -
Present state of play with B&W conversion to Colour
By GeneLamp in forum Newbie / General discussionsReplies: 39Last Post: 30th Jun 2013, 19:03 -
Mysterious dark brown tint while capturing old VHS tape
By CraigFarr in forum CapturingReplies: 3Last Post: 30th Apr 2013, 17:12 -
How to remove brown colour with Avisynth?
By VideoFanatic in forum RestorationReplies: 28Last Post: 13th Feb 2013, 00:17