


How to Make JACKET_P Pictures
Tools required: TMPGEnc
A JACKET_P picture is a picture placed on the DVD, which will be displayed when the DVD player is stopped, in place of the player's default picture, which is usually the manufacturer's logo. Not all manufacturers have yet implemented this feature in their DVD players. SONY, and perhaps others, have, and perhaps more will in the future. If your player has such a feature, it may be configured in the player's setup menus, and is usually disabled by default.
The JACKET_P picture can be different than the Menu background picture. In fact, it can be any picture you like. Many commercially pressed movie DVDs have JACKET_P pictures. Usually, the picture will be the same as that found on the cover, or jacket, of the DVD case. Hence, "Jacket Picture".
JACKET_P is the name of the folder in which the pictures are placed. The folder must be at the root level, along with the VIDEO_TS and AUDIO_TS folders. Inside the JACKET_P folder, there must be exactly three files, with specific names, and with very specific formats. The three files are the same image, at different sizes. The large size is displayed full-screen by single-disc players, when stopped. The smaller sizes are displayed as thumbnails by DVD changers. The filenames and sizes depend upon the format of the DVD, and are as follows.
For NTSC:
J00___5L.MP2 720 x 480
J00___5M.MP2 176 x 112
J00___5S.MP2 96 x 64
For PAL:
J00___6L.MP2 720 x 576
J00___6M.MP2 176 x 144
J00___6S.MP2 96 x 80
Those filenames consist of an uppercase letter 'J', followed by two digit 0's (not letter 'O's), followed by three underscores, another digit ('5' for NTSC, '6' for PAL), another upper-case letter ('L' for large, 'M' for medium, 'S' for small), and finally the .MP2 extension.
As can been seen from the file extensions, these are MPEG2 files, but not just any MPEG2 files. They must have a specific format, which as it turns out, is not at all hard to create, but was very difficult to figure out initially. Some very expensive software systems have the ability to create these MPEG2 files automatically, but I wanted to be able to create them using inexpensive or free software.
TMPEGEnc seemed to fit the bill, but after days and weeks of experimenting and reading on this and other forums, and following all the suggestions, directions, and tutorials, I was still unable to create an image that would display properly, if at all. Usually, what would be displayed on the screen would be a colour-challenged version of whatever image from the movie was being shown just before the stop button was pressed, as though that image were being held in a buffer within the player. The weird colours it was displayed in, made it almost like looking at a colour negative. And from my reading, it appeared that many others were having the very same problem.
After some detective work, I'm happy to say that I am now able to create perfect images, every time. I began by looking at the files in the JACKET_P folder of a commercial pressed NTSC movie DVD. Neither IrfanView nor SlowView could display them. XnView did display them, but gave me no additional information. Finally, Windows Media Player displayed them, and gave me an interesting bit of additional information: it showed the size of the large file to be 720 x 540, rather than 720 x 480. WMP showed the files I had encoded with TMPGEnc to be either 1068 x 480 (MPEG2), or 720 x 480 (MPEG1). WMP also reported using different codecs to display my files, than those it used to display the files from the commercial DVD. I knew the required files had to be MPEG2, but they also had to follow the same pattern as those found on commercial DVDs if they were to give the desired results. After much further work, I've found a solution, which consists of two points:
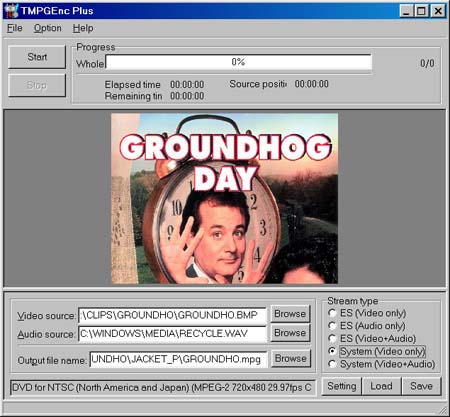
First, while everyone had been saying to select 'ES (Video only)' as the Stream Type, my success was achieved by setting the Stream Type to 'System (Video only)'.
Second, while others had been saying that no audio file was required, I found success only when I included an audio file, even though the output we are interested in is the video stream only. This may be because without an audio file, the video file created by TMPEGEnc will be a single frame only, whereas with an audio file specified, the created video stream will be as long as the audio stream. Naturally, the larger the audio file, the larger will be the created video stream, and we would like to keep the files as small as possible. However, if the audio file is too small, the created video stream will be incorrect, just as it is when no audio file is used. The contents of the audio file is completely irrelevant, only the size. You will find a large selection of .wav files in the \WINDOWS\MEDIA directory. I found that RECYCLE.WAV was of a size which gave good results without bloating the size of the video file too much.
Once these two conditions were met, I found that the MPEG2 files generated by TMPGEnc displayed in WMP as 720 x 540, and also that they used the same codecs as the files from the commercial DVD. The proof of the pudding was in the burning, and every one I have burned since has displayed perfectly on my player/TV!
Here, then, is a step-by-step procedure for creating JACKET_P Pictures with TMPGEnc:
1. Use your favourite graphics program to create the picture you want your DVD to display when stopped. It should be 720 x 480 pixels (NTSC) [or 720 x 576 PAL]. Save as BMP or JPG, as TMPGEnc cannot import PNG files. Keep in mind the TV-safe area of the picture, or you may find some important elements of your graphic getting lost in the TV's overscan.
2. Start TMPGEnc, but cancel the wizard. Press 'Load', and load the appropriate template for your region ['DVD (NTSC).mfc' or 'DVD (PAL).mfc'].
3. In the 'Stream type' box, select 'System (Video only)'.
4. Using the 'Browse' button for each, set the 'Video source:' to the picture file you created, the 'Audio source:' to an audio file of your choice, and the 'Output file name:' to your destination file.
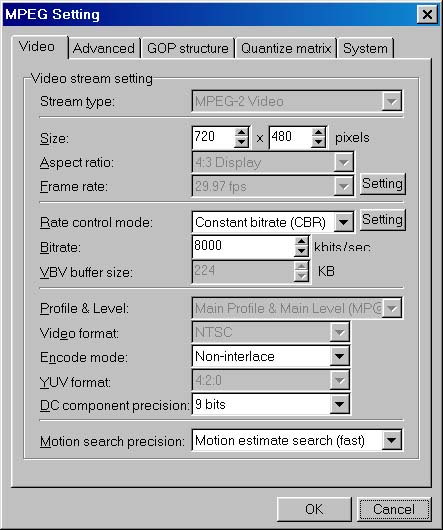
5. Press the 'Setting' button. Most of the settings within the 'MPEG Setting' dialog can be left at default values, unless they have been previously changed. TMPGEnc will remember changed settings from one session to the next. To change any setting that is greyed, you must first right-click on the setting name and select 'Unlock'.
6. On the 'Video' tab, 'Stream type:' should be 'MPEG-2 Video'. If it is not, change it. Unlock the 'Size:' setting, and set the size to 720 x 480 (NTSC) [or 720 x 576 PAL]. The rest of the settings should be okay by default. If you like to experiment, try changing them and observing the results. I set 'Rate control mode:' to 'Constant bitrate (CBR)', and 'Bitrate:' to '8000'.
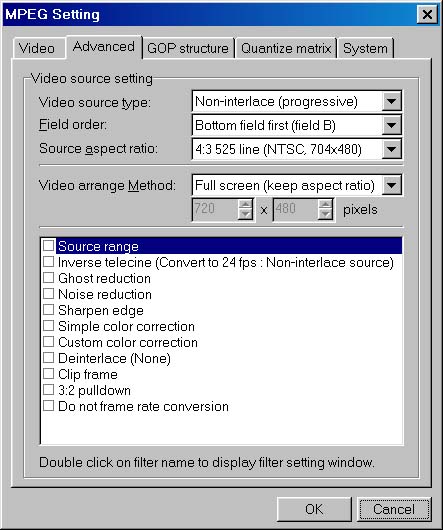
7. On the 'Advanced' tab, 'Video source type' should match the graphic you created (interlaced or non-interlaced), 'Field order:' should match the field order of the DVD you are creating, 'Source aspect ratio:' should match your region's video standard, and 'Video arrange Method:' should be 'Full screen (keep aspect ratio)'. These should all be correct by default. Try experimenting with them if you like.
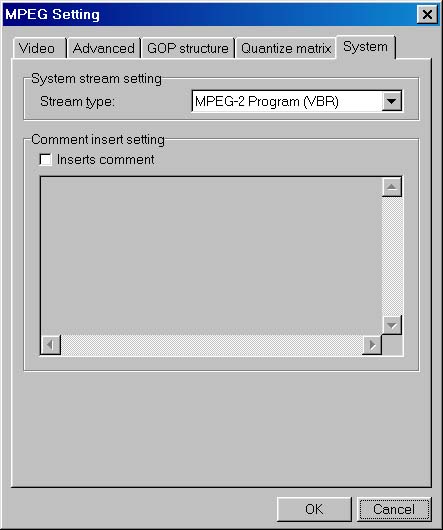
8. On the 'System' tab, 'Stream type:' should be 'MPEG-2 Program (VBR)'.
9. Press 'OK' to close the 'MPEG Setting' dialog. In the main window, press the 'Save' button if you would like to save all your settings as a template for future use. Use a name such as 'DVD_JACKET_P(NTSC).mcf'.
10. Now press the 'Start' button. Your image will be encoded. Go to your destination folder, and rename the created .mpg file to 'J00___5L.MP2'.
11. Press the 'Setting' button, and on the 'Video' tab, change 'Size:' to 176 x 112 (NTSC) [or 176 x 144 PAL]. Press 'OK' to close the 'MPEG Setting' dialog. Press 'Start' to encode the file. Rename the created .mpg file to 'J00___5M.MP2'.
12. Press the 'Setting' button, and on the 'Video' tab, change 'Size:' to 96 x 64 (NTSC) [or 96 x 80 PAL]. Press 'OK' to close the 'MPEG Setting' dialog. Press 'Start' to encode the file. Rename the created .mpg file to 'J00___5S.MP2'.
You're all done creating your JACKET_P pictures. All that remains is to burn the DVD and enjoy!
Try StreamFab Downloader and download from Netflix, Amazon, Youtube! Or Try DVDFab and copy Blu-rays! or rip iTunes movies!
+ Reply to Thread
Results 1 to 6 of 6
Thread
-
-
Video Restorer

- Jun 2003
- dFAQ.us/lordsmurf


Very nice.
Want my help? Ask here! (not via PM!)
FAQs: Best Blank Discs • Best TBCs • Best VCRs for capture • Restore VHS -
Yes, very nice. But just to warn you it's not exactly strictly compliant.
The Jacket pictures are supposed to be MPEG stills. These are actually a throwback to Sony's BlueBook Enhanced AudioCD spec (aka CDExtra) and are used in a similar manner. That's why Sony is the main flagbearer of JACKET_P's. Also, if you happen to have lying around an old app that created stills for CD Extra you could probably use it for your needs.
-----Hey wait a minute...
I wonder if Nero can do that with it's CDExtra template?
Scott -
Thanks for the feedback. After all the trouble I had getting them to work (on my Sony player
 ), I'm happy to have them work at all
  ! But if they aren't compliant, I'd like to know how to make them that way. Any information would be appreciated.
Also, it needn't be using TMPGEnc. I've purchased Nero 6 Ultra, so I'd sure like to know how to make them with that package !
!
-
Your approach is interesting, but doesn’t work for the Sony CX875P three hundred disk “jukebox”. It uses the Jacket_P, 5M pictures in an Index listing along with a two line title a Genre and a box that says “Flip” if the disk is double sided. The title can be added to the VIDEO_TS.IFO using a nice program called “Titlewriter2” which I believe I found on Doom9. This is neat because I can change location of the DVDs in the changer and don’t have to re-enter the Title.
Three times I tried asking Sony about the format of these pictures, but only got a duuuhhh (with Asian accent) in response, and they tried to blame it on the DVD authoring programs.
If I try to use your system, the result is a high rate flashing index screen, such that it is impossible to read the text. I even cut the sound down to 0.1 seconds in length.
I found a similar confusing result when I put the commercially made J00___5L.MP2 pictures into various editing and playback programs. Unlike your experience, the only one that wouldn’t show the pictures was Windows Media Player 9. Just recently it has started to show the pictures, but shows a continual “running” notation at the bottom.
If I insert the picture in WinDVD Creator, it claims the 5L is 6 frames long and also shows it continually repeating. Various Ulead editors claim all the different size pictures are only 1 frame long, but don’t give any clue as to composition. Adobe Premier Pro 1.5 chokes on them. One editor claims the compression is only 4%.
Panasonic recently released a program called ACE which is supposed to analyze these things, and it gives some interesting facts, but also is unable to decipher any GOP, just giving an error reading the GOP.
The size of these pictures is what throws me. They are much larger than any BMP converted to MPEG2 should be. The 5L is generally 180kb to 250kb. Interestingly if I create the pictures using 6 frames in an AVI base, the resulting MPEG files are about the same size as the commercial ones.
Reading the files with a hex editor shows a strange file header before the first hex FF that is made up largely of 06’s for the large pictures and 04’s for the medium pictures, and is about twice the size of most MPEG file headers.
Sure would like to know the composition of these animals !!??!!
I can put any scene from my videos into the Index picture when playing the Video, but it would be nice to have them hard coded on the DVD. -
see here - as this has been covered before
https://www.videohelp.com/forum/viewtopic.php?t=148301"Each problem that I solved became a rule which served afterwards to solve other problems." - Rene Descartes (1596-1650)
 Quote
QuoteSimilar Threads
-
Re : Emailing pictures
By chief-1 in forum Newbie / General discussionsReplies: 2Last Post: 4th Oct 2010, 01:56 -
video from pictures
By alintatoc in forum ComputerReplies: 2Last Post: 20th Mar 2010, 07:22 -
Pictures?
By taker36904 in forum Newbie / General discussionsReplies: 7Last Post: 31st Jan 2008, 07:45 -
How do I make my Samsung R150 recorder region free? I have the code to make
By charpee in forum DVD & Blu-ray RecordersReplies: 2Last Post: 26th Jan 2008, 06:10 -
Take Pictures from a VIDEO_TS...?
By Chana1 in forum Newbie / General discussionsReplies: 17Last Post: 24th Jul 2007, 13:45