


Graphics
SMBX2031 (1600x900@60Hz)
896MB NVIDIA GeForce GTX 260 (ASUStek Computer Inc)
Storage
931GB SAMSUNG HD105SI ATA Device (SATA)
931GB Western Digital WD Elements
Optical Drives
TSSTcorp CDDVDW SH-224DB ATA Device
Audio
VIA HD Audio")
Thanks for your comprehensive reply as always.
This is what I have in mind:
I want to convert the speed in D-STEP4.avi back to 17.5 and after some minor editing (details follow), save it as AVI.
I do not really know XviD or Div, but would like to save/store it in the AVI format that we have been using.When saying AVI, you mean XviD or DivX AVI, right? AVIs don't use pulldown. You can keep the framerate at 17.5 for AVI.
Second step- edit the darker parts in VD.
My thoughts were to split the video in VD and then edit every dark part, which will then be a separate clip. These will only a few clips. I will properly name each part as suggested and also use the number of the frames where the cuts were made so that I can join all the parts together with AviSynth (using your script).
Editing: If I use the VD clips, I can use some of the plugins to increase the quality of the image. In the past, I have used the levels filter, but with a video clip with black borders, it causes an abnormal histogram.
Should I perhaps use MSU denoiser as well?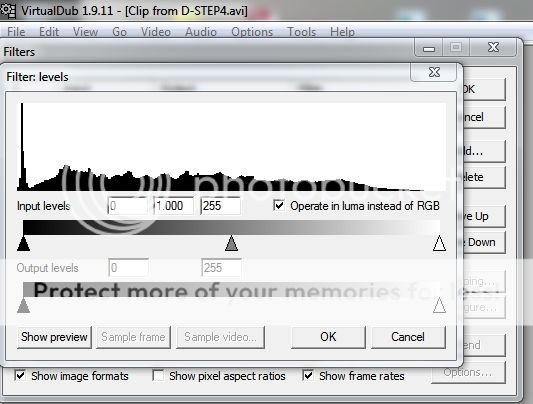
Try StreamFab Downloader and download from Netflix, Amazon, Youtube! Or Try DVDFab and copy Blu-rays! or rip iTunes movies!
+ Reply to Thread
Results 91 to 109 of 109
Thread
-
-
It would be easier and technically preferable to go back to the file created for STEP2. Then make a step3 for the scenes that require more work. For instance, to state it a a general formula:
# ### --- Input is RGB from STEP2---- ###
AviSource("drive:\path to folders\B_STEP2.avi")
Trim(start frame, end frame)
# ### --- save as "B_STEP2_Scene1.avi" in RGB ---- ###
Or save it as some name that youLast edited by sanlyn; 25th Mar 2014 at 13:34.
-
I would save only two AVi files. The most important would be the original capture. Next in importance would be the results of STEP4; it will be a large file, but not as large as the original because duplicate frames were removed.
With the VDub levels control, black borders and other blacks can be restored suing the left-hand arrow control. I have indicated the left-hand black level control in the image below:
[Attachment 18320 - Click to enlarge]
Be careful with the black level control. Strong settings can crush shadow detail. I spent some time on the "dark_clkip1.avi" sample. I assume that some processing has already occurred, because it is 25FPS progressive with no duplicated or blended frames. Note in the original frame below (left image) that the clip is very dark, but brights and specular highlights are reflected more brightly off the projection screen. So it's the color and level range below RGB 180 or so that needs work. Brightening the entire image will give bright objects a strange glow or "hot spot" effect. The scene was not photographed in bright sunlight; this was dim light, either early morning or late evening, and the sequence is underexposed.
[Attachment 18321 - Click to enlarge]
Underexposure will film and video has simialr effects: there is lots of nosie and very little detail, because the signal strength of the nosie is stronger than the strength of the video information. I used many filters here, both in Avisynth and VirtualdUb. The attached AVI is a "quick" effort with many shortcuts. One mistake I made was to use a strong denoiser (TemporalDenoise), which removed too much grain. Besides underexposure, another problem with the capture is the tape player's old-fashioned DNR. These older temporal filters tend to smear motion, especially in low-signal areas. Most of the corrections were with Avisynth and Color Mill. After correction in VirtualDub, I used NeatVideo.
There is no "bright sunlight" in these scenes. Trying to make the scenes look that way is almost impossible and would not look natural. Note that you can make the shadow areas brighter, but you'll get lots of noise and very little detail. As it is, the attached AVI had too much noise removal. The attached zip file contains the .vcf and, if you want to try, the NeatVideo .dnp and .nfp files. The resulting AVI isn't a fair test for NeatVideo, because I didn't have a proper noise sample .dnp from your video -- I borrowed one from another video, which works but is less than optimal.
The AVI demonstrates how difficult it is to extract an image from video with very high noise levels. Also notice that the noise has a mkotion of its own, shifting over several frames, probably due to the way many DNR circuits interact with high noise levels. One could use advanced masking techniques to improve the video, but I'm still learning to work with additive and subtractive masks. Meanwhile, I would not likely use TemporalDeGrain on this video again; it is too strong.Last edited by sanlyn; 25th Mar 2014 at 13:35.
-
Thanks The quality of the output looks quite good, but it feels as if we need more light. The grain is not a problem. I put a new and longer clip through levels in VD and the quality of the image did not deteriorate, but the image of my sample was more light. Then hopefully one of my last questions- I saw this afternoon that quite a lot of clips can do with more light. If I cut them, do I just expand your script to include more clips when I want to add it all together?
-
Are these meant for TV viewing, perhaps on DVD? If so you have to understand that what might look 'dull' or 'dark' on a computer monitor may look just right on a TV set. If the intent is to view on a calibrated TV set, at some point you might want to do a test encode and then see how it looks on your TV set. DVD-RWs are good for this. Encode a short piece to M2V, mux it with Muxman, burn to disc, and test it out.Originally Posted by avz10

-
Right, you should put a few scenes together in a short video and test first.
As I said earlier, I've cut important video into sections for years. I don't always do that, as some aren't so important. Brightness and color balance are matters of personal preference. The gradation curve filter is usually handy for tweaking that sort of thing because it can pinpoint color and levels regions even more precisely than ColorMill.Last edited by sanlyn; 25th Mar 2014 at 13:35.
-
Yes, it is meant for TV viewing. I should have thought about making a short video to see how it compares with viewing on a computer.
Well, I'm then nearly done with this project. I cannot thank you enough. The minor issues I will hopefully be able to sort out myself.
Albie -
Good luck, and thanks for submitting a "learning experience" and an interesting video. If you can, keep your original AVI capture and the tapes (if you still have them). I would consider them to be as valuable as the new results. And you can never tell when better processing will be developed.
Last edited by sanlyn; 25th Mar 2014 at 13:35.
-
Meanwhile, I spent some time with the other sample clips:
Attached "Dark" .m2v: Yes, it's really dark. Mostly noise, and very little color data. The clip was brightened in stages, first in Avisynth with ColorYUV, Levels, and a contrast mask, then with ColorMill and gradation curves, then with ColorYUV again -- working only on the shadows and midtones. Denoised with MCTemporalDenoise, NeatVideo, and AVisynth deblockers. Trying to kill all noise was futile. There's very little color data to work with, so "stretchng" color to make it brighter results in a hand-colored appearance. Saturation raised nearly 25% (which is very high), but more satyuration resulted in glaring hot spots. The nosie appears to be an effect of the paper surface of the projector screen; you can see that the video's signal strength is below the strength of the residual surface and media noise. The video was cut into 2 shots, each processed separately: the first scene was originally darker than the second. At least faces are recognizable.
Attached "Walking" .m2v. The Stab() plugin was used to calm the video a little, and low-power NeatVideo smoothed somewhat. Any more filters, and any remaining detail disappeared into jelly. The film appears damaged and was rattling in the aperture gate. Objects change shape and jitter. Deflicker was used, but that won't help the changing shape of the vignetting and the film hop. A few big spots were removed.Last edited by sanlyn; 25th Mar 2014 at 13:36.
-
I have been experimenting with a few filters in Virtualdub. I have not yet tackled the dark clips.
I have brought the number of clips, after playing it on a TV, down to 8.
I feel that "levels" really make a difference, the same as in Photoshop.
I am still not sue if I need to add another denoiser- I have tried MSU denoiser and also 2D cleaner optimized (0.9). Still need to decide if I need any.
On TV, I feel more sharpening is needed.
I have used Smart Sharpen as well as the built-in sharpen filter, but I am familiar with Unsharp Mask and High Pass filter in Photoshop.
With "Unsharp Mask", I will play with the settings. I tried High Pass last night, but it gives as output, the contrast lines- basically the same type as in PS. I am not sure how to compile these images on top of each other.
I feel that the color on the TV is a bit dull, although quite bright on the computer. Are MSU Color Enhancer or Color Mill options? -
MSU's Color Enhancer creates artifacts, blows out highlights, and makes some auto decisions that can be quite ugly. I'd recommend ColorMill and gradation curves -- far more flexible, clean working, and similar to those in Premiere and After Effects. Gradation curves can import settings files from Photoshop Pro's curves filter. Keep in mind that most of MSU filters' settings are not properly saved in .vcf files.
Sharpening: The two sharpeners I used were LSFMod in Avisynth and VirtualDub's NeatVideo sharpener. Using extremely high sharpness settings had little or no effect -- you have to have something to sharpen; an 8mm original simply has very little detail when enlarged, and several stages of projection, camcorder, JVC's denoiser, etc.. have lost small details. Most sharpeners have serious side effects (halos and chroma bleed). Working with gamma, contrast, and saturation can give the impression of "sharp" effects without creating ugly artifacts. Oversharpening and too much denoising will result in serious color banding and posterization. Remember, you don't haved much video data to work with.
Denoisers: QTGMC performs some denoising when it deinterlaces -- in this case, deinterlace for removal of duplicate and blended frames is rather a requirement anyway. Avisynth's MCTemporalDenoise at low or moderate settings is also useful, but I found that QTGMC did well. A good portion of the noise is chroma noise rather than grain, and some residual tape noise. Always denosie before using sharpeners, or you'll sharpen noise and make it impossible to remove. Simple but effective VirtualDub denoisers are the built-in temporal smoother and Camcorder Color Denoise. The VirtualDub 2D denoiser can have odd effects: it tends to over accentuate specular highlights, giving them an odd and unnatural glow and making facial highlights look like "clay face" effects. 2D is a spatial denoiser anyway, wheras most of the noise in this video is temporal.
It's not possible to make film or analog tape as noiseless as clean digital video. It simply results in a very strange, "raw", plastic appearance.Last edited by sanlyn; 25th Mar 2014 at 13:36.
-
Thge attached .m2v has 30% more brightness and 10% more saturation in midtones between RGB 64 and RGB 180. The only denoisers were QTGMC from STep1 and NeatVideo applied to STEP3. If video "detail" is mostly noise, removing most of the noise removes a lot of video. The sharpeners were higher settings for LSFMod and NeatVideo. The same brightness and saturation settings have different effects on different scenes -- especially the last scene, whose color problems are completely different from the others, and the first title shot is too bright. Changing brightness and gamma also reveals differences in the way colors and saturation are seen.
Last edited by sanlyn; 25th Mar 2014 at 13:36.
-
I have been making progress, but obviously got stuck again!
I made a short clip and my son and I tried various options on VD, wrote DVDs and played it on the TV.
I must say, DStep4, is very good-thanks Sanlyn!
I eventually only adjusted the levels a bit and also used MSU Smart Sharpen (small overall). We thought these 2 changes made a difference.
I then divided the video in 13 clips, tackling the dark scenes. After trying a lot of options/filters, we thought that by adjusting the levels a bit, we got the best results for the dark clips.
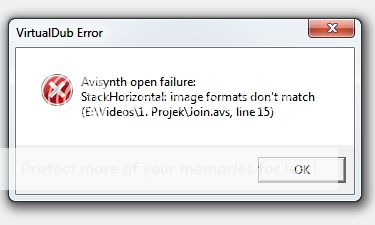
I am now stuck in an effort to combine the clips. This is the script I used and another script also gave the same error message:
This is the error message- I have tried to find a solution, but I do not understand the reasoning of the comment, since I only changed the levels of some clips.Code:a = AVISource ("E:\Videos\1. Projek\1.avi") b = AVISource ("E:\Videos\1. Projek\2.avi") c = AVISource ("E:\Videos\1. Projek\3.avi") d = AVISource ("E:\Videos\1. Projek\4.avi") e = AVISource ("E:\Videos\1. Projek\5.avi") f = AVISource ("E:\Videos\1. Projek\6.avi") g = AVISource ("E:\Videos\1. Projek\7.avi") h = AVISource ("E:\Videos\1. Projek\8.avi") i = AVISource ("E:\Videos\1. Projek\9.avi") j = AVISource ("E:\Videos\1. Projek\10.avi") k = AVISource ("E:\Videos\1. Projek\11.avi") l = AVISource ("E:\Videos\1. Projek\12.avi") m = AVISource ("E:\Videos\1. Projek\13.avi") return stackhorizontal (a,b,c,d,e,f,g,h,i,j,k,l,m)

Any help here?
If I load it in PowerDirector, PD saves it in a lossy AVI format.
Thanks
Albie -
StackHorizontal() and/or StackVertical() don't join clips as sequences. They make a video with each frame consisting of 1 frame from every clip in the formula, lined up horizontally or vertically. Each frame would be a very large image indeed.
The commands that join clips sequentially are AlignedSplice and UnalignedSPlice. They differ in the manner in which they handle audio. Alignedsplice concanatenates clips without regard to leading and trailing audio from the clips -- thus you likely would have audio sync problems. UnalignedSplice is careful to keep audio content in sync. I suppose I'm lazy, because I just use UnalignedSplice all the time, whether I have audio or not.
A shortrcut to the UnalignedSplice command is the symbol "+" (a single plus sign). So instead of:
You can use:Code:UnalignedSplice(Clip1,clip2, etc....)
If you have leading or trailing frames and want to cut them away before joining, use the Trim statement as needed. For example:Code:n = a+b+c+d+e+f+g+h+i+j+k+l+m return n
"Image formats don't match" means that the "format" could be dissimilar frame size (not likely), a different colorspace, or some are compressed and some uncompressed, or a different frame rate. Those are mistakes I've made often, such as saving one clip in RGB and the other in YV12. Try running the script by commenting-out some of the lines with "#" to see which clip doesn't match. For instance:Code:a = AVISource ("E:\Videos\1. Projek\1.avi").Trim(5,450) b = AVISource ("E:\Videos\1. Projek\2.avi") c = AVISource ("E:\Videos\1. Projek\3.avi").Trim(0,600) etc. etc.
You can also join clips in VirtualDub using "File" -> "Append AVI segment..."Code:a = AVISource ("E:\Videos\1. Projek\1.avi") b = AVISource ("E:\Videos\1. Projek\2.avi") c = AVISource ("E:\Videos\1. Projek\3.avi") d = AVISource ("E:\Videos\1. Projek\4.avi") # ---- disable the statements below with "#" ---- # e = AVISource ("E:\Videos\1. Projek\5.avi") # f = AVISource ("E:\Videos\1. Projek\6.avi") # g = AVISource ("E:\Videos\1. Projek\7.avi") # h = AVISource ("E:\Videos\1. Projek\8.avi") . . . . . . . . . . n = a+b+c+d # +e+f+g+h+i+j+k+l+m # <- clips after "d" are commented-out return n
A week ago I had a video less than 2 minutes long, but with 32 clips. I saw that format message 5 times. Each scene had different problems, different color, wrong levels, many scenes in the same setting but different color in each scene, etc., etc. I fixed all that and even changed the ending -- but forgot to re-set the colorspace on 5 of them. https://forum.videohelp.com/threads/356742-Wedding-Video-Help-Please%21-I-need-you-guys...=1#post2248371
")
Last edited by sanlyn; 25th Mar 2014 at 13:36.
-
Well, first the good news- I used your script and soon found that "b" was uncompressed. So, this is fixed and I have one film again.
I downloaded HCEncode and loaded my "final" file, but it gave me this error message:
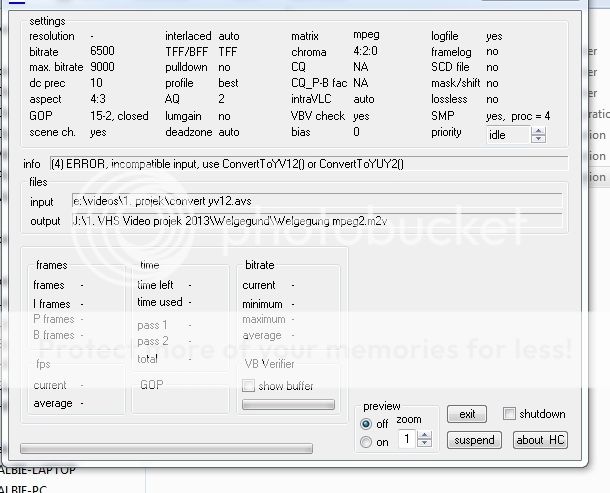
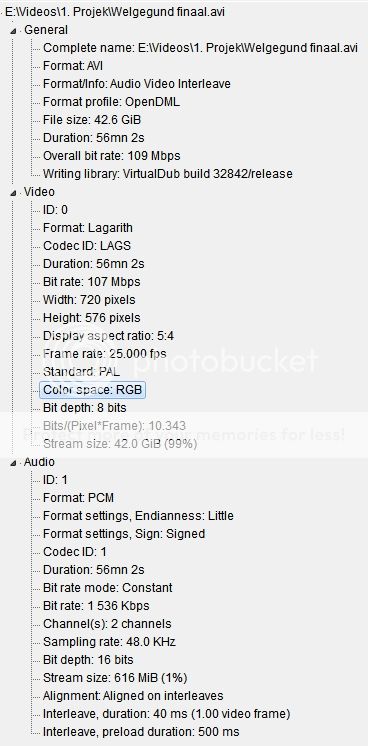
I then checked the video and saw that during all my efforts, the color space is now RGB.
I copied/wrote this script
I am not 100% sure what script I used that gave me this result (it could be:Code:# ------- Input source is RGB -------- AviSource("E:\Videos\1. Projek\Welgegund finaal.avi") # -------- save as Lagarith YV12 --------- # -------- with "fast recompress" ---------), but loading this clip for instance in HCEnc, gave me basically the same error message as above.Code:# -------- save as Lagarith YUY2 ---------
but it keeps on giving me color space error messages, as before- ConvertToYV12() or ConvertToYUY2()
I have come so far now, and with a mass of videos that still needs to be encoded, shouldn't it be easier to buy TMPGEnc? If so, will you give me guidance on the settings of TMPGEnc? -
Understandable. And how many times has yours truly made similar mistakes? I lost count years ago !!
The last several lines in STEP4 convert from RGB to YV12:
I used dither's RGB->YV12 converter to avoid banding and block noise. If your big video is still RGB, you don't have to run all the pieces again. Load the RGB version and run the line with dither, then save with "fast recompress" as YV12. Or if you really want to it a shorter way, you can use:Code:# ----- Input is RGB32 from STEP3 ------ Dither_convert_rgb_to_yuv(matrix="601",interlaced=false,tv_range=true,cplace="MPEG2",lsb=false,output="YV12") ColorYUV(cont_y=-5) LSFMod(defaults="slow",strength=50) GradFun3() AssumeFPS(25) # ----- Save as YV12 with "fast recompress" ------
ConvertToYV12(interlaced=false)
Not as pretty, but it should work. You can open the YV12 script in HCenc without saving another copy of the big RGB file itself.Last edited by sanlyn; 25th Mar 2014 at 13:37.
-
Make sure you don't have Lagarith set up as RGB. VDub should be on Fast Recompress. Then go Video->Compression->Lagarith Lossless Codec->Configure->Mode. Change it to whatever the script returns (YV12, in this case). Or did you do that already after you got the first error message in HCEnc?
You can always find out the colorspace of your script by adding 'Info()' at the end, or add it somewhere else in the script if you want to know the colorspace at that point in the script. -
This is a summary of the last part of this project! Thanks, especially to Sanlyn.
Could you please check if everything is correct?
I did this and it worked without any problems.I used dither's RGB->YV12 converter to avoid banding and block noise. If your big video is still RGB, you don't have to run all the pieces again. Load the RGB version and run the line with dither (you don't need all the other lines with ColorYUV, etc), then save with "fast recompress" as YV12
I then loaded HCEnc with the settings as you suggested.
This is the log file:
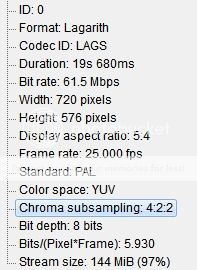
This is the media info after encoding:Code:--------------------------------------- | HCenc - MPEG2 encoder - rel. 0.24.0 | --------------------------------------- MPEG profile@level: MP@ML input: e:\videos\1. projek\rgb to yv12 nuutste.avs output: E:\Videos\1. Projek\Welgegung mpeg2.m2v -------------------- | encoder settings | -------------------- profile: BEST frames: 0 - 84067 framerate: 25.000 aspect ratio: 4:3 chroma format: 4:2:0 bitrate Kb/s: 6500 max. bitrate Kb/s: 9000 pulldown: no closed gops: yes VBV check: yes scene change det: yes interlaced: auto, TFF goplen,B-pic: 15 2 dc_precision: 10 intraVLC: auto scan method: auto bias: 0 chapter frames: 0 time code: 0 0 0 0 CPU: SSE4 (4.2) priority: idle SMP active: yes matrix: MPEG luminance gain: no adaptive quantization: yes, strength 2 deadzone quantization: auto ------------------ | source stats | ------------------ nr. of frames in source: 84068 width*height: 720x576 fps: 25.000 nr. of frames to encode: 84068 frames to encode: 0 - 84067 --------------------- | encoding - pass 1 | --------------------- pass 1 encoding time: 1:01:56 (3716.42 s) fps: 22.6 -------------------------------- | encoding - intermediate pass | -------------------------------- bitrate set to: 6500 kb/s estimated output file length: 2668174 kB intermediate encoding time: 0.11 s --------------------- | encoding - pass 2 | --------------------- pass 2 encoding time: 1:09:47 (4186.88 s) fps: 20.1 ------------------ | encoding stats | ------------------ intra matrix used 8 16 19 22 26 27 29 34 16 16 22 24 27 29 34 37 19 22 26 27 29 34 34 38 22 22 26 27 29 34 37 40 22 26 27 29 32 35 40 48 26 27 29 32 35 40 48 58 26 27 29 34 38 46 56 69 27 29 35 38 46 56 69 83 non-intra matrix used 16 17 18 19 20 21 22 23 17 18 19 20 21 22 23 24 18 19 20 21 22 23 24 25 19 20 21 22 23 24 26 27 20 21 22 23 25 26 27 28 21 22 23 24 26 27 28 30 22 23 24 26 27 28 30 31 23 24 25 27 28 30 31 33 nr. of gops: 5941 nr. of frames: 84068 nr. of I-frames: 5941 nr. of P-frames: 27991 nr. of B-frames: 50136 average bitrate: 6500 minimum bitrate: 2162 maximum bitrate: 8998 bytes in bitstream: 2732656089 bits in bitstream: 21861248712 average Quantizer: 7.160 total CPU time: 3:06:25 (11184.79 s) total elapsed time: 2:11:44 (7904.02 s)
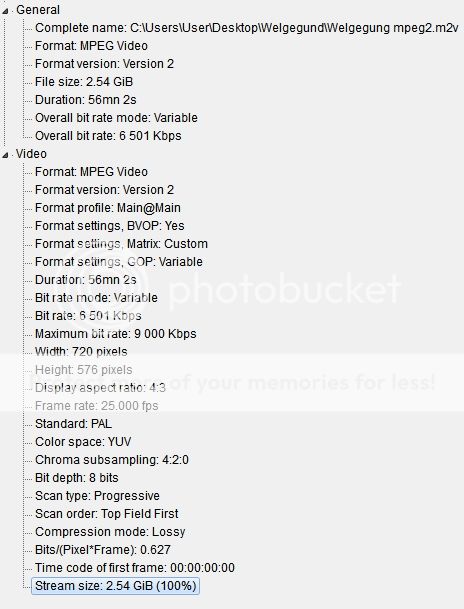
This is the media info after pulldown:
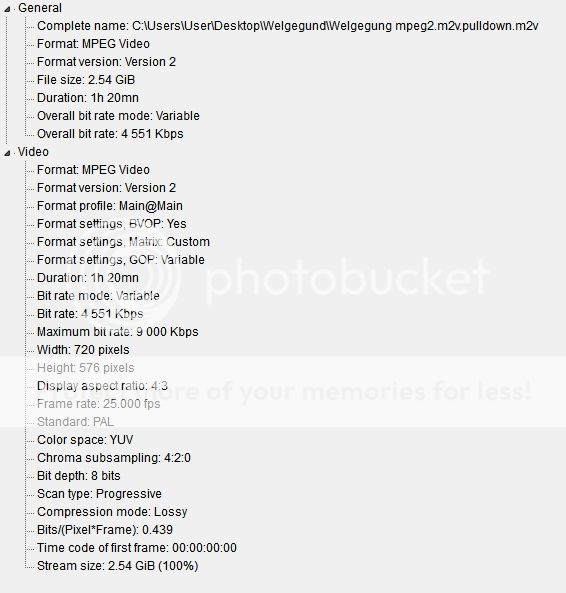
It appears as if the time difference has now been resolved.
Thanks
Albie -
Fantastick! If I had been in your place a couple of weeks ago, you would have to check this thread in June of next year to see if I had accomplished anything.
Save your original capture(s) and scripts to an external drive. As you learn more, you'll likely return to it.....if you haven't had enough punishment to this point.

Last edited by sanlyn; 25th Mar 2014 at 13:37.

 Quote
Quote


Similar Threads
-
please list the virtualdub filters to remove vhs tape video noise
By perfection in forum Newbie / General discussionsReplies: 6Last Post: 7th Jan 2020, 12:45 -
Suggestions on filters and adjustments on captured VHS Video
By Xmetalfanx in forum EditingReplies: 2Last Post: 26th Nov 2012, 07:31 -
Telecine Machine for 8mm film super 8 film transfer to dvd
By igotregister in forum CapturingReplies: 5Last Post: 2nd Feb 2009, 15:50 -
Any good VirtualDub filters to remove common VHS color bands?
By rijir2001 in forum Newbie / General discussionsReplies: 1Last Post: 15th Nov 2008, 16:10 -
8mm Film and Menus
By ia2azbound in forum Authoring (DVD)Replies: 7Last Post: 26th Aug 2008, 17:17