


VIVO
Pioneer 110D
ASUS A8N-SLI-Premium")
This guide will show you how to get high quality captures using the Video In on a Geforce 4, cleaning up the image after capturing, and how to convert to VCD/SVCD. You will need the following software:
- Virtual VCR
- TMPGEnc
- VirtualDub
- Deinterlace MAP filter for Virtualdub
- Nvidia WDM capture drivers (if you don't already have 'em)
- Morgan MJPEG capture codec
You'll also need a Geforce 4 with VIVO(Note: The guide is written for users wanting to capture with their GF4, however I don't see why it couldn't be adapted to suit other capture cards. I won't be covering them in this guide though.)
IMPORTANT: This guide is written assuming your harddrives filesystem is NTFS. The guide describes capturing to one large file, which will most likely be over the 4GB limit of FAT32. There should be an option somewhere in the capture software to split the captured file into 4GB sections, but I do not cover that here.
Part 1: Capturing
Note, step 1 is only necessary if you are using an Nvidia-based card with Video-in to capture. If using a different card, skip this step.
1) Install the Nvidia WDM capture drivers. Many users have problems with versions other than 1.08, so if you get a white bar or something like that on your captures, download and install 1.08 and you should have the problem no more. I however have not experienced problems with versions later than 1.08
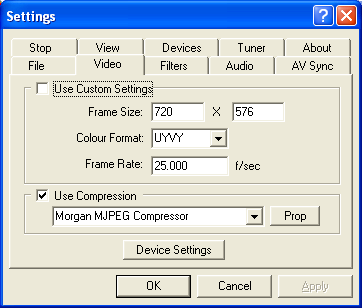
2) Start Virtual VCR. Click the settings button, and select where you want the captured file to be saved to. Next hit the video tab:
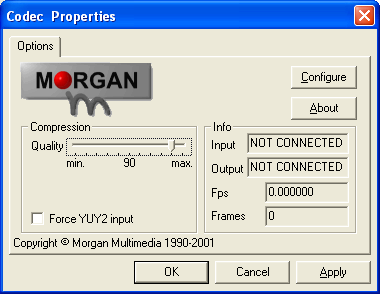
My system handles a 720x576 capture perfectly. If you have a lower-end system and you find you are getting dropped frames, lower the resolution to 352x576/480 (depending whether you are PAL or NTSC, 480 for NTSC, 576 for PAL). Now choose the "Prop" button, and change the compression quality to 90. I find this provides excellent results at reasonable filesizes (about 8GB for 50 minutes).
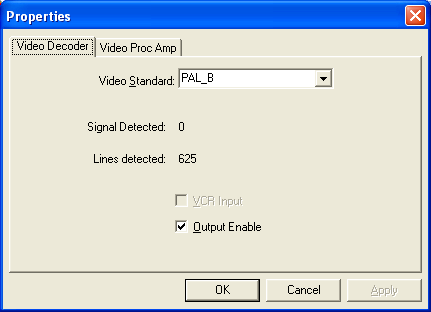
Leave the configure button alone, the default settings are fine. Close this window and click device settings:
If you are a PAL user make sure the input type is set to PAL, and if you use NTSC make sure its set to NTSC. Failure to do so will result in either a cut off image (set to NTSC when it should be PAL) or garbage at the bottom of the screen (PAL when it should be NTSC).
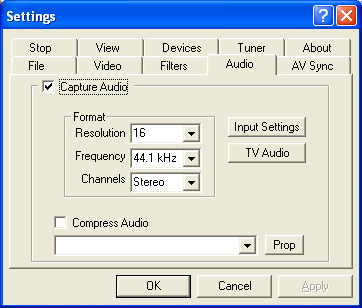
Now click the audio tab:
Those may or may not be the default settings, but they work fine for me.
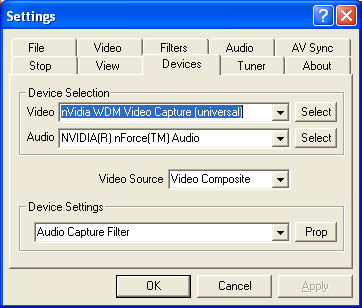
Now click the devices tab:
I'm capturing through composite from my VCR, so I select composite as the video source. If you are using a different type of connection, select it instead. Also make sure the Nvidia WDM driver is selected for video and your soundcard driver selected for audio.
The default settings under the remaining tabs should be fine.
Back at the capture preview window, select the save current settings button. Now close all background programs, and hit start capture. If your system is reasonable, you should capture with 0 dropped frames, and have a high quality file as the result.
Part 2: Converting the captured file to SVCD/VCD
Now we convert the captured AVI to a compressed format of your choice for viewing later.
1)In the folder where you have extracted Virtualdub, run auxsetup.exe, and select the install handler option. This is so you can frameserve.
2) Next run Virtualdub itself, and load your AVI into it. Under audio select direct stream copy, and under video select full processing mode. Then select the filters option in the video menu. Select add, then choose Deinterlace MAP by Shaun Faulds.
Leave the settings at default.
Now you must simply cut out the crap you don't want (eg ads). Find the first frame of the section you don't want, then go edit > set selection start. Find the end frame of the bad sections, and go edit > set selection end, then edit > delete selection. Repeat this until all the stuff you don't want is deleted.
3) Now go file > start frameserver. Click ok on the window that pops up, then choose where you want Vdub to save the .vdr file. A window will appear, leave this alone. If you want to go back to Vdud at any time, click Stop serving on this window.
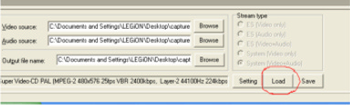
4) Open TMPGEnc. Now you must choose which format you want to convert to? Do you want SVCD, CVD or VCD? (You could also encode to DVD, but as I don't own a DVD burner I've never done this, and thus can't guide you on it. Refer to another guide if you want to create a DVD). Anyway, load the relevant template:
5) Select the appropriate template based on whether you live in a PAL or NTSC territory and what format you want to convert to. For this guide I will use SVCD/CVD as the example, but I will explain VCD further down.
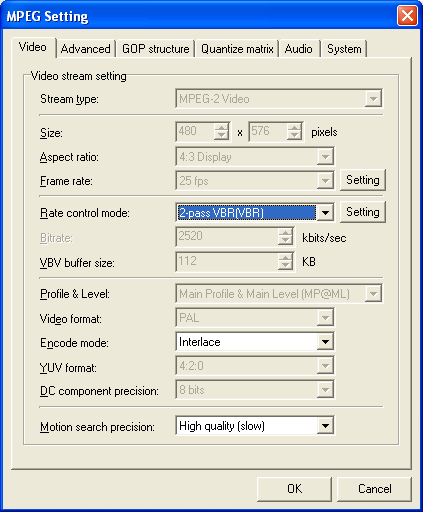
6) Select 2-pass VBR in the rate control mode box, then hit the settings button next to it. Use a bitrate calculator to determine the max, average and minimum bitrate you should use.
Interlace should be the default encode mode, so leave it as is. (You may wonder why I'm deinterlacing the source only to re-encode it with interlacing again... the answer is simple: I found unless I deinterlaced first, the outputted MPEG will have horrible motion blur. But feel free to experiment without deinterlacing, if you don't notice the motion blur you need not deinterlace in Virtualdub, cutting down the encode time somewhat).
Motion search precision is somewhat iffy. You should experiment with this, see if you can really notice a difference between them. However some advice: Do not choose "highest", it is a waste of time. I advise you to select either high or motion search estimate.
All other settings can be left at default, EXCEPT for the resolution in the event you want to make a CVD. In this case, right click "Size:" near the top, and choose unlock. This will allow you to edit the greyed out standard SVCD res. Change it to 352x576/480 for CVD.
7) Now select the Advanced tab at the top. Tick the noise reduction filter, and double click it. Make sure its set to: still picture 20, range 1, time axis 20. Now select the Clip frame filter back in the advanced options window, and you can cut off the edges around the image. (Necessary for most captures, especially at the bottom, as there is usually some distortion there which you ordinarily will not see on a TV screen). I find settings of 10 pixels for the top and bottom, and 3 for left and 6 for right work well, however it would depend on your source. Make use of the preview window to see what settings you will need.
If you want VCD:
If you want to encode to VCD instead of SVCD, simply load the relevant PAL or NTSC template, then set the motion search precision to whatever you like best, the same way as done with SVCD, then hit the advanced tab and enable the noise filter and clip frame filter, the same way as SVCD.
8) Back to the main TMPGEnc window. You are now ready to encode. Make sure your video and audio input is set to be the "capture.vdr" file the Virtualdub framserver created, and specify where you want the output to be in the box below. Now just hit start at the top, and waitThis method (for me, hopefully it will for you too) yeilds PERFECT quality files from an originally mediocre quality VHS source.
However, this method is VERY slow. To give you some idea of how slow, without the filters, encoding a 1 hour TV show to VCD minus the ads would take approximately 25-30 minutes with my Athlon XP 2000 CPU. With filters, it is over 5 hours. With SVCD, without filters in 2-pass mode, it would take about an hour and 15 minutes to encode, with filters it is over 10 hours.
As such, unless you are extremely patient, I would only advise the use of these filters if you have a quick CPU. Anything over 1.4GHz should yeild acceptable encode times.
Try StreamFab Downloader and download from Netflix, Amazon, Youtube! Or Try DVDFab and copy Blu-rays! or rip iTunes movies!
+ Reply to Thread
Results 1 to 4 of 4
Thread
-
-
Hello! I've got the "white bar in the capture" problem. You mentioned using WDM v2.08. But, the NVidia site only offers v1.23. And a couple of searches turned up nothing. I am using Win98. Is v2.08 a XP driver? If not, where can I get v2.08?
-
My mistake, it should be version 1.08, not 2.08
Anyway, you can download it here: http://205.158.109.140/Windows/23.11/WDM_1.08.exe -
hi.. just a problem with virtual VCR.. when i click "capture" i get a "cannot start Graph" error.. Any ideas on how to get around thing would be very much appriciated, thanks
 Quote
QuoteSimilar Threads
-
Can I get better quality captures?
By Aquamarine in forum Camcorders (DV/HDV/AVCHD/HD)Replies: 14Last Post: 27th Jan 2012, 17:03 -
Encoding DVB-T .ts Captures
By jamespoo in forum DVB / IPTVReplies: 19Last Post: 24th Mar 2011, 14:29