


Folgende Programme werden benötigt :
You need the following programs :
---------------------------------------
Smartripper 2.41, DVD2AVI 1.76, TMPGENC Plus 2.57.41.146, VFAPI Converter,
Cinema Craft Encoder 2.62
---------------------------------------
Im ersten Schritt wird die DVD mittels Smartripper auf die Festplatte ausgelesen.
First you extract the files from DVD to your hard disk.
--------------------------------------------------------------
1. Smartripper
Hierzu gibt’s keine weitere Hilfe da das allgemein bekannt sein dürfte. Wer dennoch Unterstützung braucht kann hier im Forum eine Anleitung finden.
I think everyone should know how it works...but if you need help you can look into this forum @ DVD RIP
-----------------------------------
Folglich befinden sich die Film-Dateien (.vob Files) nun auf der Festplatte.
Als nächstes müssen wir die Tonspur aus den .vob-Files extrahieren, da wir diese an späterer Stelle brauchen. Hierzu verwenden wir das Tool DVD2AVI.
You got the .vob files on your hard disk. Next we have to rip the audio out of the .vob files because we need the audio file later. Use DVD2AVI for extracting the sound.
---------------------------------------------------------------------------------
2. DVD2AVI
In DVD2AVI müssen ein paar Einstellungen vorgenommen werden. Schauen wir uns das in Ruhe an.
Wie von jeder DVD bekannt, enthält diese verschiedene Sprachen, z.B. Englisch, Deutsch, Französisch usw. Alle Tonspuren sind in den .vob-Files enthalten.
We have to do some settings in DVD2AVI. Lets have a look ! Every DVD contains different languages e.g. english,german,french...
The .vob files include all these audio tracks.
--------------------------------------------------
Wie bekomme ich jetzt die richtige Tonspur ?
But how do I get the right audio track ?
---------------------------------------------
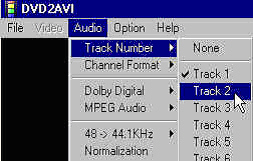
Die Audiospuren innerhalb der .vob-Files sind in sogenannte Tracks unterteilt. Jeder Track entspricht einer Sprachfassung. Welcher Track die deutsche Sprachfassung enthält, kann unterschiedlich sein. Ich habe die Erfahrung gemacht, daß zum Großteil Track 1 oder 2 den deutschen Ton enthält. Am besten ein paar Minuten Ton extrahieren, dann abbrechen und kontrollieren. Wie das geht wird gleich gezeigt.
The .vob files are subdivided in several audio tracks containing the different languages. Each track stands for one language. It can be different which track number you have to choose. Tip: Extract a few minutes, stop and check it ! How it works you'll see !
------------------------------------------------------------
Wählen wir also unter Audio -> Track Number -> Track 2
Choose Audio-> Track Number -> Track 2
Surround gefällig ?
Der folgende Absatz ist für die Inhaber einer Dolby Surround bzw Dolby Digital Anlage interessant. Wer also über einen passenden Verstärker und die notwendige Anzahl Boxen um sich gereiht hat...der kann zumindest vom Surround Klang der DVD profitieren.
Dolby Surround bedeutet in diesem Zusammenhang eine Art Raumklang, der über die verschiedenen Boxen einer Surround Anlage wiedergegeben werden kann.
Hierbei handelt es sich um ein Stereo Signal, also ein Signal für den linken und rechten Lautsprecher. Zusätzlich ist jedoch ein Signal für die hinteren beiden Lautsprecher enthalten. Somit erhält man einen „Hauch“ des Gefühls, mitten im Geschehen zu sein. Natürlich weitaus „bescheidener“ als bei einem echten Dolby Digital 5.1 Signal.
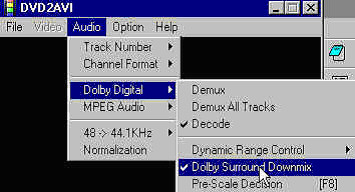
Wer diese Funktion nutzen möchte, sollte unter Audio -> Dolby Digital -> Dolby Surround Downmix
anschalten.
You like surround sound ?
Read this if you're interested in surround sound. If you have a Dolby Surround or Dolby Digital Stereo Amp and also 5 loudspeakers, you can take advantage of the DVD sound tracks.
Choose Audio -> Dolby Digital -> Dolby Surround Downmix if you want to extract the sound with Dolby surround attributes.
---------------------------------------------------------
Ausserdem muß jeder die Option Audio -> Dolby Digital -> Decode gewählt haben !
You MUST select Audio -> Dolby Digital -> Decode !
Hinweis : Bei Filmen in Dolby Surround 2.0 braucht man natürlich keinen Downmix mehr durchführen, da es sich um ein Stereo Signal handelt und der Surround Kanal enthalten ist.
Remember : If your DVD is Dolby Surround 2.0 you do not need to select Dolby Surround Downmix because the surround sound is already included in the stereo signal.
-----------------------
Downsampling
Was ist Downsampling ?
Die Tonspur einer DVD ist generell mit 48 KHz aufgenommen. Manche DVD-Player können auch SVCD’s mit dieser sogenannten Samplingrate abspielen aber eben nicht jeder.
Da ich mich an die Standards halten will und eine SVCD erzeugen möchte, die jeder abspielen kann, muß folglich die Tonspur von 48 KHz auf 44,1 KHz „downsamplelt“ werden.
Ob die Tonspur mit DVD2AVI verändert wird oder das mit einem anderen Tool geschieht ist Entscheidungssache. Ich persönlich verwende hierzu Sound Forge, da das Programm schneller ist und man zusätzlich die Tonspur in der Lautstärke etwas anheben kann.
Hinweis : Die Tonspur einer DVD innerhalb der .vob-Files ist sehr leise. Wenn man sich also für DVD2AVI entscheidet und die Tonspur incl. Downsampling extrahiert, muß man später den Verstärker oder eben den Fernseher ein ganzes Stück lauter machen. Das führt natürlich auch zu einem gewissen Grundrauschen.
-------------------------------------
Downsampling
The audio tracks on DVD are encoded with 48 KHz but not all DVD Players can handle SVCD's with 48 KHz sound. So we have to "downsample" the audio track to 44,1 Khz. We want to create a standard SVCD so we have to downsample to 44,1 KHz. You can choose between different programs to downsample.Remember : The audio track in the .vob files is not as loud as usual television sound ! So if you choose DVD2AVI for extracting and downsampling...you have to turn up the volume of the TV or the amp. This will cause a little background noise. So I prefer Sound Forge because it's faster in downsampling and you can turn up the volume of the track - but it's not free.
-------------------------------
DVD2AVI
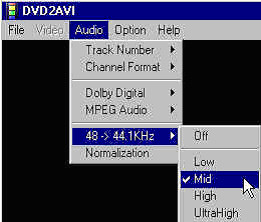
Unter Audio -> 48->44.1 KHz -> Mid wählen.
Select Audio -> 48->44.1 KHz -> Mid
Die anderen Optionen hab ich selbst noch nicht getestet. Im Internet gibt es zumindest unterschiedliche Meinungen welche Option man nehmen soll. „Ultrahigh“ soll zumindest unnötig sein. Wer‘s probieren möchte kann ja mal „High“ testen ob dadurch der Klang extrem viel besser wird. Ich denke jedoch nicht.
I haven't tested other settings. There are different opinons about "mid", "high". I surfed through the internet an the results were, that "ultrahigh" is not needed. If you want to take "high" as option, please test it and give feedback ! I take "mid" and the sound is good enough.
---------------------------------------------------------------------
Eigenschaften des Films
Movie properties
Bevor wir die Tonspur extrahieren schauen wir noch nach, auf welche Art und Weise der Film aufgenommen ist. Diese Info brauchen wir später im Cinema Craft Encoder !
Before we extract the audio track we have to see have the DVD movie is encoded.We need this info later in cinema craft encoder.
-----------------------------------------------------------------
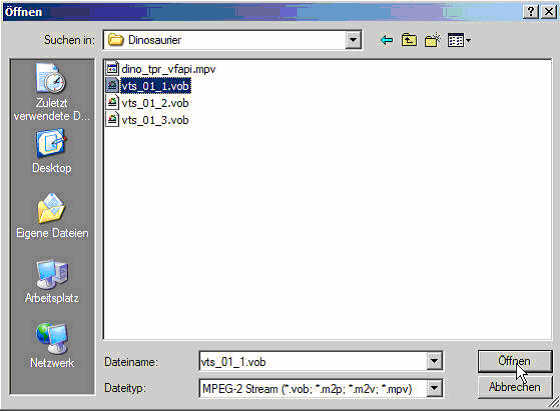
Zuerst öffnen wir den ersten .vob-File.
Open the first .vob file
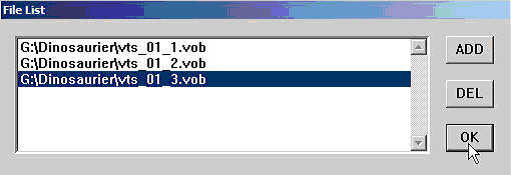
DVD2AVI erkennt automatisch die restlichen .vob-Files. Wir bestätigen mit OK.
DVD2AVI recognizes the rest of the .vob files automatically. Click on OK.
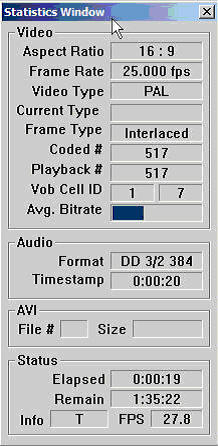
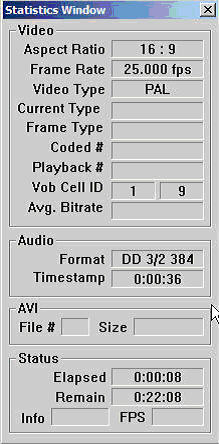
Das Fenster von DVD2AVI müßte sich jetzt vergrößert haben.
Ein Druck auf die F5 Taste und schon erscheint das Statistik Fenster und der Film läuft ab.
DVD2AVI window size must be enlarged. Press "F5" and the statistic window opens and the films starts to play.
Wichtig hierbei folgende Parameter :
Remember the following parameters :
Aspect Ratio :
Filmformat. Zu 99% steht hier 16:9. Das ist das typische „Breitbild Kinoformat“. Es könnte aber unter Umständen auch 4:3 da stehen. Das wäre dann das Vollbild auf einem europäischem PAL-Fernseher.
Frame Type :
Bilderfolge / Bilddarstellung. Ein Film bzw die Einzelbilder des Films können Interlaced oder Progressive sein. Auch hier ist standardgemäß meist Interlaced angegeben.
Notieren wir uns die Werte da wir sie später noch brachen.
Aspect ratio :
film format. 99% it will bve 16:9 the standard movie format you also see in the cinema. Maybe it's 4:3 which means fullscreen on television without black borders.
Frame type :
Interlaced or progressive. Most is interlaced. It's the way how the picture is represented in the video part.
Write down these parameters because we will need them later.
------------------------------------------------------------------------
Es ist geschafft !
Let's go !
So nun aber endlich zum Extrahieren der Tonspur.
Let's extract the audio track.
Entweder den Schieberegler unten ganz nach links ziehen oder eben einfach noch mal den ersten .vob-File öffnen wie zuvor beschrieben.
Move the slider to the left or reopen the first .vob file again to begin from the first second of the movie.
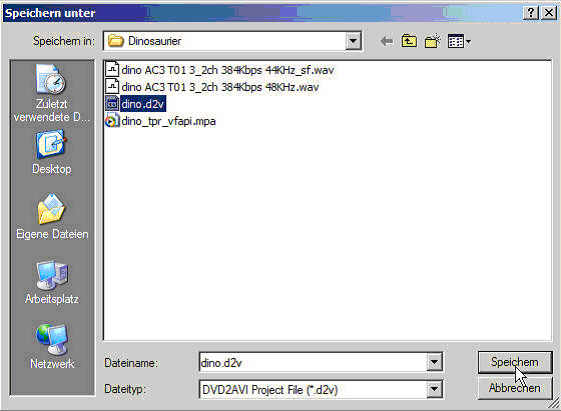
Nachdem wir alle Optionen eingestellt haben speichern wir das Ganze als Project.
All options are set. Now we save everything as a project.
Wählen einen Filenamen für das Project und klicken auf Speichern.
Choose a filename.
Es geht los ! Das Statistik Fenster erschient erneut und die Festplatte bekommt endlich was zu tun.
Im Status unten kann man sehen, wieviel Zeit noch ungefähr benötigt wird. Die Zeit hängt übrigends von der Geschwindigkeit des Systems, der Platte und den Ressourcen ab. Also einfach zurücklehnen und warten.
It starts. The statistic window opens and your hard disk has to do some work. You can see in the statistics window howe long it will take to extract the audio track. Speed is part of your whole system...hard disk...front side bus...Memory...so let's rest for a while.
-------------------------------------------------------------------
TMPGENC
Nachdem DVD2AVI seine Arbeit getan hat kommen wir nun zu TMPGENC.
After DVD2AVI completed successfully we start TMPGENC.
-------------------------------------------------------------------
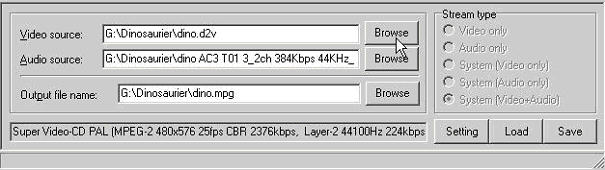
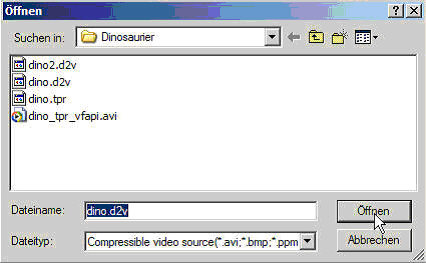
Zuerst öffnen wir das von DVD2AVI erstellte Project als Video Source indem wir auf Browse klicken.
First open the .d2v project from DVD2AVI as video source.
Wir wählen das entsprechende DVD2AVI Project aus.
Choose the right project.
Als nächstes wählen wir den Audio Input. Eben die große .wav-Datei,die DVD2AVI zuvor erstellt hat.
Next we select the .wav file which DVD2AVI created.
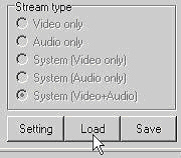
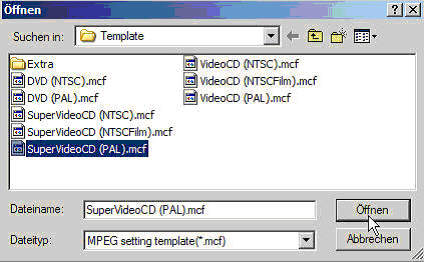
Nun müssen wir noch ein bestimmtes Template öffnen, um das richtige Video-Format, in diesem Fall SVCD zu bekommen. Hierzu klicken wir auf Load.
Click on load to select the right template for SVCD.
Und wählen dann das Template für SVCD im PAL Format aus.
In Europe you have to select the PAL version, in USA (Region1) NTSC version.
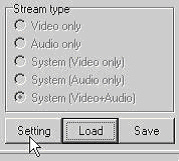
So, das Template ist geladen. Jetzt müssen wir natürlich wieder was einstellen. Klicken wir zunächst auf Setting.
Template is loaded. Now we have to do again some settings. Click on settings.
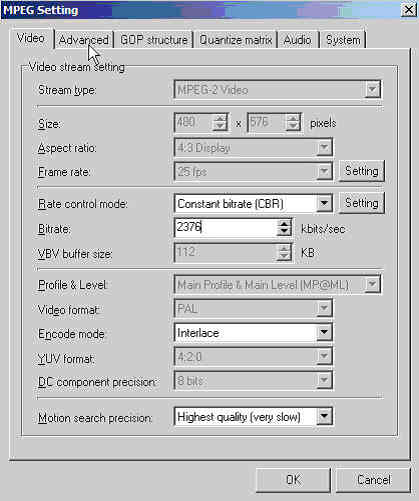
Im folgenden Fenster befinden wir uns zuerst in der Reiterkarte Video.
In the following window we see the "video" options.
Am besten die Einstellungen so übernehmen wie hier gezeigt. Als nächstes wechseln wir in die Reiterkarte Advanced.
Take these settings as in the picture above. Next go to "advanced".
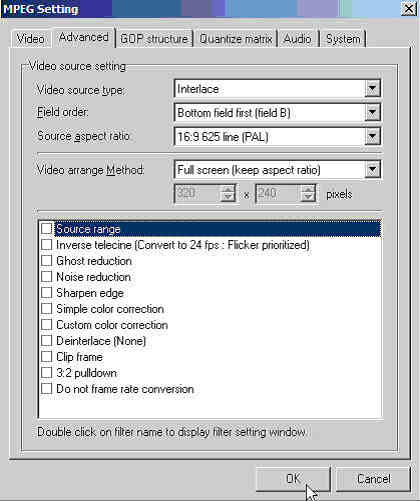
Hier kommen jetzt die Einstellungen zum tragen, die wir uns zuvor bei DVD2AVI notiert haben. Nämlich der Video Type und die Aspect Ratio. Einstellungen je nach Notiz vornehmen und mit OK das Menü verlassen.
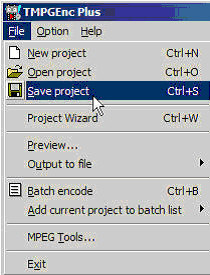
So das wars schon fast. Wie immer müssen wir natürlich auch was speichern. Dafür gehen wir unter File auf Save project.
Now you take the information from DVD2AVI -> video type and aspect ratio.Click "OK" to exit the menue.That's all - but we have to save again as a project.Go to file -> save project
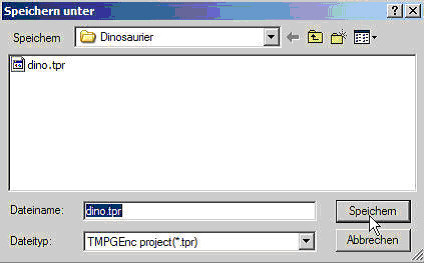
Jetzt geben wir dem Projekt noch einen schicken Namen.
Select a filename.
Ein Klick auf Speichern und fertig !
Click on "save". Finished !
-------------------------------------------------------
VFAPI Converter
Wozu noch dieses Tool ?
Ganz einfach. Cinema Craft, also unser effektiver Encoder, kann nur AVI-Files öffnen.
Somit müssen wir Cinema Craft „vortäuschen“, daß es einen AVI-File zum encoden bekommt.
Diese Aufgabe übernimmt VFAPI Converter und macht aus unserem TMPGENC Projekt einen „AVI"-File.
Why do we need VFAPI Converter ?
It's simple.Cinema Craft can only open AVI-files. So we have to convert the TMPGENC-project into an AVI-file.
-------------------------------------------------------
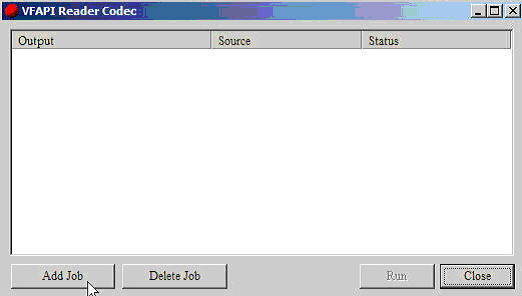
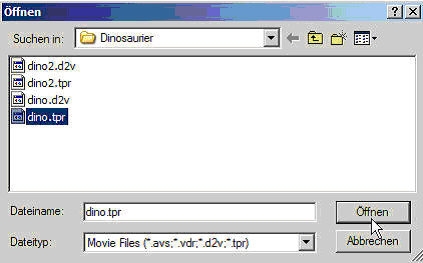
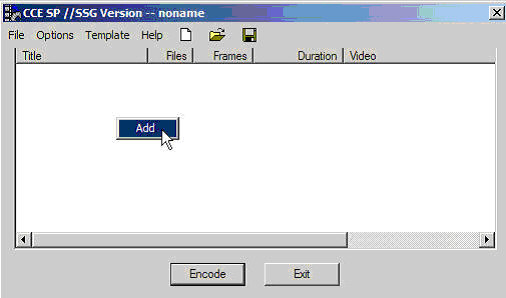
Zuerst klicken wir auf Add Job.
Dann wählen wir das Projekt von TMPGENC aus und klicken auf Öffnen.
Select the TMPGENC-Project and click "open".
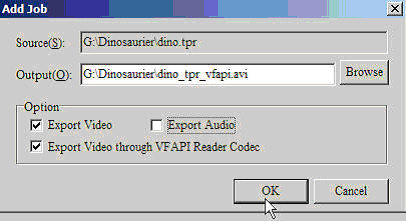
Im folgenden Screen den Haken bei der Audio Spur entfernen und mit OK bestätigen.
Deselect the audio option und click on "OK".
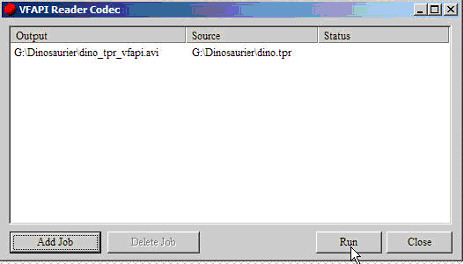
Danach ein Klick auf Run und schon wird aus dem TMPGENC Projekt ein AVI-File.
Click on "Run" to start converion.
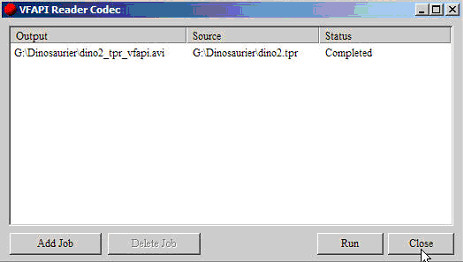
Der Vorgang dauert nur wenige Sekunden und wird mit Completed im Status bestätigt.
It takes only a few seconds and and status says "completed" when finished.
Ein Klick auf Close und das war es zum Thema VFAPI Converter.
Click on "close" to exit.
--------------------------------------------------------------
Cinema Craft Encoder 2.62
Jetzt geht es endlich los mit dem Encoden !
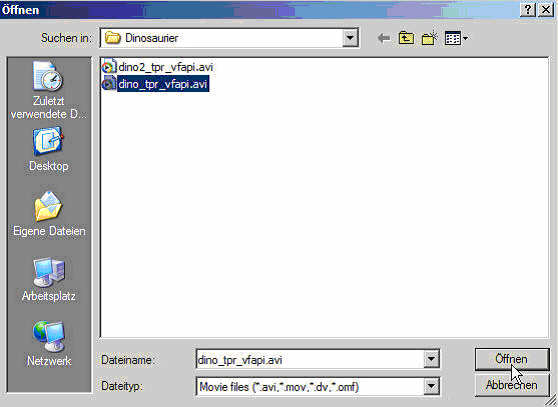
Zuerst per rechtem Mausklick Add auswählen um eine AVI-Datei hinzuzufügen.
Now we can encode the video. First right click -> "add" to add an AVI-File.
Dann das AVI-File wählen, welches zuvor von VFAPI Converter erstellt wurde.
Select the AVI-File from VFAPI Converter.
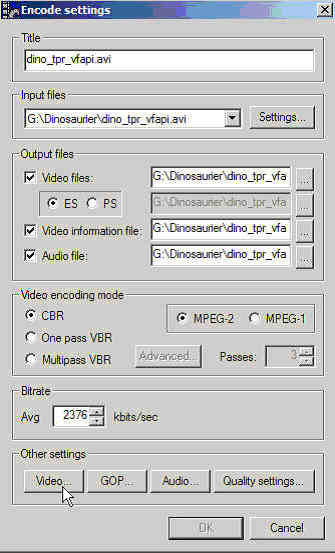
Per Doppelclick auf den AVI-File gelangen wir zu den Optionen.
For the options doubleclick on the AVI-File.
Hier die Einstellungen wie in der Vorlage übernehmen.
Das bedeutet, als Video encoding mode wählen wir CBR (Konstante Bitrate), MPEG-2 für SVCD und stellen die Bitrate auf 2376 ein. Klar, bei den Output files kann man natürlich die Namen und Verzeichnisse wechseln wenn man möchte.
01.10.2002 Update : Maximale Bitrate für den Video-Part bei SVCD ist 2524 KBit. Wer will kann das auch nehmen um noch mehr Qualität zu erreichen.
Select options as in the picture. I take CBR (constant bitrate), MPEG-2 for SVCD and 2376 KBit as Bitrate. You can choose different output names if you want.
01.10.2002 Update : Maximum bitrate for the video part is 2524 KBit. If you want you can take this setting for better quality.
---------------------------------------------------------
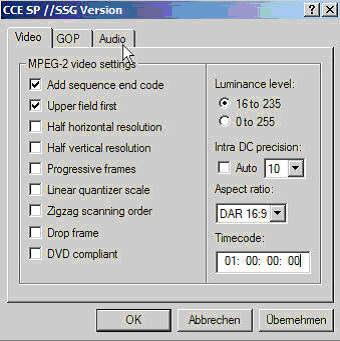
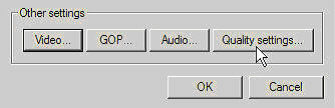
Danach klicken wir unter Other settings auf Video.
Under "other settings" click on "video".
---------------------------------------------------------
Im folgenden Fenster stellen wir wieder die Aspect Ratio ein, die wir zuvor bei DVD2AVI notiert hatten. Der Rest wird einfach übernommen.
Hinweis : Sollte DVD2AVI angezeigt haben, daß der Film Progressive ist, muß natürlich noch ein Häkchen bei Progressive frames gesetzt werden.
In the following window we select the aspect ration which we noticed from DVD2AVI.The rest stays like in the picture.
Info: If DVD2AVI said that the movie is in progressive mode you have to select "progressive frames" !
Jetzt wechseln wir in die Reiterkarte Audio.
Now we go to "audio"
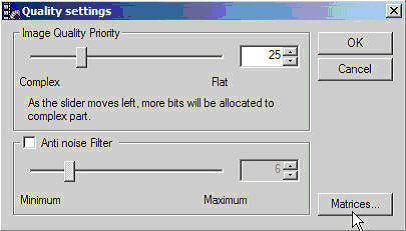
Die Einstellungen exakt so übernehmen wie im Beispiel und mit OK bestätigen. Als nächstes widmen wir uns den Quality settings.
Select everything as in the picture and click on "ok" !
Den Anti noise filter brauchen wir nicht. Also das Häkchen entfernen und anschließend auf Matrices klicken.
We do not need the "anti noise filter". Deselect it click on matrices.
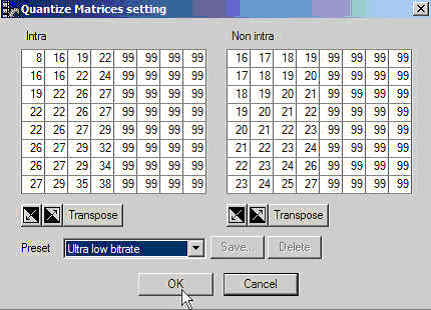
Wir wählen Very low bitrate und bestätigen mit OK. Laut CCE Handbuch sollte man diese Einstellung für Bitraten unter 4000 KBit wählen.
Choose "Very low bitrate" and click on "ok". You can test other settings if you want. I read on the internet that this option would give better qualtiy. CCE handbook says, that this setting should be used for bitrates under 4000 KBit. I don't know if it's right...
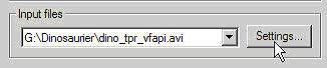
Im Hauptmenü der Optionen angelangt kümmern wir uns nun um die Input file Settings.
In the main menue we go to the input settings.
Mit einem Doppelklick auf den AVI-File gelangen wir ins nächste Fenster.
Doubleclick on the AVI-file for next window.
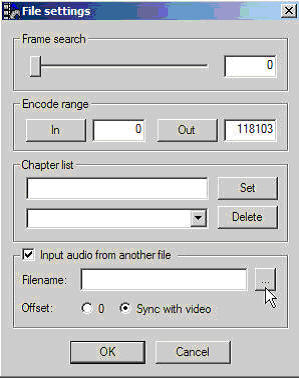
Wir wählen Input audio from another file. Die restlichen Optionen bleiben und wir klicken auf den Knopf mit den Punkten um den Audio-File auszuwählen.
Choose "input audio from another file". Keep the rest as it is and click on the button with threee points to select the audio track.
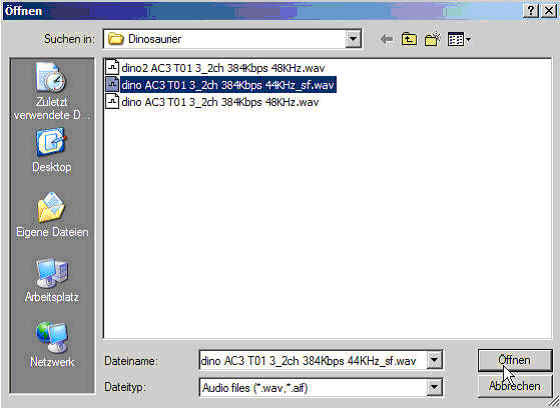
Wir wählen jetzt die .wav-Datei aus, die zuvor DVD2AVI erstellt hatte und klicken auf Öffnen.
Select the .wav file from DVD2AVI nad click on "open"
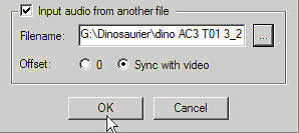
Wir bestätigen die Auswahl mit OK.
Click on "ok".
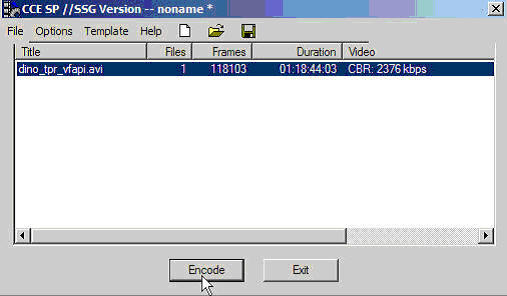
Wir haben nun alle notwendigen Einstellungen vorgenommen. Es kann losgehen
Mit OK und nochmal OK gelangen wir wieder ins Hauptmenü, wo sehnsüchtig der Encode Button auf uns wartet.
Setup is okay. We can start. Click "ok" and again "ok" to go back to main menue. Here we find the "encode" button.
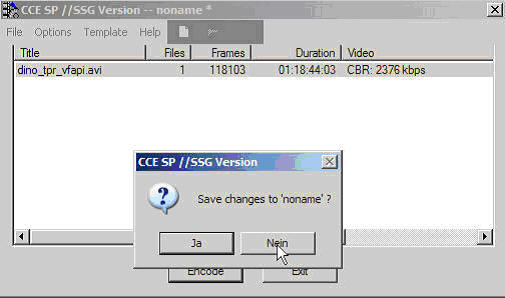
Bevor es richtig losgeht müssen wir noch die folgende Frage mit No beantworten.
Choose "no" for saving.
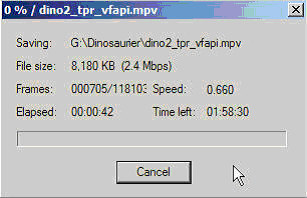
Jetzt heißt es zurücklehnen und die Show geniessen.
Now let's wait...
An dem Parameter Speed kann man erkennen, wie schnell der Rechner ist. Im Beispiel ist der Wert 0.660 angegeben. Das bedeutet, daß die Encoding-Zeit weniger als doppelt soviel ist wie die original Filmlänge. Kurz gesagt, ein Speed von 1.000 entspräche Encoding in Echtzeit. Das Codieren ist reine Last auf der CPU ! Man darf sich also nicht wundern, wenn der Rechner ausser encoden sonst nichtmehr viel zustande kriegt – sprich “schneckenlangsam” wird.
Parameter speed shows you how fast encoding is. 1.000 would be realtime. More than 1.000 faster than realtime and as in example 0.660 a little bit less than double of the movie length. Encoding with CCE will load your whole system. So don't be afraid when your system does nothing else as encoding. *g*
-----------------------------------------------------------------
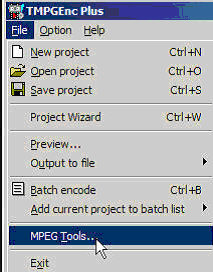
Aber halt ! Ganz fertig sind wir noch nicht !
Stop ! Process is not ended.
Nachdem CCE ganze Arbeit geleistet hat, befinden sich nun eine .mpa und eine .mpv Datei auf der Festplatte. Also zurück zum guten alten TMPGENC um die beiden Dateien in eine MPG-Datei umzuwandeln.
Unter File die MPEG Tools wählen.
When CCE finished successfully we got a .mpa audio file and a .mpv video file on the hard disk. We have to return to TMPGENC to multiplex these files to one .mpg video-file.
Select under "file" "MPEG Tools".
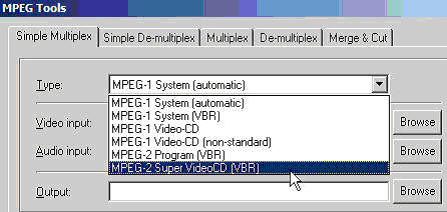
In der Reiterkarte Simple Multiplex als Type MPEG-2 Super VideoCD wählen.
Select "simple multiplex" and as type MPEG-2 Super VideoCD.
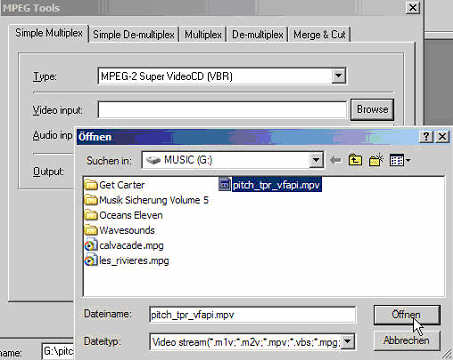
Jetzt wählen wir unter Video input die .mpv Datei aus.
Under video select the .mpv file
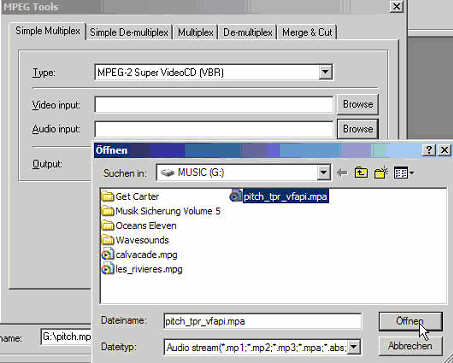
Und unter Audio input logischerweise die .mpa Datei. Stehen die Files alle in einem Verzeichnis so übernimmt TMPGENC die Suche und füllt alle Felder schon aus.
Under audio we choose the .mpa file. If these files are located in the same folder TMPGENC finds them automatically.
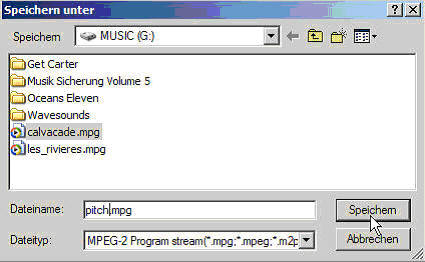
Zum Schluß wählen wir unter Output die gewünschte Ausgabedatei für den .MPG File
Select an output path fpr the .mpg file.
Mit Run starten wir den Multiplex Vorgang. Das dauert ein paar Minuten.
Fertig !
Click "run" for multiplexing. It will take a few minutes...
-------------------------------------------------------------------------
Wer jetzt noch fragt, wie man z.B. einen 1,8 GB großen MPG-File auf eine CD brennt...dem kann ich nur sagen, daß er sich mal in Ruhe bei TMPGENC unter den MPG-Tools die Cut/Merge Funktion anschauen sollte.
In the end we maybe have a 1,8 GByte .mpg file. But how do I get this file on one CD-R and burn it. The answer again is TMPGENC ! Under MPEG Tools you'll find a cut/merge function ! Search this forum for a guide but I think it's easy to use.
--------------------------------------------------------------------------
Hope this guide is useful....
So long !
If someone has ideas and suggestions for improval...just tell it !
Try StreamFab Downloader and download from Netflix, Amazon, Youtube! Or Try DVDFab and copy Blu-rays! or rip iTunes movies!
+ Reply to Thread
Results 1 to 28 of 28
Thread
-
-
Press "edit" and uncheck "Disable BBcode in this post". Hopefully then we will see the screenshots. But why do you post the guide in german language?

-
I've done this guide in german so I post it first in german...
Do you want an english version too ? -
Well, as a german I can read it, but I am afraid most of our members use to speak english, hence an english translation might be even more usefull. Thank you anyway. Next time you should try to optimize the images. I think, *.png is better than *.jpg and most browsers should support it (tested with Opera6, IE5+6 and Mozilla 1.0).
-
I will resize the images and upload them again. I'll do a translation to english tomorrow or on saturday, okay ?
-
@ daro73
Thanks for this great guide ... it sure was very helpfull for me! -
I included english comments. Have fun now for everyone !
-
The Old One

- Aug 2000
- Hellas (Greece), E.U.


That's kind of guides we need here...
Simply, straight and full
Also, multilanguage texts are a plus! I love the idea, maybe I'll adapt it on my articles!
Great work! -
is the audio in this svcd 5.1 or is that not possible?
-
In this guide the audio track is a simple stereo signal. If you do a Dolby Surround Downmix with DVD2AVI you get Dolby Surround Sound which means Dolby Digital 2.0. You hear sound from all 5 speakers,but is is definitely not Dolby Digital 5.1 ! Look @ the new guide about DVD 2 SVCD with DD 5.1 Sound. I made a comment about that guide...if it is possible to create a SVCD with DD 5.1...it will only work on a few DVD payers because 99 % of all players don't support such a feature !
Remember : Dolby Digital 2.0 or Dolby Surround is a stereo signal which includes surround information for the center and the rear left/right speaker. The signal for the rear left/right is a splitted mono signal. -
Try using DVD2SVCD.
It´s an all in one tool for converting DVD or avi .
It contains nearly all the programs mentioned above and you got a very comfortable GUI.
So its faster and easyer to create SVCD with alsolutely excellent quality.

-
Has anyone other then the person who wrote it tries this guide?
I'd like to know the results

-
A few things about my guide :
1. Standard / not standard
I show the way to a kind of standard SVCD which will work on every DVD player.
2. Quality
You get a result which stands relative to the settings and the time you want to wait. You can take higher bitrates for better quality or 3-pass VBR for better encoding...resulting in an excellent SVCD, but I want to have a SVCD which works on every DVD player so I choose 2376 KBit for video and 224 KBit for audio. And of course I don't want to wait 8 hours for just one film.
3. Time :
Time is part of your whole system. On my PC, a P4 1,6GHz running overclocked at 2,154 GHz with 133 MHz inside, I need 3 hours 30 for a film with 1 hour 30 length. Not encoding time ! Time for the whole process of ripping,converting,encoding and cutting ! I think that's faster than most of all other programs and the quality is good to very good in my opinion. In my tests quality is better than DVDx which takes over 6 hours for encoding on my machine. So I made a compromise between time and quality. It's very fast and the quality stays better than other programs. That's all I want... -
Update :
- you can use "17" for quality setting in Cinema Craft for better quality
- if you want to use matrices you should better use "very low bitrate". "very low" stands for bitrates under 4000 Kbit. "ultra low" is used for bitrates under 2000 Kbit. -
I`m just wondering, I have previously used other guides, or the excellent CLADDVD XP, how much difference will I NOTICE by encoding this way, instead of letting TMPGenc do it all? What I`m basically asking is, do we need to use Cinema Craft, is the extra time / work involved worth it , or is this just if you are going for absolute max quality ?
Nigel. -
TMPGENC is a very good program and I think the quality of Cinema Craft is minimal better. Of course you can still use TMPGENC !
But the thing is, TMPGENC takes about 8-9 hours encoding...CCE needs only 2 1/2 hours ! And quality is as good as TMPGENC or a little better so the decision for me was easy.
That's all. In this case for me it was only a question of time - not of quality.
-
I would like to thank you for providing this guide, because it has made me realise I can use CCE with only a slight modification to the way I worked before using TMPG. From DivX I can go via TMPG as you illustrated, and if working from DVD I can also use the avs file I get from Gordian Knot.
I am very happy with the quality I get from TMPG, but I cannot bear the time 2-pass VBR takes, and the uncertainty of filesize with CQ (which I use mostly) can be frustrating. So far I have experimented with 3-pass VBR, which is much quicker than TMPG's 2-pass mode. Which leads me to some questions:
Is there a great deal of difference between 2-pass and 3-pass with CCE? And is CCE's 2-pass roughly the same as TMPG's 2-pass (apart from speed)?
2. Is there any reason when exporting the project file from TMPG to alter any settings on the Video page? I know the Advanced page filters can be used, but I presumed the rest of the settings were only applicable if encoding with TMPG. So, if anyone knows what will and will not be carried over to CCE, perhaps they can enlighten me? -
VFAPI Converter , i cant open the tmpeg project with the version of VFAPI Converter on this website , any ideas?
-
Did you run vifpset.bat before trying to use it?
-
Why don't you just use Smartripper->DVD2AVI->TMPGEnc ?? This will convert DVD to SVCD!
The procedures from your first message will not create subtitle anyway!
-
First another update :
You can take 2524 KBit for video as maximum.
2524 KBit video + 224 KBit Audio = 2748 KBit the absolut maximum for STANDARD SVCD.
@hailieu : I don't need subtitles so I go this way.
@banjazzer : You are right with your suggestion that the TMPGENC Settings are not needed. The only thing you MUST choose is the resolution of 576*480 because CCE can only do half horizontal/vertical resolution. I haven't tested all settings but I think you can leave them as they are. I think they do not take any effect in CCE.
@movman : Can I include CCE SP in DVD2SVCD ? And where is a good and easy guide like the one I made ? Please help -
just use vcd2svcd and select 1 cd by bitrate (change de cd min to 120 min) and go
you got perfect quality on 1 cd in svcd
the only thing that's a problem is the time +/- 12 hours for one moviejokeman -
In regards to the use of Sound Forge for extracting and downsampling the audio track...
I don't think the current DEMO version of Sound Forge will let you save the extracted audio file. Is there any other Shareware or FreeWare that will allow you to turn up the volume on the track?
Thanks! -
You don't need Soundforge for either function. There are freeware tools that do the job just as well.
Downsampling: SSRC http://www.doom9.org/Soft21/Audio/ssrc-1.29.zip
Usage is via a DOS box. Usage is ssrc --rate 44100 input.wav output.wav (to convert to 44.1kHz.)
Normalising: http://www.doom9.org/Soft21/Audio/normalize0241.zip
http://www.doom9.org/Soft21/Audio/NormalizeGUI.zip
By the way, it is generally better to downsample after normalising. These progs are in no way inferior to those you pay a lot for. 8) -
I am trying this technique, but TMPGenc for some reason cannot open the D2V file from DVD2AVI?
Also, trying to use DVDx for the authoring directly into MPEG, I got choppy sound (but only when I try to encode into SVCD, not VCD)
Thanks
Kevin -
ok i thought that i had follwoed the instructions to the letter.
i am getting good results - well sorta - however they are in the wrong format - it appears that it is in 4:3 or simillar , when i want it to be 16:9 PAL. I have made the settings 16:9 as in the instructions....
where am i going wrong? -
check your dvd-player menue if the format is 4:3 or 16:9. I had the same problem and I saw, that my DVD player was 4:3.I switched it to 16:9 and everything was okay. Your picture is stretched in height am I right ?
-
hi
first of all my english is very bad but i try it now. the guide is very good but i habe two proglems.
1. when cce is finish there comes a error message von win xp that cce is not correctly ended (error in the user*.dll) this problem is not so bad but nerved. when the svcd is finish and i look it at my pc all is good, but when i look it at my standalone player (Scott 838) the picture bucking horizontal and it seams that the picture is not centerd.
any suggestions?
cu frank


 Quote
QuoteSimilar Threads
-
Tutorials: The Complete Guide to Macintosh Video Conversion
By galactica in forum MacReplies: 40Last Post: 9th Jan 2019, 18:25 -
How To Add Subtitles to a DVD. (THE COMPLETE WORKING GUIDE).
By TheMatrixx in forum User guidesReplies: 653Last Post: 23rd Jul 2017, 01:40 -
Making a dvd with an english track from a mkv file that has both japanese and english
By andyjc in forum MacReplies: 0Last Post: 12th Feb 2010, 09:41 -
Solved: How to email high quality printable doc with English and Chinese
By jimdagys in forum ComputerReplies: 5Last Post: 3rd Oct 2008, 14:25 -
StaxRip Guide-w-Templates for High Quality XviDs
By Trac in forum User guidesReplies: 0Last Post: 24th Jul 2007, 01:53