


Guides to make your homevideos look cooler with Adobe Premiere.
Video fade in/out
Audio fade in/out
Make the text roll
Reverse the video
Make you fly!
Simple split screen
Advanced split screen
Watermark / Logo
Video effects
Fade in/out video
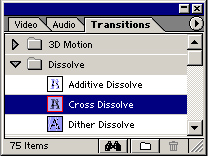
Go to Window->Show Transitions to get to the transitions window. If it stands hide transition the window is alread open. The window often appears on the right beside the timeline.
Choose cross dislove under the disslove dir. The transition cross dislove is good to use when fading from a clip to another. I always use it.
Drag it between the two clips in the transition box. Rember that you have to have the two clips on video 1a and b.
Double click on the transition icon. Choose wich clip the fade will start and end. In this case from b to a. To make the fade slower or faster just drag the icon bigger or smaller.
Render the area and check if it looks good.
Note! Do not use too many special transitions!
Audio fade in/out:
Drop down the audio track.
Make the two audio files cross each other.
Click on the red line to make “stops” and then just drag the line as abrupt as you want the audio to tone down.
Make the text roll:
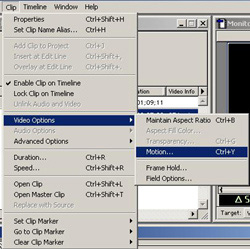
Mark the clip you want to roll. Then choose Clip-> Video Options->Motion
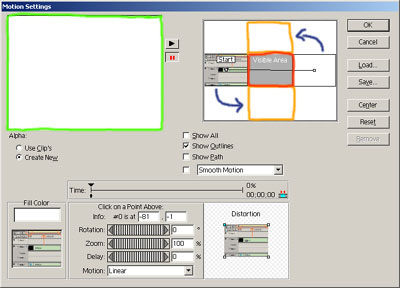
Set the start point under the visible area (inside the red line) and the end above.
If you press the play button you’ll see an example on how it will look like (inside the green). But the speed isn’t correct that you see in that window, it’s much faster.
Note! To see the correct result you must render the area and see it in the preview window. You adjust the speed by making the clip longer or shorter.
Reverse:
Mark the clip you want backwards.
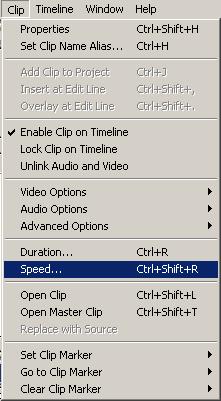
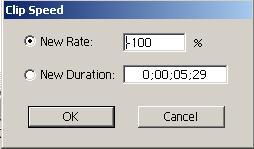
Go to Clip->Speed
Type -100 in the box
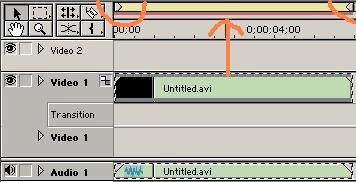
Note! You have to render the clip to see the correct resulat. The renderarea is the area between the yellow line. You adjust the area by draging the grey buttons in the end of the yellow line. Too start the rendering just press enter. Everything inside the red line under the area must be rendered to see the correct result.
Videoclips: Example on when to use this: , clip after used the effect.
Blue/Greenscreen
Put the video you want to cut away the background on in the video 2 line. The movie that you want to use as background you put in the video 1 line.
Mark the clip in video 2 and go to the effect controls (Clip-> Video options-> Transparancy) and choose transparancy.
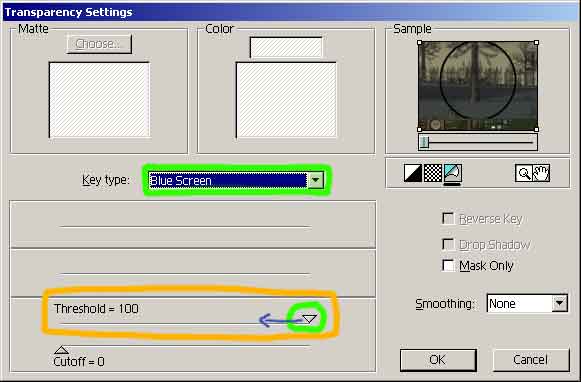
Change the key type to bluescreen or greenscreen dependent on if your background is green or blue.
Adjust the thresholds byt draging the pointer. This you do if there is colors still left in the background that you want to cut off, maybe the background got diffrent blue tint. Of course this can make trouble like cut off from the picture you want to have left.. you’ve got to adjust carefully.
Press ok and render the area and see if it looks good.
If you now like that clip to move check the guide below!!
Note! Rember that the backround you want to use must be as homogeneous as possible.
Videoclips: after!
Make you fly!
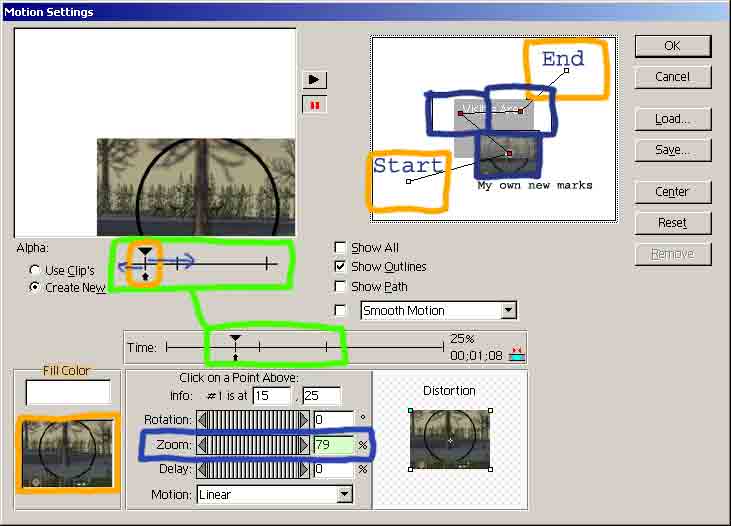
First you have to make the movements then add the background. Mark the clip and go to the motion section, Clip-> Video options-> Motion
You see the start and end marks, drag the start point where you like to have the movement starting and the end where it will stop.
After done that you maybe not want the movement just to go straig from start to end. Then you point on the line between start and end and a new mark will be done, just drag the new mark where you like it.
It’s kind of borring if the picture isn’t seem’s to go further and closer. To fix that you can use the zoom function. Choose one mark where you like the clip to be zoomed out/in. Then the motion function automatacly zoom the picture while it’s moving.
When you have done the marks it also has been marks in the timeline. It’s because if you don’t like the time when the picture is in the mark, so if you liked the picture to be zoomed after 10sec, just drag the mark where you are zoom settings are to the time where you like to have it.
Now there is one big “bug” in premiere, I realy hate it. When you are zooming out the clip it will be a black line just above the picture you’ve been filming. I only got one solution to that and it’s to make sure you never show the whole picture when it’s zoomed out, you have to place the black line outside the visible area. Keep that in mind when you act in the film.
Set the fill color as the same as your backgroundcolor that you are planing to cut away. You get the same color by pressing on the picture below the fill color text, you see a small sample of you picture there, just press on the background.
Now look on the bluescreen/greenscreen guide to see how you now change the background.
Videoclips: after!
Simple split screen
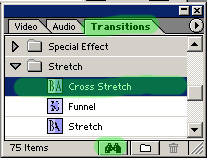
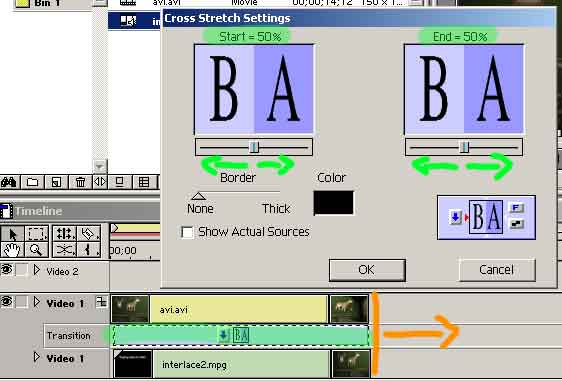
Set the clip on video 1a and b, then add the transition “Cross strecht” in the transition track. You can use the find function to find the transition, just search on Cross strecht.
Double click on the transition icon and choose start at 50% and end at 50%. To make the split screen longer just drag the clip to the right and the transition icon too. Now just render the area and you will see the result.
Advanced split screen
Now to a more advance way to fix split screen. If you use this function you will be able to have more then 2 clips in the same window.
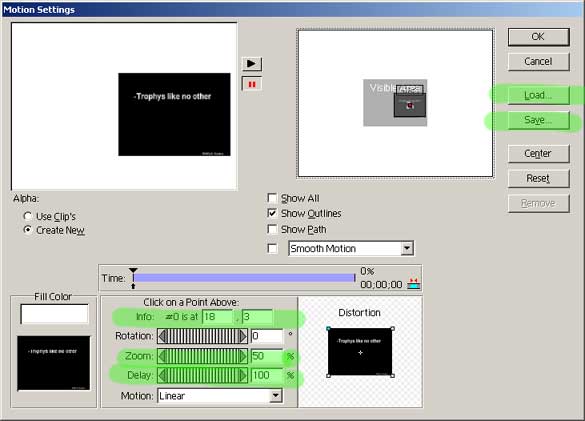
Create a video 3 track (Timeline->Add Video track). Set the clip in video 2 and 3. Mark the clip on video 2 and go to the motion section (Clip->Video Options->Motion). At the bottom there is a delay slider. Set it to 100% then you keep the clip from moving, set the zoom for example to 50%, rember to set the zoom to 50% inte the end point to. Drag the picture where you like to have it and then save the settings. You find the save bottom in the upper right.
Now select the other clip and go to Clip->Video options->Motion and load your previous settings, it will place the clip in the same position and size, so now there is only one change you have to do and that is to change the position. In the top of the same box as the zoom slider there are two entries, where you can adjust the position. The right box is your vertical setting and the left your horizontal. If your number is -18 then change it to 18 or if it is 18 make it -18.
Render the area and look if it looks good, it may need some adjustment.
Watermark
If you are going to make your own logo I suggest you to do it in photoshop and save the logo as psd and have the logo on a layer for itself. Then it will be very easy to add it on the video.
1. Import the logo. If you now have made the logo as I typed before you just choose the layer you want to use. Drag it to the timeline in the video 2 box or if your video source is laying there add a new video track and put the logo above the video source.
There is two ways to get the logo on the right place:
1. When you are making the logo you make it in the same resulotion as the video source.
2. Use the motion function (Clip->Video Options->Motion). Set the delay to 100% and then adjust the start and end point in to the right position.
3. If your picture where the logo is isn't transparant you need to use the transparancy function. Mark your picture and go to Clip->Video Options->Transparency.
Choose RGB Difference and then choose the color you want to remove.
Render the area and you are done!
Add video effects
1. Go to the Window menu and click on Show Video. If it stands Hide Video the video effect map already is open. Drag the effect you like to use on to the clip.
2. Now click on the clip where you have droped the effect on. Go to the Window menu again and choose Show Effect control.
Now you will see the settings for the effect. For example if you have taken the brightnees effect you can adjust the strength of the brightness.
You want notice any diffrent before you change the settings because it is on 0.0 when you add it. So just drag the bar to the left or right.
If you want to see what happens with the clip in the preview window while you are adjusting the brightness you need to have the time bar in the position where the clip is.
Remeber that the f must be selected in the littel window in the effect control menu, else the effect want effect the clip.
Render the area and you are done!
Export movie
1. File->Export Timeline->MOvie
2. Press the settings button.
3. Choose the file type that you want to export the movie in. Remeber to check so the Export range is set to "Entire project", export video, audio is selected. To get to the video settings press the next button or scroll down in the general box.
4. Here you choose what codec you want to compress the film in and what quality you would like to have (resulotion, fps and so on). The configure button beside the codec is the button to press if you like to configure the codec you will use. The things markt with green is the most importent things to adjust. Now press the next button or scroll in the general box to get to the audio settings.
5. Set the settings as you like. The things markt with green is the most importent things to adjust.
If you wonder what settings to use, you shall ask the great members on the forum and not meI'm not into codec and stuffs. The settings you see on the pictures are those settings I use when a export my dv clips. You got a great quality with these settings but in a big avi file that you cant play on the dvd-player. So after I have export the film into this I convert it to a mpg with tmpgenc. Read this guide for that: http://www.vcdhelp.com/convert
helmut@vcdhelp.com
Try StreamFab Downloader and download from Netflix, Amazon, Youtube! Or Try DVDFab and copy Blu-rays! or rip iTunes movies!
+ Reply to Thread
Results 1 to 18 of 18
Thread
-
-
Just wanted to say that I am very happy to see the premier guide. Have searched google for "how to" but have not found one yet with good graphic and explanation. I am planning to cover weddings on digital camcorder (have not bought one yet) edit in premier and transfer back on to Vhs. Will est the guide in a couple of weeks.
-
Nice job! This helps show why Premiere is THE application to use for video editing.
One addition, text scrolling is also a choice when producing a title screen. This would allow you to make a much longer scroll than may be practical using the motion described here. -
I want to know how to do a split screen video - something like the Zoolander "Start the commotion" MTV by the wiseguys...
TIA -
Originally Posted by morpheuse
I'll try to do that.. maybe it will be done this evening, it depends on the weather
-
I'll do two guides on how to split screen, there is lot of way to do split screen but I only will describe two ways.. be patient and the guides will soon be up!
-
Now the splitscreen guides are added!!
-
the only reason you can't find good free guides on the web is because people could make a ton of money making guides... We thank the people that do them free...
-
Maybe we could get guides in premiere for:
Fast/Slow motion video & audio
How to make images appear on top of video
How to make transparent watermarks
How to capture video in premiere -
[quote="SteveDVD"]Maybe we could get guides in premiere for:
"How to make images appear on top of video"
Hmm.. you mean to make a image transparant over the video?
"Fast/Slow motion video & audio"
The speed effect together with the motion effect or?
"How to capture video in premiere"
There is already a guide on how to do that on the site.
Many thanks for the proposal!!! I'll start think about making the guides.Helmut
# SNiGLA @ EFnet
# vcdhelp @ EFnet
# vcdhelp @ DALNet -
thanks for the tips
could someone please make a guide to add effects?
I can't seem to get those to work right -
Helmut,
I just saw that I guess you could call phase two of the guides were screated yesterday. Again very nice job.... -
Very Nice Guide!
Just one question: can you post a sample-pictures before/after with all your guides when possible (or even better: sample clips, like you did with "Make you fly" and some others)

-
That would be great but I dont have any server to put the files on. The ones I have now is on vcdhelps server and I think vcdhelp already have enought of traffic

-
OK, this is my first post here, so be gentle.
I've read the guide about exportin with Premiere. Is it normal that it takes a really long time. The film is about 4 minutes and it was about take 30 minutes to make the export avi file with settings show in this guide (I cancelled, so I don't know about the result).
Few other questions:
What's the difference between Microsoft AVI and Microsoft DV AVI?
How important is the compressor? Why not uncompressed?
And finally, what happens to quality if I export a PAL avi from NTSC
project with Premiere? Better ideas to do that?
Thanks for the answers! -
How much time it takes to export depends on your computer. 30minutes for a 4min file doesnt sound weird.Originally Posted by beorn
If you use uncompressed the file will be huge! -
>> What's the difference between Microsoft AVI and Microsoft DV AVI?
I have asked myself this question several times, and I have now concluded the following - please let me know whether it is correct or not.
Both formats save the file as an AVI file - no difference there. The difference is in the Codecs.
When you choose Microsoft AVI you can choose between different codecs. When choosing Microsoft DV AVI there is no choice for a codec - as it is the Microsoft DV codec, i.e. a DV25 codec.
I presume that if you purchase the Mainconcept DV codec, you can save your file as a "Microsoft AVI" and then choose the Mainconcept codec.
Why it is done in this way I find fairly strange - as it confuses people. Maybe the reason is that choosing any other codec but the DV codec makes Premiere re-encoding the whole project - while when choosing the DV codec is basically mean saving the project (as DV25 is the "native" codec for Premiere).
Comments
-
In out country we follow NTSC WITH aDOBE PREM SUPPORT AND THAT WILL IT HELP ME IN CONVERTING AN IMAGE (bmp OR jpeg ETC.) WITH TRANSITION AND SOUNDEFFECTS AND WRITE IT ON VCD.
nat_59

 Quote
Quote

Similar Threads
-
Fit2Disc Guides
By montgal in forum Newbie / General discussionsReplies: 0Last Post: 28th Dec 2009, 12:18 -
Virtualdub Guides?
By ATLien in forum Video ConversionReplies: 6Last Post: 23rd May 2009, 22:18 -
FAVC guides?
By php111 in forum User guidesReplies: 64Last Post: 25th Aug 2007, 10:53