


What with one thing and another, I’ve stumbled across some uses for a few filters that maybe were not intended in their original design. I haven’t seen these uses mentioned here before. So here are some simplistic suggestions that might turn out useful for someone.
Graft’s DeFlicker for VDub as denoiser on big sky gradients
This filter is intended to deal with flicker from converting actual film.
But ya know what?? It can do a pretty nice job on those panning sky shots that flicker and shimmer and shimmy with grainy noise --- tested de-noisers and smoothers gave me color banding / posterization on the gradients.
I believe it is DeFlicker’s “softening” setting that does it. I just made sure to use the filter INSTEAD OF, not in addition to, denoisers. I haven’t yet tried it on regular scenes, so don’t know if blurring would be unacceptable.
(Kassandro’s AviSynth filter ReduceFlicker / ReduceFluctuations can work also, but seems more aggressive, with possiblity of artifacting and smearing.)
Screenshot wouldn’t show much, but if you’re interested here is short comparison sample clip. 8-mb xvid avi. http://www.mediafire.com/?3syumg2yeg9
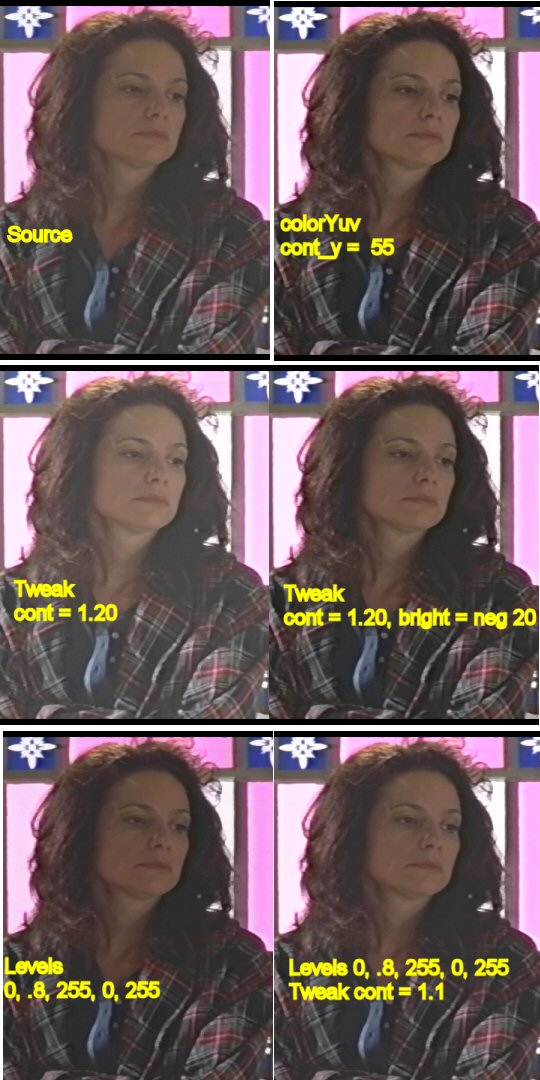
ColorYuv “cont_Y” (contrast of Luma channel) to add emphasis
I use ColorYuv for color and brightness adjustments (often more than Tweak, using “gamma_Y” and “off_y” to brighten & darken.).
AviSynth documentation states that ALTHOUGH use of cont_Y “is possible, it doesn't make sense to apply this setting to the luma of the signal.”.
Well, fiddlesticks say I. Sometimes it does exactly what I need --- it can intensify lights and darks, without affecting the mid-tones much at all. It must be used carefully to avoid getting too much black. But it has sometimes helped me avoid a sharpening filter, by adding a touch of needed emphasis to the picture. Going negative can, of course, mute the contrast.
I’m sure someone will come along and explain why I should NOT be using this setting, and maybe offer a viable alternative. Tweak contrast brightens the mid-tones more than I want, which lightens the entire picture, so I end up using a negative bright setting to darken it back down. This makes no sense to me…….
These cropped and down-sized screenshots are not the best example to compare results I’ve seen, but my other source clips are temporarily unavailable.
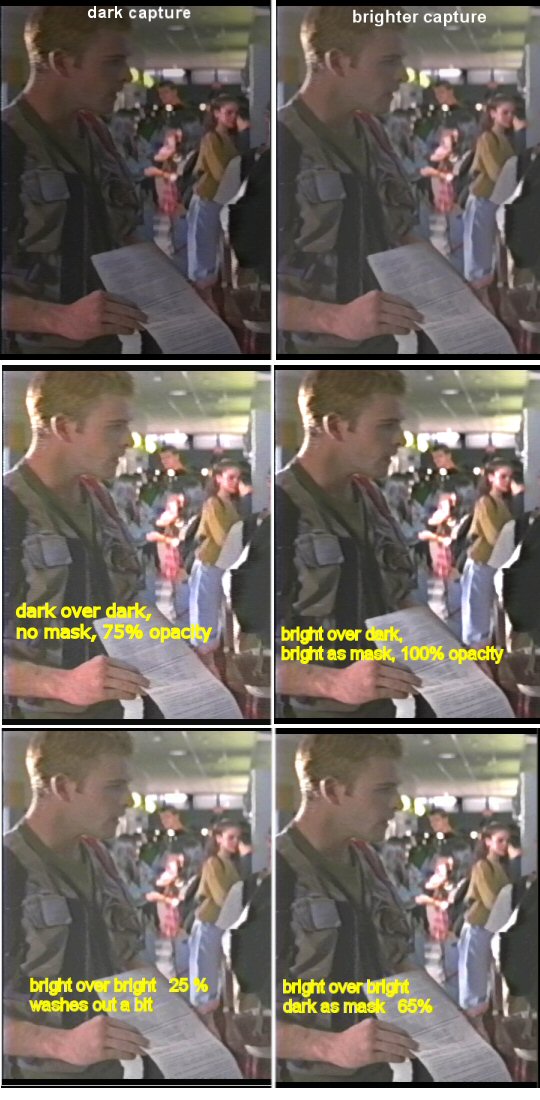
Overlay as “poor man’s HDRAGC”
Some scenes needed brightening --- it is supposed to be a school hallway, not a coal mine at midnight! Capturing brighter looked pretty muddy yet, and capturing even brighter started to wash it out.
HDRAGC was causing strange “picture-frame” artifacts, and pulsing darker/lighter from frame to frame (fault of the source, not the filter, I’m sure.) I was disconsolate. HDRAGC had failed me for the first time!
Fiddling around with Overlay, I learned to overlay a dark clip on itself, and use “add” mode to brighten up the picture nicely, without washing out the darks (that unfortunate side-effect of using Brightness and Contrast filters.)
Another (better?) possiblity is to overlay a brighter version on the dark clip, and use one of the clips as a mask to protect the blacks and produce more intense colors.
I was able to brighten the dark background this way even better than using ColorMill, which showed some hazing & wash-out. Downside is that existing bright highlights might get too bright (that’s when ColorMill “levels” can come to the rescue.)
Downside # 2 is that Overlay can slow down your script.
No color-corrections on these cropped and down-sized screenshots, just the overlay scripts.
script two ----
darkClip = AviSource(“C:\hx_dark.avi”)
briteClip = AviSource(“C:\hx_Brite.avi”)
Overlay(darkClip, briteClip, mask = briteClip, mode = “ADD”, opacity = 1.0)
Try these out on your own source, and see what you think.
Please --- Share surprising and useful stuff YOU have discovered in your adventures
Try StreamFab Downloader and download from Netflix, Amazon, Youtube! Or Try DVDFab and copy Blu-rays! or rip iTunes movies!
+ Reply to Thread
Results 1 to 12 of 12
Thread
-
grannyGeek ~~
Antique Newbie -
Good information, thanks for posting it. I've twiddled around with a lot of filters trying to lighten up a dark video without washing it out. That looks like a interesting way to try.

I have heard of the 'trick' of a light blur when you have panning noise, but never tried a method like you mention. -
Nice info. Gotta try some of these suggestions out. Thanks.
-
Whee! I just found another great tool for my toolbox, and I'm not using it in any unusual way, but wanted to share because I've never seen it mentioned.
I found Didee's YLevels in the Shared Scripts section on Avisynth.org wiki.
http://avisynth.org/mediawiki/Shared_functions
It is a script function avsi that requires MaskTools v 1.5 or newer, and because of MaskTools only works in YV12.
(I think?) it uses MaskTools to create curves to moderate the effects of AviSynth internal Levels filter somewhat. You can use much more aggressive settings and get really wonderful contrast. Saturation might need to be bumped up a bit afterward.
Take a look at these (cropped & downsized) screenshots.
My home pc monitor is calibrated some darker than the one I'm on now, so the comparisons aren't as dramatic when I view them here. But see what you think.
I think it's a keeper!
ylevel.jpggrannyGeek ~~
Antique Newbie -
I'm impressed that you were able to pull any detail out of the dark part of the scenes and not wash out contrast that much. Very nice. Thanks.
-
I think they meant to say it doesn't make sense for the chroma (like in the description of gain).Originally Posted by grannyGeek
-
Correction is mostly about fixing Y levels without touching chroma.
-
Note that the AVISynth docs are about the cont_* arguement in general, not specifically about cont_y.
Applying cont to the chroma channels would result in very strange color shifts.cont (contrast) is also multiplier for the value, and it stretches the signal out from the center. That means that if the contrast is set to 0, it preserves the values as they are. When the contrast is 256 all values are multiplied by 2 (twice as bright). If the contrast is 512 all values are multiplied by 3. Thus if cont = k*256 for some integer k (and zero gain) then Y becomes Y + k*(Y-128) (idem for the chroma). Although it is possible, it doesn't make sense to apply this setting to the luma of the signal. -
Guys, ya gotta help me out here! Your comments have confused me some.
Am I misunderstanding the AviSynth help document, or did they make backwards recommendations?
GAIN is a multiplier for the value, and it stretches the signal up from the bottom. ..........
..........Although it is possible, it doesn't make sense to apply this setting to the chroma of the signal.CONT(contrast) is also multiplier for the value, and it stretches the signal out from the center. ...........
.............. Although it is possible, it doesn't make sense to apply this setting to the luma of the signal.
Regardless of the help file, I will probably continue to use the parameters as I have done, as long as they give me results I like.grannyGeek ~~
Antique Newbie -
It's obviously a mistake in the documentation. It makes no sense to apply GAIN or CONT to the chroma channels. Doing so results in odd color shifts in addition to some contrast shift. Try it, you'll see!
GAIN and CONT are the same function except that GAIN streches from the bottom (0), and CONT stretches from the middle (128):
output_luma = input_luma * GAIN
output_luma = 128 + ((input_luma - 128) * CONT)
Note that gain and cont use scaled integer math rather than floating point. -
Thank you, Jagabo.
My last tiny shred of sanity was getting waterlogged, and I was sinking fast, you threw out an answer in the nick of time.

Ah, it's wonderful that my education here just continues every day.grannyGeek ~~
Antique Newbie -
Member

- Apr 2004
- Death Valley, Bomb-Bay


This is so much Fun.....
 Quote
QuoteSimilar Threads
-
best DVD recorder filter & ATI AIW filter
By VCRcomp in forum RestorationReplies: 1Last Post: 27th Jan 2011, 17:27 -
MPG to transport stream - my finds (projectX)
By T12345 in forum Video ConversionReplies: 0Last Post: 28th Jun 2007, 01:57 -
Easy Analog Copies - I knew it was coming
By SCDVD in forum Newbie / General discussionsReplies: 6Last Post: 10th May 2007, 08:52