


Thanks for any help on this. I am a newbie with premier pro, but have figured out most everything I need on it for what I need to do. However, when I created my last video the quality was very low. It was quite blurry!
I had imported another existing video, but added different audio to it. I exported it as a "Microsoft DV AVI" and I'm using Premier Pro v. 7.0 Columbo.
I am presuming that I can easily take care of this if directed to the area where I would adjust contrast, or focus, etc. I just have not been able to find how I would adjust that and I've clicked on just about everything in the program!
I have also attached an image of what the video looks like where you can easily see the blurr and what I need to fix.
Thanks for any help with this.
Nelson

Try StreamFab Downloader and download from Netflix, Amazon, Youtube! Or Try DVDFab and copy Blu-rays! or rip iTunes movies!
+ Reply to Thread
Results 1 to 28 of 28
Thread
-
-
Focus won't help.
 Have you looked at the quality of the original video? If your processed video is much worse, then the problem is with your processing. I suspect you have re-encoded it to a much lower quality.
Gspot or MediaInfo will tell you some information about your videos. I think if you check the specifications for your original video and your final video, you will see the problem.
Every time you re-encode a video, you will have quality loss. I would limit re-encoding as much as possible. One way you can lower quality loss is to use a higher bitrate. But that will give you a larger file.
There is a lot more to all this, but we have guides to the left. <<<<<<
And welcome to our forums.
-
Are these screen captures taken directly via software, or filmed with a camera ?
If they were taken directly, as what resolution ?Read my blog here.
-
Thanks both for the help. I will try the resources you recommend.
The screen captures were taken using software, but I really don't know at what resolution. My biz partner did it a long time ago and doubt he'll remember, but will ask.
Thanks again!
Nelson -
This is clearly a case of "garbage in, garbage out." Neither Premiere nor the DV-AVI codec would produce such an image unless the source itself was low-resolution to begin with.
-
Great. So, is there anything I can do at this point to fix this filmboss80??
nelson -
Short answer - unlikely.
Long answer - start by working out what the hell you actually have there. As Redwudz pointed out a few posts back, g-spot or MediaInfo will tell you what the resolution is, and what compression is being used. If the resolution is stupidly low then you are in trouble. While you might be able to use something like VideoEnhancer to resize up without too many jaggies, you simply do not have any detail in the image to work with. And if it aint there, then it aint there. Simple as that.Read my blog here.
-
OK, I'll check that out and see what I can find out.
Thanks again!
nelson -
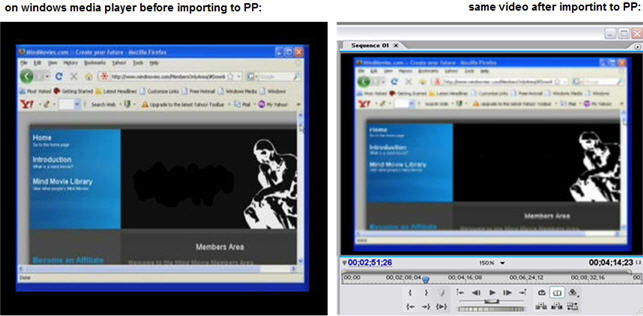
Hi, Back!
OK, looks like the quality of the video I am putting into PP is good. I watched it before importing to PP and it looks nice and crispy. Once I import it to PP it becomes blurry. What settings can I mess with inside PP to correct this?
Below is an image of what the video looks like when I play it on Windows Media Player and another image of the same video imported to PP.
Am I on the right track here and providing the right information?
Thanks again.
Nelson
-
I know it is hard to tell the difference, but the one on the left is completely clear and perfect quality!
-
Also, please note that this is a video of a website being viewed from a browser.
-
it would be better if you posted a few second of before and after footage for comparison.
Read my blog here.
-
Guns1inger,Originally Posted by guns1inger
That was what I tried doing here.. one of before PP and one after. Not what you mean? I guess my post is just a fancy way of asking how do I mess with the quality settings inside of PP which I have not figured out yet? Is there a way to do this? After I find out how that is done, I can try that to see how it goes from there.
Thanks for your help!
Nelson -
Video clips of the source, not very small images that really don't show us anything useful. Hint : If you have to say this : I know it is hard to tell the difference, but the one on the left is completely clear and perfect quality! then your images aren't helpful.
Use a tool like AVIDemux to trim off a few second from the before (clear) video and the video from Premiere so we can
a) see the actual difference
b) look at the source settings, such as codec, resolution, bitrate etc, and compare these to the settings you are using to encode.Read my blog here.
-
OK,
Here's the image of the one before (clear) video from WMP. (this is as large as I could get it):

-
Here's one of the after (blurry video) on PP:Originally Posted by nfreytes

-
Video clips. Not still images. Still images don't tell us very much.
Read my blog here.
-
Thanks,
It's now clear that I'll have to get some sort of expert in here to help me out with this as I am obviously lost. I will find someone on craigslist to come help me out.
Besides that, could you just tell me where inside of PP I would play with adjusting video quality?
Thanks for all the help.
Nelson -
Why don't you post a clip as guns1inger suggested?
The video preview can be set to worse quality, but that's just a preview, it should not affect the final render quality. You would adjust this in the sequence settings under video preview. Posting the same preview still for us conveys no additional useful information...
If you didn't add any filters/effects (e.g. blur), then the rendered video should be the same as the input video. (with the exception that Premiere may do a colorspace and/or levels conversion depending on the input format, and note some versions of Premiere act differently)
The difference would be the settings and format you used for export (e.g. bitrate, quality settings etc..). You mentioned DV for export, but didn't mention the settings used. Nor did you mention the input format. DV is interlaced. If you input video was a screen capture on a PC, it is likely that it is progressive, so DV would be a poor choice.
If you want more help, you should post the clips and provide more information as was requested, and you still haven't provided mediainfo or gspot info. -
Well, I'm all for that, but the thing is that I have NO Idea how to do it.. and just don't want to keep wasting everyone's time here. Thing is that I started this project with minor training on PP, or just enough to go through it with no problems. Now that this issue arises I am stuck.
So, I can give the clip a try and I'm a great follower of directions, but again, just didn't want to impose.
Thanks for any extra info. And no worries, if it takes me calling on an expert to come help me out I just gotta do it!
N -
OK lets start simple:
1) open the input file in mediainfo (view=>text) and post the text information here (copy and paste)
2) do the same for the exported file
In addition to providing us information, this will determine what kinds of programs you might use to generate a sample -
What kind of file are you playing in media player? Is this a DVD, a CD or what?
How did the media player playback get to a video? This looks maybe like a cap from the video card. But why do we have to guess when you can explain what you did?Recommends: Kiva.org - Loans that change lives.
http://www.kiva.org/about -
OK, I hope this is what you had in mind Poisondeathray and guns1inger:
From Input File:
General
Complete name : C:\Documents and Settings\Paul\Desktop\nelson\download templates.mpg
Format : MPEG-PS
File size : 6.00 MiB
Duration : 1mn 36s
Overall bit rate : 524 Kbps
Video
ID : 224 (0xE0)
Format : MPEG Video
Format version : Version 1
Format settings, Matrix : Default
Duration : 1mn 36s
Bit rate mode : Variable
Bit rate : 440 Kbps
Width : 320 pixels
Height : 240 pixels
Display aspect ratio : 4/3
Frame rate : 25.000 fps
Scan type : Progressive
Bits/(Pixel*Frame) : 0.229
Stream size : 5.03 MiB (84%)
Audio
ID : 192 (0xC0)
Format : MPEG Audio
Format version : Version 1
Format profile : Layer 2
Duration : 1mn 35s
Bit rate mode : Constant
Bit rate : 64.0 Kbps
Channel(s) : 1 channel
Sampling rate : 44.1 KHz
Resolution : 16 bits
Stream size : 746 KiB (12%)
From Exported File:
General
Complete name : C:\Documents and Settings\Paul\Desktop\nelson\Finished Videos\Bajar Plantillas - Dowload Templates.wmv
Format : Windows Media
File size : 2.47 MiB
Duration : 2mn 42s
Overall bit rate mode : Variable
Overall bit rate : 128 Kbps
Maximum Overall bit rate : 209 Kbps
Encoded date : UTC 2009-03-25 06:16:23.243
Video
ID : 2
Format : VC-1
Format profile : MP@LL
Codec ID : WMV3
Codec ID/Info : Windows Media Video 9
Codec ID/Hint : WMV3
Duration : 2mn 42s
Bit rate mode : Variable
Bit rate : 208 Kbps
Width : 320 pixels
Height : 240 pixels
Display aspect ratio : 1.200
Frame rate : 30.000 fps
Resolution : 24 bits
Scan type : Progressive
Bits/(Pixel*Frame) : 0.090
Stream size : 4.02 MiB (163%)
Audio
ID : 1
Format : WMA2
Format profile : L2
Codec ID : 161
Codec ID/Info : Windows Media Audio 2
Description of the codec : Windows Media Audio 9.2 - 48 kbps, 44 kHz, stereo 2-pass VBR
Duration : 2mn 42s
Bit rate mode : Variable
Bit rate : 48.2 Kbps
Channel(s) : 2 channels
Sampling rate : 44.1 KHz
Resolution : 16 bits
Stream size : 954 KiB (38%)
Thanks for taking a look. -
When you output from premiere
1. Use 25 fps - the same as the source. You gain nothing by going to 30 fps, and it reduces quality
2. Use a higher bitrate
FWIW - 320 x 240 is way too low to produce clear screenshots of this nature anyway. It is one quarter basic 1992 VGA resolution, and about 1/20th of todays standard resolutions.Read my blog here.
-
Does:
refer to number 2?Originally Posted by guns1inger
Thanks for the info. I'll report tomorrow!
best,
nf -
Several issues that I see:
1. Source is 320x240 @25fps MPeg at a low 440Kb/s bit rate. This would be an original PAL cap.
2. You didn't say but you probably used a default 720x480i NTSC DV project setting for CS4. So the source would be enlarged to 720x480, interlaced and converted to 29.97 fps when rendered on the CS4 timeline.
3. Then you exported to progressive 320x240, 30fps wmv at a very low 208Kb/s. That means the 720x480i DV file would be deinterlaced, then downsized to 324x480 and then encoded to wmv.
All that conversion and low bit rate would cause the blur we observe.Recommends: Kiva.org - Loans that change lives.
http://www.kiva.org/about -
I didn't see guns1inger's reply. Like he said, you should use a higher resolution source if possible.
If you must use the 320x240 source, set the CS4 project as follows under "New Project".
PAL 320x240, 25fps progressive (no fields)
Audio uncompressed PCM 16 bit
Then import your source and edit as you wish. Render timeline to preview.
Export to 320x240, 25fps wmv @ various video bit rates (e.g. 1000Kb/s, 540Kb/s,256Kb/s) to see the quality trade off.
Render audio to 64 or 128 Kb/s or more if audio is important.
Your result should be less blurry.Recommends: Kiva.org - Loans that change lives.
http://www.kiva.org/about -
Hi everyone. Thanks to all here who helped. I ended up paying an expert to come over and explain most of it. However, I do have a new issue that seems to be in the rendering part. All I need is to figure out how to change the rendering of the video to a higher number.
I am using PP v7.0 Columbo. Can someone please tell me how I can chage what it renders at as far as height and width?
The original videos are set at one level, but for some reason the project is rendering at a much lower level.
Thanks for your help.
Nelson
 Quote
QuoteSimilar Threads
-
Blurry video in monitor of Premier Pro CS5
By oldtimefiddler in forum Newbie / General discussionsReplies: 10Last Post: 21st Jan 2012, 00:25 -
Blurry Video Output from Premiere Pro CS5.5
By flyinthecoop in forum EditingReplies: 3Last Post: 24th Oct 2011, 21:23 -
captured video with hauppauge card... video looks blurry
By granturissimus in forum CapturingReplies: 4Last Post: 2nd Feb 2011, 06:43 -
How to edit video in Pro Res over Windows using Premier Pro2?
By Cyclope in forum Newbie / General discussionsReplies: 4Last Post: 8th Oct 2010, 18:09 -
Premier Pro Video Import Problem
By JojoTilly in forum Video ConversionReplies: 0Last Post: 3rd Jun 2008, 17:42