


This guide will help you how to rip DVD karaoke and encode to Mpeg 1 (X)VCD only.(before do this, check your standalone DVD player support (X)VCD or not.
Tool you need:
1. SmartRipper
2. DVD2AVI
3. TMPGEnc
4. Nero
5. DVD player program
6. Cool Edit
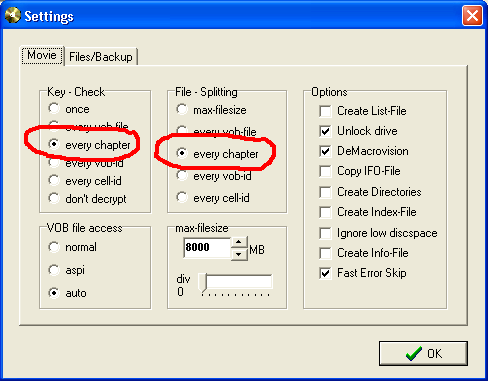
1/ First you must rip DVD to your HDD. Open SmartRipper, click on setting, in File - splitting box & Key check box, check on " every chapter " this will split every chapter that mean you have one song in one .vob file.
Click OK. Select folder where you want to save to then click run.
When rip complete you will have about 20 song ( if your DVD karaoke disc have 20 song ) in 20 .vob file.
Delete all unnecessery files: ifo file, info file ......just keep .vob file ( every .vob file will have about over 100mb )
Now rename every .vob file you got to the name of that song ( ex. vts_01.vob My heart will go on, rename to My heart will go on )
This is for easy to remember. If you are not sure, open .vob file with DVD player program to check it.
2/ Open DVD2AVI
Click file > open, select .vob file name you want to decode.
Click video > field operation, click none.
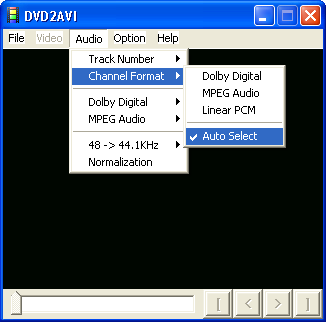
Now in audio you will do very carefull. Click audio > channel format, click auto select:
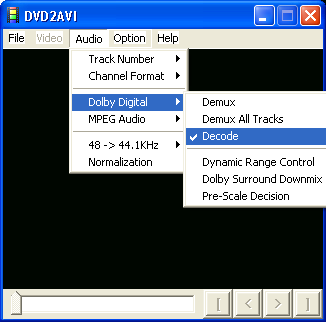
Click audio > dolby digital, click decode:
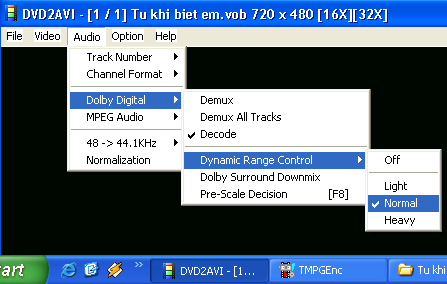
Click audio > dolby digital > dynamic range control, click normal:
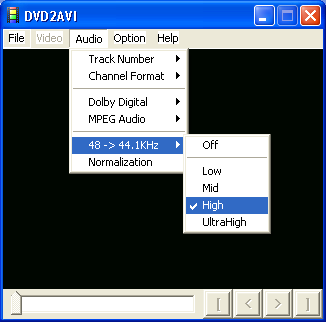
Click audio > 48-> 44.1KHz, click high:
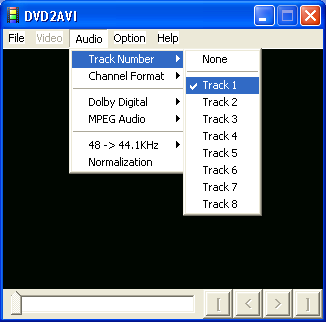
The most important part is track number, usually track number 1 = music + vocal, track number 2 = music only.Click audio > track number, click track 1:
Click on file > save Project to save your .d2v file and the wave file to the same folder.
It take about 2 minute to decode track 1 to wave file. When finish, check the wave file then rename the wave file to vocal or non vocal (for easy remember).
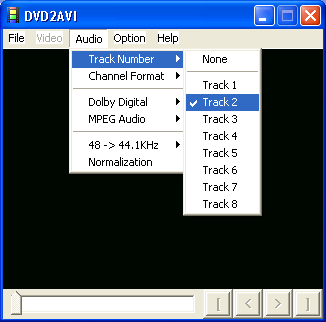
Now decode track number 2: Click audio > Track Number, click Track 2:
Click on file > save Project to save your .d2v file and the wave file to the same folder.
It take about 2 minute to decode track 2 to wave file. When finish, check the wave file then rename the wave file to vocal or non vocal (for easy remember).
In the folder you have 3 files: one .d2v file and two wave file ( 1 vocal & 1 non-vocal ). Two wave file must same size in Mb.
3/ Open Cool Edit:
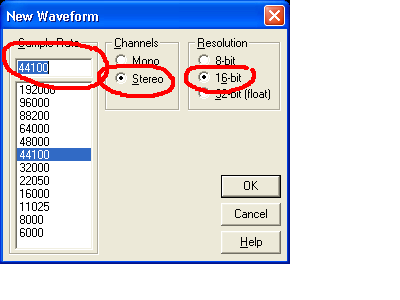
Click on File > New. This will pop up new waveform windows. Then click OK.
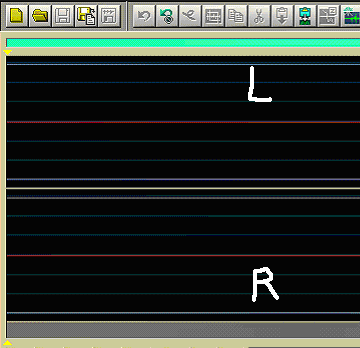
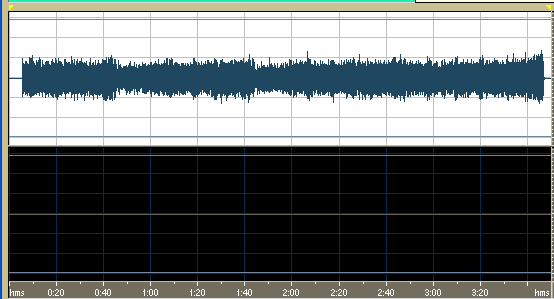
You will see like this, the top half is left channel, the bottom half is right channel:
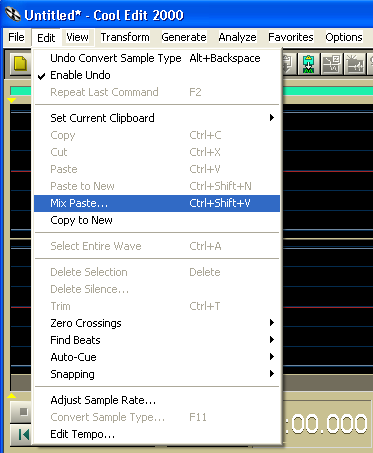
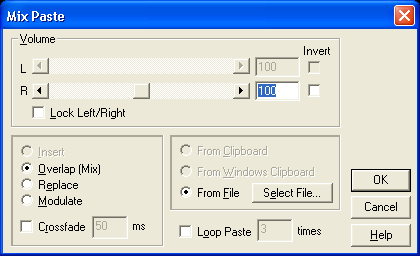
Now you move the arrow to the top half until you see the arrow and small L letter appear, you must right click once. This means you edit left channel only. Now click Edit > Mix Paste:
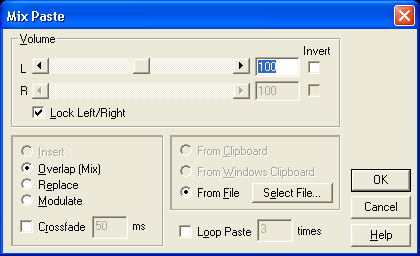
You will see Mix Paste window appear:
You can adjust the volume bar, the higher number the sound is louder:
Click Select File and choose your non vocal (music only) wave file you saved before, then click Open and then click OK:
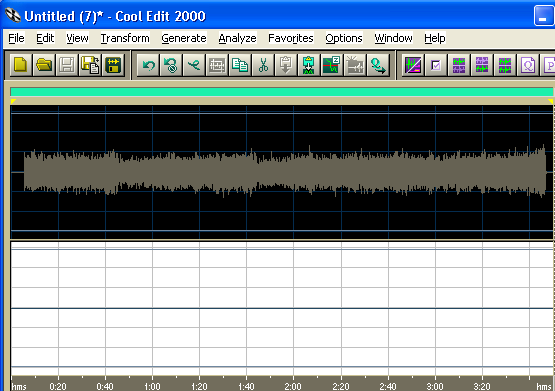
You will see some thing like this:
After finish, you have non vocal (music only) on left channel, press play to check the wave file, if correct press stop:
Now move the arrow to the bottom half until you see the arrow and small R letter appear, double click and you will see bottom half will change to white colour, the top half change to black colour.
Important: Make sure you don’t see the straight line yellow colour on the bottom half, because this yellow line is startting point of the wave file. If you put wave file in right channel,this will not match on both channel right & left.
Now you do the same with left channel above. This time you choose the vocal wave file (music + vocal).
Click Edit > Mix Paste, click select file then Open and OK:
When finish you see like this, press play to check any out of sync, if not click save:
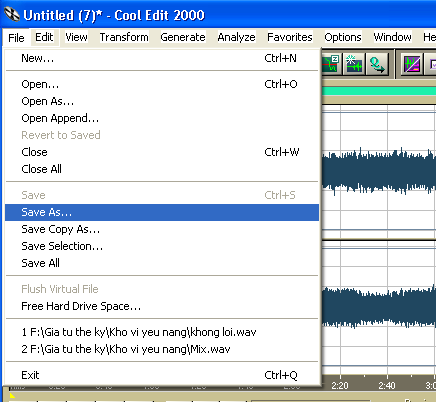
Click File > Save as then type the name and click Save.
You are now have a single wave file with left channel is music only and right channel is music + vocal.
3/ Open TMPGEnc:
In Video source click browse, select .d2v file you save before.
In Audio source click browse, select the wave file you edit with Cool Edit and save before.In Output file name click browse to save mpg file name.
Click Load, then select VideoCD (NTSC).mcf or VideoCD (PAL).mcf template, click open:
Click Setting, in video tab click Motion search precision select High quality (slow):
In Advance tab, leave it as it is:
Click OK, then click Start, you are done.
When finish you will have a mpeg file with mpeg1 video, 1 left channel and right channel in one audio stream.
4/ Finally, burn it with Nero:
Open Nero, select VideoCD, then click New:
Select your Mpeg file, use drag & drop to add files to your compilation:
After finish, click File > Write CD and finally click Write:
That’s it. You are done.
Remember to burn with CD-RW to test it with your standalone DVD player first and this mpeg file can turn from left channel to right channel.
One more thing, when you insert CDR in the tray of DVD player and you close the tray, do not press play on remote control or on DVD player, if you press play, you will unable select numberic key on remote control to choose which track number you want, you only able press next or previous to choose the next track or previous track. You just press number 1 or any number you want on your remote control to play it, this will allow you to jump from track 1 to any track you want by pressing numberic on remote control. Enjoy it.
Johncc35.
Email me if you have any problem. 8)
+ Reply to Thread
Results 1 to 9 of 9
-
-
hi guys,
just a quich question about this guide.. where do i get the cool edit software ?? -
Hi John,
I have the latest version of TMPg (2.59, I think) and I cannot open the .d2v file. It says something like: File unsupported, unable to open.
Is it correct that the file is only about 50 kbytes? Thanks for any answer.
Dan -
can someone tell me what i miss here, when i save project, it took almost a hour to decode, also how do you check the wave file?
-
The Cool Edit part is not good way to make karaoke because your video will split into two diff channels. One is music+vocal and other is music only. so when you don't want to sing or want to hear it sing, you only have one channel audio (left in this case perhaps). That sounds crap.
BTW, Soundforge is easier to use with your method. -
Hi! Can seem to make the right thing here. After following the step. It comes out that when I switch the audio to right NO SOUND. If left it sings only the music. I more thing. After smart ripper I had 24 VOB. does it mean I had to go thru DVD2AVI each VOB? then, after DVD2AVI the track 1. I found out that only the song from the 1st up tp the 9th have been extract. why?
Another thing, What version of DVD2AVI your using? its not the same picture as mine. Im using 1.773 ver.
o Thanks! and hope to hear from u guys soon. -
sorry if im way too late..Originally Posted by networkswiz
i just recently got into this..
and i have same problem above..
can someone kindly help me?
thanks alot -
Hello,
Thanks for the instructions. Does anyone know how to make karaoke DVD from Karaoke VCD? -
Try this:
1. Rip the VCD with VCDEasy (VCDxRip tool). This will give you correct MPGs (as well as XML of the structure).
2. For each MPG, demux in TMPGEnc to M1V (video) and MP2 (audio).
3. (This process may be skipped for audio editors that import MP2 files) Decode to LPCM wav files. Use TMPGEnc or other free/share-ware tools.
4. Open MP2/WAV stereo files in audio editor of choice. L channel will be Music+Vox, R channel will be Music only--OR vice-versa. Separate into 2 mono tracks (good to rename ***_M+V.wav, ***_M.wav or something similar). Individually apply SRC to convert from 44100Hz to 48000Hz.
5. Encode w/ TMPGEnc to 48kHz mono MP2 @ ~96 kbps each if you want MP2, or use Vegas/SoftEncode/SurCode/etc to 48kHz mono AC3 @ ~96kbps each if you want AC3. You could even leave as LPCM mono wave if you want--shouldn't be a bitrate problem.
6. Author in DVD app of choice. Use the directly demuxed M1v file for the video, use the just previously encoded audio files for the audio--1 for each audio stream. Which one goes 1st is personal preference (I'd do Music-only 1st). Use the XML as a general guide for how the structure should work on the DVD. Sorry, you have to do this manually.
7. Compile and burn.
That's it.
*** IF you wanted a 3rd, VOX-only track, you should be able to get it by reversing the phase/polarity on one of those tracks and mixing together ( [M+V] - [M] = [V] ).
This would be helpful if you really wanted to use the Extended Karaoke functions available to the DVD spec. These are complicated, so I won't go into them here.
HTH,
Scott

 Quote
Quote

Similar Threads
-
I need help with Karaoke DVD to Karaoke VCD(MPG)
By adrianneow in forum Newbie / General discussionsReplies: 1Last Post: 8th Jun 2011, 09:02 -
How to make a Karaoke DVD from scratch?
By MadeInBrazil in forum Authoring (DVD)Replies: 3Last Post: 15th Dec 2010, 12:06 -
how to convert LD karaoke to VCD karaoke ???
By sandmankeren in forum Authoring (VCD/SVCD)Replies: 1Last Post: 7th Aug 2008, 15:53 -
How to make the Karaoke DVD disc.!
By movielover005 in forum Authoring (DVD)Replies: 6Last Post: 5th Mar 2008, 06:40 -
how to make the audio of DVD karaoke louder
By edong in forum Authoring (DVD)Replies: 2Last Post: 20th Oct 2007, 15:23