


How to convert a DVD/DivX/XviD/h.264 to low bitrate XviD ideal for a Pocket PC running TCPMP or Coreplayer.
*For anyone interested, this program will also work in Linux using WINE. At least it does on my Laptop running Ubuntu 7.10. The only limitation/problem I have encountered so far is with the cropping window. Although the program allows you to crop the video, it doesn't properly show the effect. As a side bonus, it encodes approx. 25% faster in Linux.
Tools required:
PocketDivxEncoder 0.3.96 (Free)
Preparation:
Depending on your source, you may need to do some preparation. PocketDivxEncoder can convert right from a DVD VOB file, but
it needs to be decrypted first. I like DVDFab HD Decrypter, which is free and works very well. You can use the guide here to do just that. It may be possible to convert directly from a commercial DVD with AnyDVD, but I've never tried.
Guide:
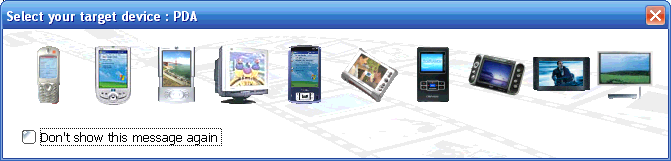
PocketDivxEncoder is a self contained executable, so no installation is required. When you launch the program, you are offered a selection of templates to choose from....
Basically, the template you choose will define the default resolution and max available video bitrate. Unless you want to play around with high resolution/high bitrate video (not ideal for Pocket PCs) then choose the second option 'PDA'.
Once you've selected a template you will be greeted by the main interface with the 'Output dimensions' already set
to the ideal resolution for your device. In the case of QVGA Windows Mobile/Pocket PCs, 320x240.
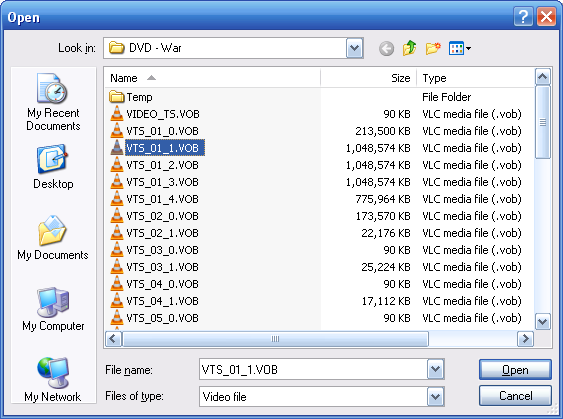
Begin by clicking on the folder icon to the right of step one labeled '1 - File to encode'. If you are working with an already compressed video file such as a DivX/XviD compressed AVI or h.264 MP4, simply select the file. For a decrypted DVD, select any of the VOB files in the VTS set that you are working with. PocketDivxEncoder is smart enough to know that you want to convert the whole movie and will automatically grab the full set. If you don't know which VOB to select, take a look at the files sizes. Usually the movie will consist of several 1 GB VOB files. VTS_01_1 through VTS_01_4 make up the file set in my example.
If you are working with VOB files, you will get a second window prompting you to select which audio stream to use.
You're pretty safe to select the first stream in the list unless you want to use an alternate language. In this example, streams 130
through 132 are commentary tracks.
Note: It is possible that you may also get this dialog when working with a container other than VOB that supports more than one audio track (MKV for example). Personally I have never tried.
The button labeled 'ABC'is for inserting hard coded subtitles. I haven't really used this function, but from my limited testing, this option doesn't appear to work. At least not when using the subtitles included in the VTS title set. It may work if you have a separate SRT subtitle file.
The second field labeled '2 - Output file' allows you to specify where you want your output file saved and give it a name.
At this point, feel free to hit the 'Preview' button. What this does is randomly choose a 10 second portion of your movie and encodes it
using the selected settings. This will give you an idea of what your resultant video will look like.
You could click 'Encode Now', but if the settings are still set to their default values, you will not be getting the best bang for you megabyte.
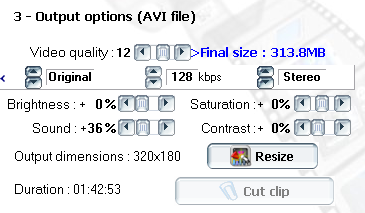
Output options:
Video quality:
The 'Video quality' option provides a slider which allows you to specify the video bitrate. The selected bitrate value is shown at
the bottom of the window. The 'PDA' profile has a max bitrate of 360 kbps. You get the best picture quality at this bitrate, but at the expense of file size. I find that the quality starts to look bad below 192 kbps. I personally find 248 kbps to be a good balance of picture quality and file size.
Audio quality:
The 'Audio quality' slider allows you to select values between 22 KHz, Mono at 24 kbps and 44 KHz, Stereo at 96 kbps. For more
control, click on the arrow to the left of this option. This will bring up options to manually set the frequency, bitrate and # of channels. Audio frequency and # of channels (mono/stereo) do not effect file size, but you need to have a sufficient data rate to have a good sounding MP3 audio track. I prefer to sacrifice a bit of file space for better sounding audio. I generally use Original, 128 kbps, Stereo. Feel free to experiment with lower bitrates.
Brightness:
This slider allows you to increase the brightness of the encoded video. Increasing the brightness allows you to avoid having to increase the back light on your Pocket PC but at the sacrifice of black levels.
Sound:
Increase the MP3 audio level. Increase this value if you find the resulting audio output level too low.
Saturation:
Increase color saturation. Usually left at 0%.
Contrast:
Increase contrast. Usually left at 0%.
Output dimensions:
The 'PDA' profile loads 320x240 as the default resolution. When you load a file to encode, the output dimensions are automatically
adjusted to match the new content all while maintaining the aspect ratio. If you load an anamorphic DVD VOB for example, the
resolution is changed to 320x180 (16:9). If the DVD has an aspect ratio greater than 16:9, then there are black bars in the video that
should be cropped. Otherwise your wasting video data encoding black bars that could otherwise go towards actual video.
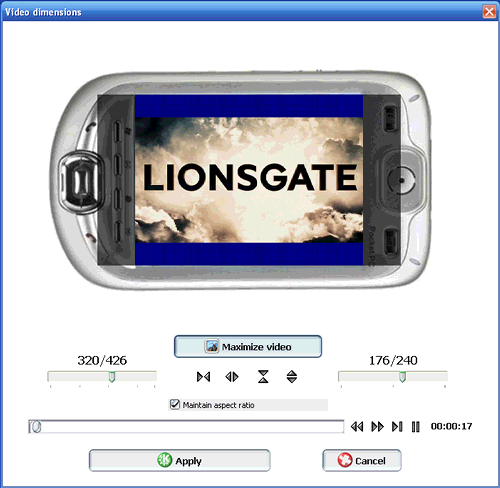
To manually crop the black bars, click the 'Resize' button to open a new window.
Leaving 'Maintain aspect ratio' checked allows you to scale or crop the output without distorting the aspect ratio (important in my opinion).
Maximize video - zooms video to fill screen (sides are automatically cropped)
The four sets of arrows allow you to crop the top, bottom and sides. In the example below, I used 'Maximize video' to fill the
screen and then cropped the black bars. This maintains the correct aspect ratio while only loosing some of the video on the sides.
This is all up to your own preferences. On a small screen (2.8" or less) you may find deluxe widescreen videos (2.35:1 for
example) too small to enjoy without a bit of zooming.
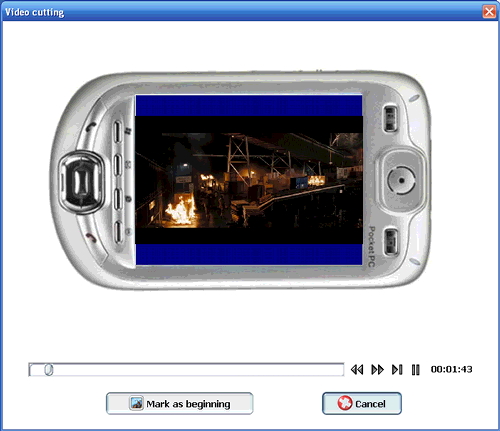
Cut clip:
Clicking on the 'Cut clip' button brings up a new window that allows you to set a new beginning and end (if you only want a portion of the video encoded).
Advanced Options:
Orientation:
Clicking on the little picture of a Pocket PC changes the orientation of the encoded video. If you find you are dropping frames and don't plan on watching the encoded video on a PC, you can encode the video in landscape mode. This gives you roughly 5% better playback performance since you are not depending on the Pocket PC software to do the video rotation.
Advanced video options:
---Direct video stream copy - video is not converted. Leave un-checked.
---Use 2-pass encoding - encoder uses two passes of the video to determine the best use of bits. 1st pass analyzes video and makes a plan for bitrate distribution. 2nd pass does the actual encoding. This increases video quality at the expense of encoding time.
---Framerate (fps): - allows you to manually set the framerate for the encoded video. Used in conjunction with IVTC or if you simply want to force a lower framerate.
---B-Frames - enabling this feature tells the encoder to use bi-directionally interpolated frames in the encoded
video. This feature increases compression efficiency which results in better picture quality. There is no reason not to use this feature.
---VHQ - enables very high quality motion compensation. This feature increases picture quality during high motion scenes but also increases encoding time. I always enable this feature unless I'm in a real hurry and don't care about the loss in quality.
---XviD - despite the name, PocketDivXEncoder doesn't use the DivX codec to encode videos. If you do not check this option, videos are encoded using FFMpeg. XviD is the preferred codec for our task so make sure this is checked.
---IVTC (Inverse telecine - Used in conjunction with the Framerate option. When working with NTSC movies on DVD, set the frame rate to 23.976 and enable IVTC. See below for more details.
---Deinterlace - enable this feature if you want to deinterlace an interlaced video source. Useful when working with content captured from NTSC TV or some TV shows released on DVD.
Advanced audio options:
---Direct audio stream copy - audio is not converted. If your source already contains MP3 audio at a bitrate your happy with, enable this option to simply re-use the audio stream in the final output. There is no reason to re-encode the audio if it's not necessary.
---'Live' effect - this option does some type of audio manipulation that messes with the channel separation. Leave unchecked.
---No audio - self explanatory.
---Audio normalization - enable this feature to normalize the audio track. DVD audio tracks are fairly dynamic which is fine for a home theater system, but not so good for portable devices. Without this enabled, you may need to continually play with the volume on your PDA in order to hear dialog without loud parts blasting your ears. Leave checked.
---Save/Load settings - self explanatory.
Once you have all of the options set to your liking, hit 'Encode Now' to start the encoding process or 'Add to the list' if you want to do a
batch of encodings. If doing a batch, hit 'Encode all' and it will start at the top of the batch list.
---Some notes about IVTC and deinterlacing. Deinterlacing can apply to both NTSC and PAL content, but IVTC only applies to NTSC content that was originally filmed at 23.976 fps (Film) and then telecined to 29.97 fps (NTSC). If you encode this type of content at 29.97 fps, you end up wasting bits on redundant frames. To remove these redundant frames and improve compression efficiency (which in turn increases picture quality), enable IVTC (inverse telecine) and set the framerate to 23.976.
---To determine if you need to deinterlace or enable IVTC you can use a program like DGMPGDec to analyze the content for you. Without getting into much detail, open your content in DGMPGDec and press F5 to start playing. An information window will open and show details about the content. The important things here are Frame Rate, Video Type and Frame Type.
---Frame Rate
------29.97 fps - content is NTSC, continue to Video Type
------25.00 fps - content is PAL, continue to Frame Type
---Video Type (you may need to let it run for a minute or two before it stabilizes on a value)
------Film or Film with >96% - content is of type 'Film' and you can restore the original 23.976 framerate using inverse telecine (IVTC) - (enable IVTC and set framerate to 23.976)
------NTSC - content was filmed at 29.97 fps and should be encoded at this framerate. - (uncheck IVTC and framerate)
------everything else - uncheck IVTC and framerate and let PocketDivXEncoder encode at whatever framerate it detects.
---Frame Type
------Progressive - content is already Progressive and deinterlacing is not required.
------Interlaced - enable 'deinterlace' to allow PocketDivXEncoder to try and deinterlace the video stream.
I think that about covers everything important as far as PocketDivXEncoder is concerned. =)
Try StreamFab Downloader and download from Netflix, Amazon, Youtube! Or Try DVDFab and copy Blu-rays! or rip iTunes movies!
+ Reply to Thread
Results 1 to 1 of 1
Thread


 Quote
QuoteSimilar Threads
-
Please help me about converting avi (xvid) to MP4 (Ipod touch 4g)
By jolo in forum Video ConversionReplies: 2Last Post: 4th Jul 2011, 02:38 -
How to convert DVD TV episodes to AVI Xvid or MP4 H264 with subtitles
By Baldrick in forum User guidesReplies: 9Last Post: 5th Jun 2010, 02:06 -
AVI/Xvid->MP4/Xvid w/o recompressing?
By chconnor in forum Video ConversionReplies: 15Last Post: 9th Feb 2010, 16:47 -
MEGUI MP4 to AVI XviD Error
By DruidCtba in forum Video ConversionReplies: 22Last Post: 6th Nov 2009, 14:35 -
MKV to Xvid Avi/MP4 help.
By Born4battle in forum Video ConversionReplies: 1Last Post: 9th Feb 2008, 15:25