


Hello,
I have been trying to construct the diy telecine outlined here:
http://homepage.mac.com/onsuper8/diytelecine/
Everything has been done well in accordance with the directions,
and seems to be working properly EXCEPT for the Aerial imaging system.
Here is my problem:
I have the camera pointing at the flat side of the condenser lens, as directed.
I then have my video camera pointing at the curved side of the condenser lens.
But no matter what I try, I cannot get any sort of virtual image described.
I've experimented quite a bit with distances - both projector to aerial imaging box, and imaging box to camera.
What happens when I film is that all I see is one big circle of light. If I pull out a little bit, I can see
the lens apperatus on the projector. If I put a piece of paper where the camera lens is, I can see that an images is indeed being projected. I cannot understand what I'm doing incorrectly, or what needs adjustment.
(I can post video of what I'm seeing if it helps anyone.)
I tried emailing the author of the website, but I have not heard back -- going on months now.
If any one could help me troubleshoot this, or has any information on aerial projection/imaging systems,
I would be most obliged.
Thank you!
-Daniel R.
Portland, Or
Try StreamFab Downloader and download from Netflix, Amazon, Youtube! Or Try DVDFab and copy Blu-rays! or rip iTunes movies!
+ Reply to Thread
Results 1 to 30 of 348
Thread
-
-
HI
Found your post on this forum....I can help you with your telecine set up.
I have constructed the same unit following the same instructions.
The system works well for me and I get pretty high quality transfers.
I dont think it really matters what side of the condeser lens you use to obtain your ariel image.
You need to ensure that you have the correct shutter speed set on your camcorder and use
manual white balance if your camcorder has this feature.
Could you post some images of your set up and images of what you are getting on the lens.
The lens is used to magnify the gate of the projector as I am sure you know...once this done its
about positioning your camcorder at the optimum distance from the lens to record the ariel image.
Did you use the Eumig 610 D projector suggested in the instructions ?
You should also use manual focus feature of the camcorder not auto focus or the focusing system
of the camcorder will 'hunt' to attempt to keep the moving images in focus.
On the last page of the instructions the author takes you through the set up very
accurately....did you follow these instructions carefully ?
If you did I cannot understand why you cannot see the projected image on the lens.
If you use your eyes rather than looking through the camcorder you should be able to see the
magnified ariel image of the projected film as it passes through the gate.
Look here to see a transfer I did recently...the first half of the film is very dark...wait until second
half (the children and dog) to see what is possible with this set up
http://looksharpfilms.blip.tv/ -
Further to my last post I am going to try to post some images for you to look at of my set up and
photographs of the ariel image created on the condenser lens...here goes


The top 3 photos show the ariel image created on the condenser lens.
Then a photo of the lens box.
The last photo is of my setup showing distance from projector lens to
the flat side of the condenser lens ..approx 20 cm
As you can see I constructed a jig to mount the projector on along with the lens box so that I dont have to mess about setting them up in the future ...saves a lot of time and I only have to worry about positioning my camcorder at the optimum distance from the lens to record the ariel image.
Hope this helps. -
Hello Rony,
Let me start by saying THANK YOU for helping me.
I appreciate it greatly. Read what you said pretty thoroughly....
I did try to follow the author's instructions, and have re-read a couple times, so I'm not sure
what I'm not reading right, or missing.
This is the one thing I didn't really mess with: "You need to ensure that you have the correct shutter speed set on your camcorder" Perhaps that is my problem? I'm going to dig up the camera manual and figure out how to set it on the camera.
Oh, and the other thing I haven't done is connected it up through the software so that the camera only captures when the microswitch triggers. I figured that I would be able to see the virtual image in the camera without triggering in sync with the frame. Will I be able to see the image, or does it need to be capturing through the software to see it?
Yes, I am using the 610D.
One thing that is notable is I have not widened the gate
as was suggested by the author of the tutorial. However, if I'm not mistaken,
that step was optional, even though not doing so reduced the visible frame by 25%.
I had planned on widening the gate after my initial test. And as you know, my test
produced no results.
I've attached some pictures of the setup (a little haphazard, but only for testing. It will be in a better
environment when it's finished. )
And a youtube link to a video of what my camera is capturing.
http://www.youtube.com/watch?v=X5kmLvnj-Ls
.jpg)
.jpg)
.jpg)
.jpg)
Once again,
Thank you for your patience and help,
Daniel[/img] -
I have a load of Super 8 movies to transfer and while I can't offer you any advice, I just wanted to say thanks for posting the images. Its very cool to see your set up, how lovely to see a movie projector!
I must dig mine out (euming) and do my movies be4 its too late! -
Hi Daniel
No problem...happy to help...I know how frustrating things can get if you dont see what you expect
Your set up is almost identical to mine except for the mirror in the box which I did'nt bother with...to me its just another opportunity for dust etc to find its way onto the final capture. I simply perform a horizontal flip in Sony Vegas to correct the reversed capture...hope that makes sense.
I cannot,looking at your photos see any reason why you should not be able to see an ariel image projected onto the lens. This is the first thing to get sorted out. You say in your original post that when you place a piece of white paper in front of the projector lens you see images...by the way you do not have to be capturing to see the ariel image on the lcd screen of your camcorder.
Dont be disheartedned ...you simply have to tweak your set up to start capturing your films...
This is what I would do..
Project your film at 6fps onto the mirror which as you probably know has to be exactly positioned at 45 degrees to the lens in the box. Have your camcoder out of the way...crouch down and look at the front of the condenser lens...adjust the focus knob on the projector until you can see an ariel image on the lens..as in the first of my photos...you might have to mess about a bit with the distance of the box in relation to the front of the projector lens...be patient you will be able to achieve an image.....I see your box is designed for a mirror...as you can see mine is slightly different because I left out the mirror part....however this should not be an issue. The position of your eyes/head has to be in the right place to see the image..if you are slightly askew you wont see it...its the same when you come to setting the position of your camcorder....the position of it is critical...it took me ages to get right...thats why I built the jig to hold the projector and box...removing that step in the chain so that I only have to worry about getting camcorder and lens distance/position correct.
Once you can see the ariel image its time to attempt positioning camcorder from lens....looking at your photos things look pretty good.
Does your camcorder have at least 12x optical zoom (not digital) ?
Use manual focus on the camcorder.
Set manual white balance if your cam has this feature.
Set the shutter speed....that is the f number...I find around f5 to be good...but adjust if necessary.
There is no reason I can see why you will not get the projected images onto your lens.
As far as widening the gate is concerned...I did this...its pretty easy if you take your time and use a watch maker's
file (a very small one)...you will be able to see the sprocket holes of thefilm in the first of my photos. Worth doing but take your time if you do attempt it.
The triggering of the microswitch can be troublesome...ts only the tensioner that causes the switch to trip on and off...different filmstocks cause differences in tension...I only have the top of the switch screwed to the tensioner so that I can adjust its position by swinging it (very carefully)...its the weakest part of the design...others have designed better triggering using an optical switch mounted in a different part of the projector.
Persevere with it ..you will get it to work....even capturing in real time at 18fps gives very good results.
Are you using cinecap to capture your frames ?
Let me know how you get on...shame I'm in the UK or I would pop round and get it all sorted out for you
Actually looking at your photos again and your you tube movie I think the camcorder would have to be a lot closer to the lens...trial and error with the positioning though....I would try moving camcorder much closer....you are almost there ....
Just had another thought..you did fit a diffuser and lower wattage lamp to the projecter did'nt you ?
Without the lower wattage bulb the light source would be far too bright..I used a 20w bulb..also without the diffuser you will get a hot spot... -
Hi Rony,
Thanks again for the help you've been providing!!
I can't tell you how grateful I am...
Anyhow, yes, it is fitted with a 20w halogen bulb and a piece of opal diffusing glass.
I'm going to try and do everything you said. I also switched the condenser lens to a normal housing without
the mirror, just to insure there is nothing happening at the 45 deg. angle.
If nothing else, I'll at least try and get the image visible to my eye in the condenser lens.
I took a look in my camera's manual and it says optical zoom is only 10x, digital zoom is 120x.
Will 10x not cut it at all? I do eventually plan to buy a better camera for this (3ccd, maybe hidef.)
but will 10x even let me capture anything?
Thank you so much!
-Daniel
P.S. - I'm not sure my camera allows me to set the shutter speed. Could this also be a problem? -
From what I can remeber from the instructions the camcorder should be at least 12x....however I am pretty sure you could still obtain some kind of result with a 10x zoom.
If you do buy another camcorder I dont think cinecap (if thats the software prog you are using for capture) supports hi definition...so check that out before laying out a lot of money for a hi def camcorder. There are plenty of 3ccd dv cams that would do a fantastic job for a lot less money and you can be sure cinecap will work with them.
I noticed in your photos that you had another box
It should be pretty straight forward to get an ariel image on the lens...thats the first thing to achieve...the photos of the ariel image I posted were taken with a cheapish digital stills camera.....no camcorder involved at all....
So try to achieve the ariel image first before introducing the camcorder into the chain...
Once you have the image you can start to mess about with positioning your camcorder....if you discover that your 10x zoom does not allow you to focus in on the ariel image you may have to borrow a friend's cam that has at least 12x optical zoom.
The instructions stipulate at least 12x zoom
The shutter speed on my sony cam is set by adjusting the 'exposure' control..it opens up or closes down the shutter....I get an f stop readout on the lcd screen...as I mentioned before around f5 seems to work for me ...but you can adjust this in real time once you have the ariel image appearing on the lcd screen of your cam.
If I dont have a 50% white balance reading I get flickering / jumping of the picture on the lcd screen...thing is my cam does not have manual white balance control only automatic....I have to mess about with my cam in different light situations until it automatically sets itself to 50%...then I am good to go.
let me know how you get on
My name is mike btw
If you do have manual white balance control set it to 50% -
Your replies sparked my interest because I am just starting to build a telecine unit using a Eumig 610 projector. For years I used a Professional teleicine unit that allowed for 2 slide projectors and a movie projector setup. It to used a condenser lens, and over the years we used a good half dozen different projectors from 8mm to 35mm.
http://www.toddvideo.com/transfers/film_chain.html
One thing that different in the home made unit is that the mirror is very close to the condenser lens, also there is no field lens which is required for aerial imaging to work correctly. I found that most projectors had to be 2 to 3 ft away from the condenser lens to focuses correctly. Some required a zoom lens or a different lens then what came with the projector. If I remember correctly we focused the projected image several inches short of the condenser lens using a frosted glass plate. Most of our problems was the projector focuses was off. Also the angle to the Condenser lens has to be perfect. Even 1 deg off can distort the image so bad the video camera will not pick it up correctly.
The actual focused image should be about 2x3 inches on the condenser lens center. That why a 12 time zoom is required, also the focuse on the video is not as critical as the projector, since the camera is closer to the condenser lens then the average focuse setting on the lens can accomidate.
I used a broadcast camera, originally a 3 tube JVC that worked very well. IF you run your projector at normal speed to record increase it to 20fps don’t try using a built in shutter on a camera to remove flicker.
Anyway in a few weeks I should have one up and going and I may just find the same problems as you did, but I hoped this helped a little.
-
Hello
This thread is has some great points and tips that the webpage doesn't cover very well.
I am trying to build the setup outlined on the website, but the instructions are a little vague in some places and I was hoping for some help from someone who might have done it and gotten it to work. Where I am stuck is at the part where I connect the microswitch to the phono jack. Where do the wires to the switch come from, where do those wires go, and where is the phone jack mounted on the projector?
I have the Eumig 610D like the website suggests. Any descriptions, instructions and/or pictures to help me understand would be fantastic and greatly appreciated! -
Hi
I routed the wire from the micro switch (mounted on the film tensioner) through to the other side of the projector.
I then mounted a switch and phono socket on the back casing of the projector. I then used a phono lead to connect the modified mouse with the phono socket on the side of the projector. The switch on the side of the projector is not shown on the 'design' website...but it is one of the suggested improvements since it allows you to have the 'microswitch' in standby mode while you get the software (cinecap) set up to capture. When you are ready to go you can simply start the software to 'capture' flik the switch and away you go.
Hope this helps..I will try to post some photos of my setup.
heres a link to some examples of transfers I have done with this setup
http://looksharpfilms.blip.tv/#498456 -
Thanks for the reply! I also was wondering about what wires are attached to the microswitch. The website shows an image of it with 2 wires soldered to it, but it doesn't really say where the two wires come from and where they end up. If you could show/explain what you did, it would be a big help.
I must have missed the info about the 'standby switch' - I'll look into that. -
Ok ...first ...you can use this system to capture film to a camcorder in real time. The results are very accepatable and if you decide this is adequate for you there is no need to worry about wires at all. Simply project your film onto the plano convex lens as an arial image and use your camcorder to capture / transfer your film.
The design of the system incorporates the facility for single frame capture using a computer and appropriate software (cinecap). This is when you need to start worrying about wires. The software needs to receive an on / off signal every time a frame of film is in the gate..this is sent to the software by the modified mouse via usb. The wires that are soldered to the 'microswitch of the mouse' are connected to the phono socket fitted to the casing of the mouse itself. A phono lead is connected to this socket and the other end to a phono socket fitted to the casing of the projector. The wires soldered to the microswitch positioned to be triggered by the film tensioner are connected to the phono socket on the projector casing.
As the film is trasported through the projector at 3fps it causes the tensioner to trigger the microswitch...this signal ia passed to the microswitch in the modified mouse which in turn tells 'cinecap' to capture a frame of film.The system is a little fiddly to get set up....but once it is set up it works pretty well.
Can I suggest printing out the design instructions from super8.org and reading them over again carefully...I read them several times until I fully understood how it all fitted together. -
Nice to see some build it yourself projects...takes me back to all those plans I used to send for from the back of old electronics mags. I used to use the Optex transfer unit (http://cgi.ebay.co.uk/Cine-to-DVD-Transfer-box-Super-8-Standard-8mm-16mm-9-5m_W0QQitem...QQcmdZViewItem) which produced good results. I use a friend's service now as he does semi-pro conversions as part of his business. I like the idea of the stills capture. I'll be following this thread.
-
Hi oldfart

This is the DIY system I constructed for single frame capture at 3 or 6 frames per second...
http://homepage.mac.com/onsuper8/junk/
I've had some pretty decent results...maybe not in the same league as a rank or flying spot film scanner...but a hell of a lot cheaper
In my humble opinion nothing but nothing beats the atmosphere of film..especially super 8...but it is nice to be able to use modern computer editing software. If I ever film any footage that deserves it I will have it professionally transfered.
regards
Mike -
There are some nasty interlacing-like artefacts in that clip. As if it was interlacing at some point (which is bizarre, given the source) and wasn't deinterlaced before uploading for the web. Without them, it would look really cool.Originally Posted by ronypony
Cheers,
David. -
Ah ..yes you are right David....I can explain ...when I shot the film I used quite a bit of stop motion at 1fps.
The clip I posted was transfered in real time...this is what has caused the 'artifacts'. I then captured
at 3fps as opposed to 18fps (real time on my projector) and this has eliminated the artifacts.
I will post the single frame transfer and you will see the difference .....actually you can see the difference in the clip.
When the footage was shot at'normal' speed i.e. 24fps (played back at 18fps ...fastest projection speed on my
machine) it looks pretty good as you indicate in your post. For a DIY telecine setup you really can get some decent
results if you take your time.
Single frame capture at 3 or 6 fps is the ideal but very fiddly to get everything working as it should.
The weakest part of the system is the microswitch triggered by the film tensioner of the projector..it
needs a lot of fine adjustment since different film stocks produce different tensions (due to thicknesses of
film ).
Still in the 'trial and error stage' with my setup ..but getting better all the time...
-
Member
- May 2008
- United States


Deleted
-
OK - I finally have all the pieces in place and I am having a few problems. My biggest problem is getting the aerial image to "fill the frame" and still be in focus. I can get it looking pretty good with the image at about 50% of the size I would like, but if I try to get it larger, I can't keep it in focus. Does the projector focus control make a difference?
I have tried to follow the DIY as closely as possible - I have the Eumig projector, the 114mm lens, the works - except my mini-DV camera only has 10x zoom. I have adjusted the white balance, and set the shutter speed on my camera to 1/60 (best looking).
I was hoping somebody who has made this setup work could give me some rough measurements of how far the lens is from the projector, how far the camera is from the lens. Maybe I'm too close, or too far.
Any other ideas? Thank you! -
I am building the same system as explained on this forum, without a mirror.
As condenser lens a plano convex lens is used .
On the French forum they suggest, for the same sytem, to use a magnifying glass , which is convex on both sides.and has a + 3 dioptry.
This glass is easier to find .
Is the result the same and is it suitable -
I have read the DIY Telecine questions and answers with great interest. However, I have not been able to find the detailed instructions on how to make the sytem. The posting for the DIY Telecine using the Eumig 610 projecter has been deleted. Can anyone help me with a copy of instructions for a DIY Telecine? Thank you.
-
i too would LOVE to have a copy of that page if anyone has one cached...
-
So far, no responses to my request. I will send you a copy if I get one.
-
this is so sad. i FINALLY get to the point where i'm ready to start transferring, and the site disappears! also, i notice that cinecap now is only available if you buy that funky printer thingy that i was trying to avoid buying in the first place! anyone got a copy they might wanna sell?
-
Haven't you heard of the internet archive?!
http://web.archive.org/web/*/http://homepage.mac.com/onsuper8/diytelecine/
Pick whichever version of the page you want (e.g. try the most recent one, Feb 2008).
Some of the images are missing, unfortunately.
Hope this helps.
Cheers,
David. -
That is the site I have been looking for!! Thank you David! I obviously did not know about the archive.
-
i didn't know either! thanks so much david!! now, to find a copy of cinecap....
-
I want to start with the same project, but before I embark on anything, just one question.
I have the Eumig Mark 600D. It does not look as if it has variable speed.
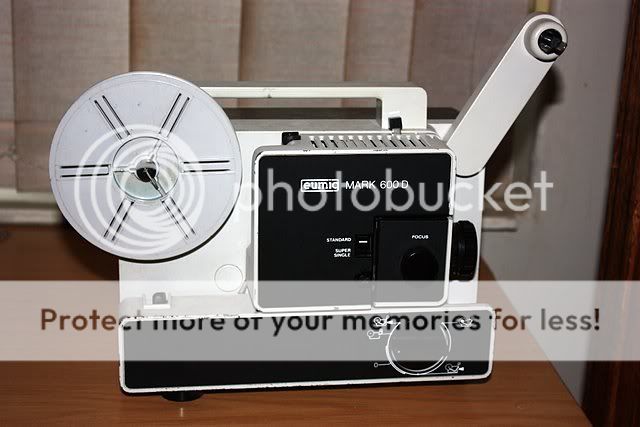
This is from inside
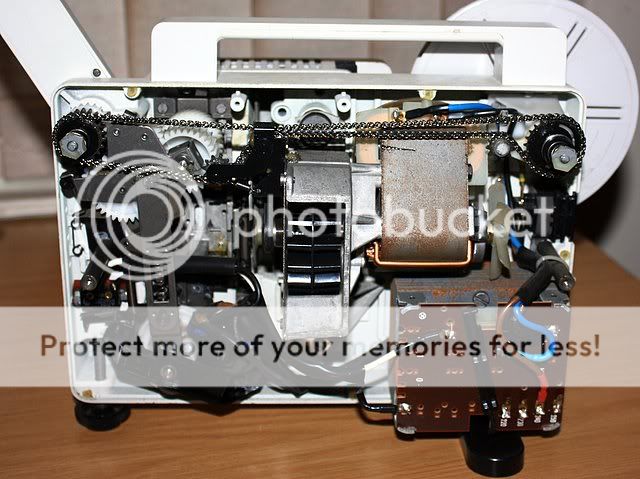
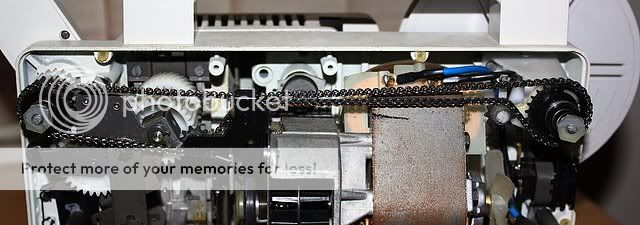
Will it be possible to modify the projector sothat one gets a slower speed? -
i suggest you rethink this, because it looks like the software required for this (unless you use a mac) is not available any more....
-
Are you sure- I have seen references to cinecap on many sites, but I have not tried to download it.
Any other alternatives then if this is not possible?
 Quote
QuoteSimilar Threads
-
8mm film to dvd and which video transfer system to use
By krlorenz in forum RestorationReplies: 16Last Post: 28th Jul 2014, 16:12 -
Telecine Home Made Box cheap DIY
By wrathofbod in forum CapturingReplies: 9Last Post: 1st Feb 2014, 12:30 -
diy telecine - monitoring issues
By TopazUK in forum CapturingReplies: 0Last Post: 2nd Mar 2012, 14:56 -
Telecine Machine for 8mm film super 8 film transfer to dvd
By igotregister in forum CapturingReplies: 5Last Post: 2nd Feb 2009, 15:50 -
Trouble playing DVD-Rs on home system
By wysiwyg20 in forum Video ConversionReplies: 1Last Post: 14th Oct 2007, 08:27