


I know a couple of methods for adding subs to .avi or .mpg video, but I can't figure out how to get the subs to appear inside a semi-transparent rectangle.
That is an option in DVD-Lab, and I think some video players. It surprised me that it's not--at least not obviously--an option in VirtualDub, VobSub, or FFDShow. Am I missing something, or do I need to use a different program?
Also, it doesn't seem to be an option when creating .bmp subs in Subtitle Workshop. Again, I could be missing something.
Try StreamFab Downloader and download from Netflix, Amazon, Youtube! Or Try DVDFab and copy Blu-rays! or rip iTunes movies!
+ Reply to Thread
Results 1 to 6 of 6
Thread
-
-
I've found a couple of methods for adding subs inside an opaque box.
1. Use the "fill" filter in VirtualDub to create a box behind your subtitles. (Add subtitles using the "subtitler" filter.)
1a. Use the "logo" filter in VirtualDub to display a box behind your subtitles. This has the advantage of adjustable opacity, but, like the "fill" filter, it's an "always on" solution.
To make use of filters in VirtualDub, I think you'd have to encode the whole video with a bar displayed, and then splice pieces of that into your original. There has to be a less labor-intensive method.
2. Edit a .ssa file to change the background color from transparent to gray or black. Maybe you can choose a "semi-transparent color"? Even if you could, though, multi-line subs will appear in a jagged/stepped box--not a rectangle.
3. Go into settings in Subtitle Workshop, uncheck "try transparent background", click "Background.." and choose black or gray. Again, this is an opaque rectangle with non-rounded edges. It's the best solution I've found so far, though.
None of these methods really give the effect I'm looking for. I think I should rephrase the question.
How do I add permanent subs surrounded by a semi-transparent black rectangle?
4. Create a custom title script in Windows Movie Maker. I won't detail how to do this here, but it's possible to get the exact effect I'm looking for using this method. The problem is, a) it's labor-intensive (you'd need a dozen or more scripts and overlay images just to replicate Subtitle Workshop's background effect) and b) the subtitles have to be created in Windows Movie Maker, which is nowhere near as efficient as Subtitle Workshop (or any of the other tools recommended in this forum). I would only do this with short videos--video doodles. If you do a lot of short videos with subtitles, though, this would be one way to go. -
Someone please help us.Please.I'm also looking for such a solution for months
 Please help us
-
-
A detailed tutorial with avisynth will be very much appreciated as I'm a newbie and don't have much in-depth knowledge about video encoding
Is there any way this can be done using virtualdubmod ( the one tool I know how to use and use to hard sub subtitles in batch mode )?
Thanks -
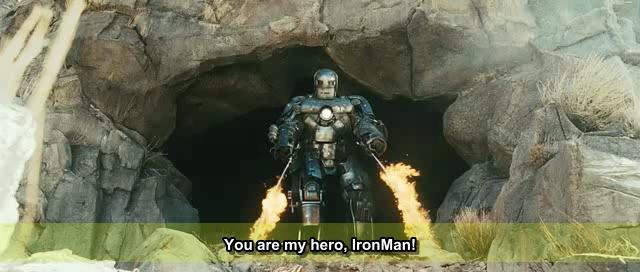
I uploaded a tiny <2mb zip file of some exercise files so you can learn what is going on. Included are:
ironman.avi (from apple movie trailer)
ironman.srt (some fake srt subs)
1.jpg (screenshot of video playing with subs)
1.png (semi-transparent overlay image made in photoshop)
ironman.avs (the final script used to encode in virtualdub)
exercise.zip
1) install avisynth and vsfilter (make sure there is a vsfilter.dll in your avisynth plugins folder)
2) take a screenshot of your subs & movie, to get the subtitle spproximate position ("1.jpg" in this example)
3) open that screenshot in an image editor (e.g. photoshop) and make the semi-transparent overlay. Change the position, color, shape (you don't have to use rectangle, you can use custom shape) and transparency level to your tastes, and save a .png with transparency ("1.png" in this example) as the same size of the video dimension. Basically, you create a new layer (with the bar) on top of the imported jpg layer, and delete the old layer underneath (the jpg image). If you don't know how to do this, use Google search.
4) write your .avs script. Just write it in notepad, and change the extension from .txt to .avs. Note you have to change the filenames and paths to match whatever video/picture assets you are using
a1=AVISource("ironman.avi")
a2=ImageReader("1.png",pixel_type="RGB32")
Overlay(a1,a2,mask=a2.ShowAlpha())
TextSub("ironman.srt")
5) open the .avs in vdub and encode. The subbing is done by the TextSub() function in the script, so you don't need to use the other method using vdub plugin
The problem with this method is that the bar persists even when there are no subs (nobody speaking), but the alternative is to do it manually for each line, which is very tedious. If you wanted to put the subs underneath the bar, just switch the order of the Overlay() and TextSub() lines. You can change the layer transfer modes in the Overlay() function (e.g. you might try lighten, or darken). Read the avisynth documentation for more details
Cheers
 Quote
QuoteSimilar Threads
-
adding permanent subs to mp4
By xtwist3dx in forum Newbie / General discussionsReplies: 15Last Post: 18th Mar 2014, 19:28 -
Fix overlap of opaque boxes with VobSub (semi-transparent)
By Pie in forum SubtitleReplies: 1Last Post: 22nd Apr 2012, 09:32 -
subs look transparent (sub/idx)
By X_Splinter in forum SubtitleReplies: 2Last Post: 22nd Dec 2010, 10:26 -
FFDShow semi-transparent opaque box
By Digiface in forum SubtitleReplies: 0Last Post: 1st Jan 2008, 13:04 -
Creating a white and "little transparent" box in the DVD menu
By ihmcjacky in forum Authoring (DVD)Replies: 4Last Post: 30th Dec 2007, 21:11