


The Ultimate guide
This step-by-step guide will make you capable of creating the best quality PAL/NTSC SVCD-s from a 25 or 23.976 fps divx/xvid ( or any other codec) source.
This guide doesn't deal with NTSC film (29.97fps)=>PAL, NTSC
Anyone interested contact me, or red more about 3:2 pulldown or telecine
Please note and forgive that The softwares I use are in my language so if you seem to have different writing on a button than note that I use hungarian programs and subs. I think the buttons are all the same place in every language
If you feel like xperimenting than this is the guide for you. Everything is done manually, and you can also use it for VCD/XSVCD/XVCD with a few modifications
1, Tools you need
Didn't link them, you can find the link for them under tools on the left
http://www.vcdhelp.com/tools
Operating system: win2k, winxp, ( winme is not suitable for adding subs but good for anything else)
Virtualdub 1.4.9
Cinema craft encoder SP 2.50.**.**
Avi2mpeg ( bbmpeg ) 1.24
Vcd easy 1.1.4
Beesweet ( gui for a set of useful tools )
VCDaesy's own svcd bitrate calculator http://www.vcdhelp.com/calc.htm
Optional:Headac3he v 0.23
Subtitle studio v2.0
ACDsee powerpack or some photo editing sw.
You may also use different version of the above mentioned tools, I just listed the ones I use, and with these, you'll succed for sure.
Step 1,
What is your source?
Install virtualdub
Run the auxsetup.exe ( install handler )
optional:
download the textsub filter and copy the ddl's into the
plugins dir
Open your video in virtualdub
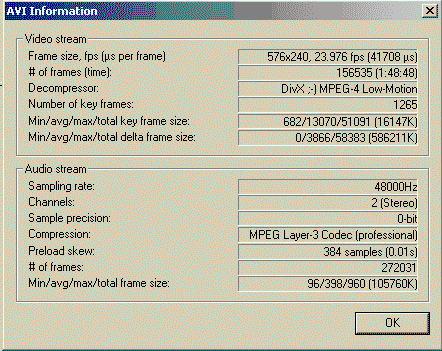
Under file file information youll see sg. like this:
Video:
Framesize: x:Y ( lenght:height ) aspect ratio= x/y
Fps: frames per second : read more under standards here in vcdhelp.com
decompressor: video codec used for compressing the pictures in a movie to .avi file
keyframes: every 100-300 frame should be one. Much=> big size, few=>impossible to forward ( or play at all) if it's not like that => get another source
Audio:
Sampling rate 44.1 or 48 kHz ( standards )
Channels: selfexplainitory
compression: in my case mpeg layer 3
If: " uknown tag id 2000" than you have ac3 sound. more later
Make sure you have every ( the ones often used! ) codec installed.
If you encounter any problems in the above than you have bad or missing codecs follow Kingjohns guide to codecs under
http://www.vcdhelp.com/forum/viewtopic.php?t=135217
It might not handle every issue esp xvid. but it's still the best out there.
Step 2,
Options
Subs: in this guide I'll explain how to put permanent subs under SVCD
More from subs Under => Step 5
AC3 sound source
This is a multichannel sound used in movie theatres and DVD movies.
Not copmatible with SVCD standards howewer there are people trying...( forum)
Open avi in virtualdub ( vdub later )
Audio direct stream copy
File save wav
save file as moviesound.ac3.wav
Rename when finished to moviesound.ac3
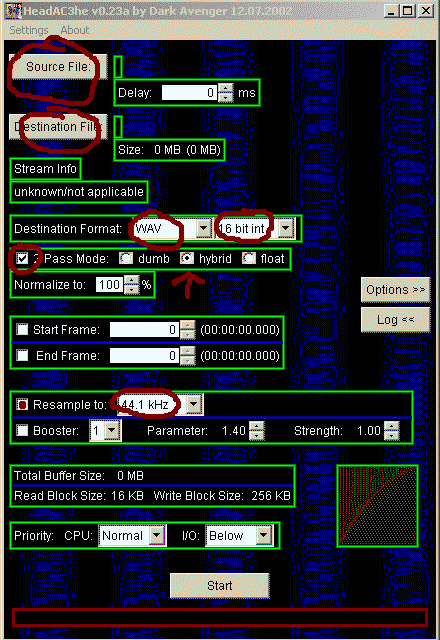
Open file in headac3he ( source file )
destination format wav 16 bit
2 pass hybrid mode
resample to 44.1 kHz
What I didn't mention doesn't need to be touched
go to end of step2
"improper vbr sound......." ( Vdub prompts this )
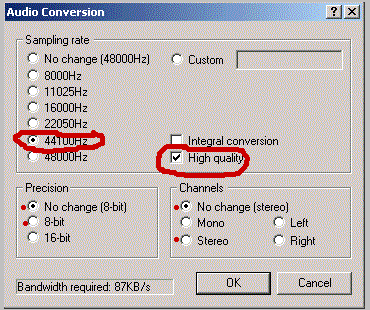
sound: full process mode
compression: none ( PCM )
check high quality as well
In some cases this causes problems, so U might skip high quality
save wav as moviesound.wav
After saving you wav get it back into virtualdub
audio/ wav audio, open the file you just saved
Step 3,
Check wheter your standalone DVD player accepts NTSC discs
if so then skip this step
In not, or you want to make standard discs then follow this guide
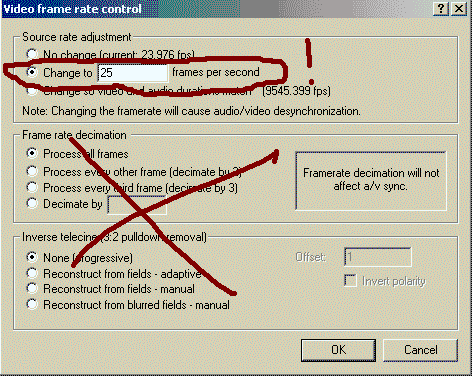
PAL video is 25 frames per sec. If your video is 25 fps then skip this step
if not then....
under video in vdub do this
audio: no sound
video: direct stream copy
file/save avi
save as movie25.avi
for the audio:
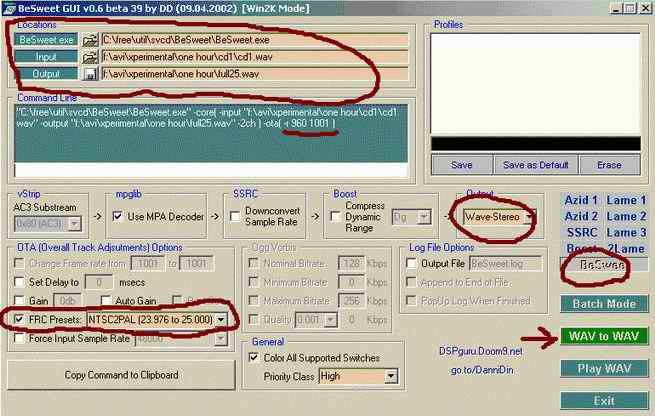
open the .wav audio ( extracted beforhand as mentioned in step 2) in the beesweet GUI
There's a setting for both US/JP NTSC, but you can also enter manually the OTA settings for bogus framerates
save the "25 fps " wav as moviesound.wav
now open the movie25.avi in vdub under audio select wav audio and add the moviesound25.wav
Now you have yourself a fully PAL avi
A video converted this way will have some frames inserted to have a 25 fps speed. 23.976=>25 fps conversion will not result in jerky high motion scenes especially when vdub+cce frameserving is involved.
However certain movies might have a special way of encoding resulting in jerky scenes. 29.97=> 25 fps conversions can be done this way, but the quality of the movie will gradually decrease, so I dont recommend this.
If you are interested more in this topic then read about telecining and pulldown. I will not try to xplain theese here.
Step 4,
Aspect ratio:
I 'll not try to judge the different methods, instead I'll write down my method
It's best for watching movies on a 4:3 TV set. ( like most of the sets at home )
your movie can be 1,85:1, 16:9, 4:3........ ( divide the x:y as in step 1 )
PAL SVCD resolution is 480*576 pixels which is expanded to 4:3 when viewing on a DVD player
You have a fully PAL avi in vdub right now.
Set the video/ full process mode in vdub
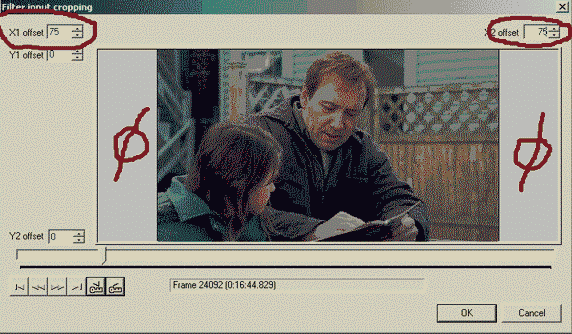
Under video/filters/add add a nulltransform filter, select "cropping"
This filter cuts some part off from the picture. By setting the X offset (see picture) adjust the picture to a 16:9 ( x:y ) format.
xample:
source: 576*240 (x:y). For 16:9 cutting do some maths: 240*16/9=427, (576-427)/2=75
So by cutting 75-75 by both left right edges you'll get a 427*240 (16:9) picture.
As you will see you wont miss the action, instead you'll have a movie and not some black bars with something happening inside them.
A way of skipping this all is to buy a 16:9 TV set. Sure....
Step 4A,
Letterboxing
translation: Addig the black borders ( top and bottom )
It comes handy when addig the subs but also necessary without adding subs.
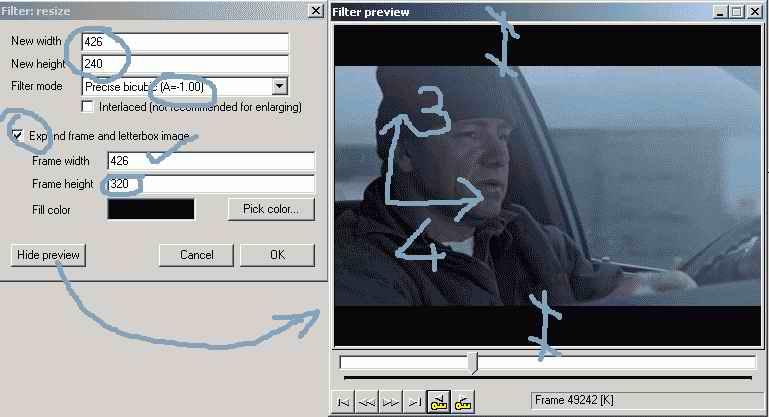
In Vdub under video/filters add filter resize
Do the maths: in my expamle
(426/4)*3=319,5=320 for the new height
In the upper fields ( resize ) just enter the dimensions you got after cropping
Fill color should be black
Step 5,
Adding subs ( you may skip this )
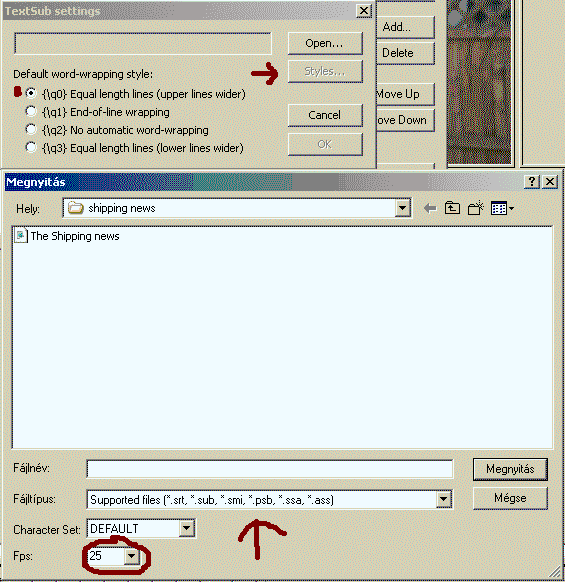
In vdub under video/filters/add add the textsub filter
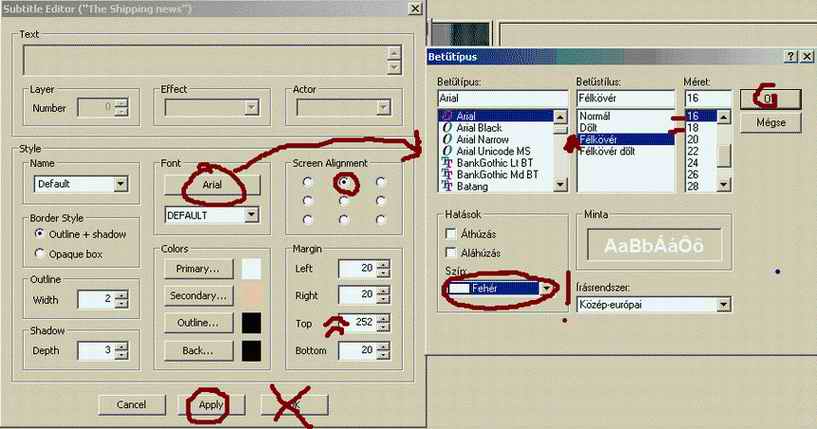
under styles do the following:
So, adjust the lines to the top, so they stay in the lower letterbox field.
Play with the top margin number until the text is right under the picture.
Use 16-18 White ( yellow) wide arial chars ( 16 is enough ).
Press apply.
Mind that by speeding up the NTSC format film to PAL the sub will desyncronize.
With subtitle studio you can correct this.
open the sub file in substudio
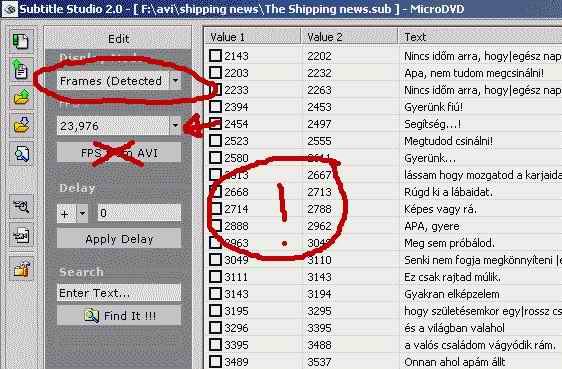
It will display frames.
1, Adjust the fps to the original avi's fps.
2, Switch to time display
3, Adjust the FPS to 25 ( PAL )
4, Switch back to frame mode.
5, Save
This trick works most of the time. But you can use any other sub tools to do this job.
Remember always to check the video/sub syncronisation in virtualdub!!!
This can't be corrected later on!
Step 6,
Frameserving
In vdub add another resize filter resize the letterboxed avi to 480*576 with the precise bicubic mode (A=1.00)
If you are making an NTSC disc ( you skipped step 3) than convert your movie to 480*480 instead.
Uncheck letterboxing if checked.
Cutting the movie in half for better quality
Around 50-70 mins of video will fit on one disc. If your movie is bigger then cut it in half.
with button "3" set the start of the first half ( third ) of the film
with buttons '1' and '2' select the end of the first disc
If you've seen the movie than mind that this cut should be in a proper place!
With button "4" set the end of the first half
Write down the end frame on a piece of paper
When doing the second part do the same as above, but with the second part
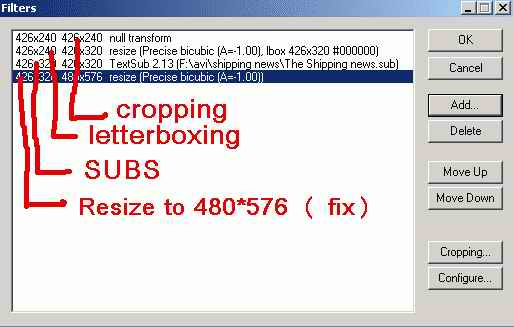
Last check that everything is in order
If you've done everything right in the vdub filter window you should get something like this. Its important that the filters are in this order.
Under file/start frame server
frameserver setup: enter something.avi then start
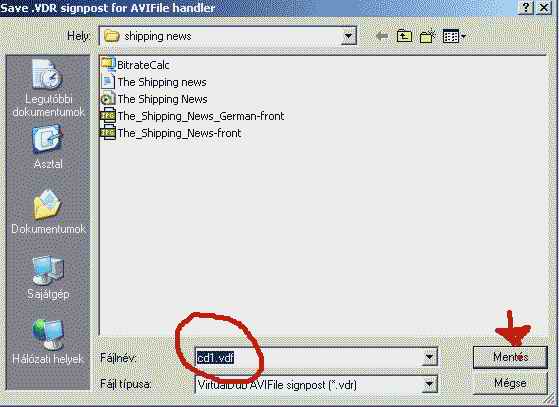
Save a file forxp: cd1. vdf ( !! .vdf !! )
Start Cinema craft encoder ( later cce )
right click in the main window "add"
Go to the dir where cd1.vdf is, select all files, then click on cd1.vdf
right click on the file and select edit
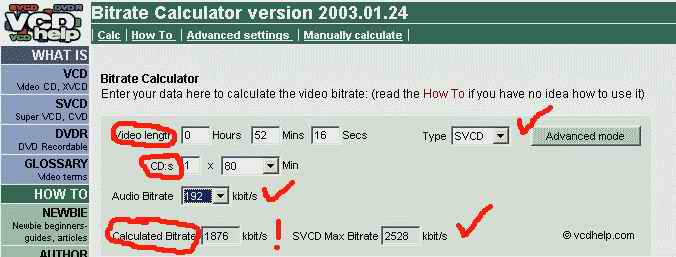
Open the official VCDhelp. com bitrate calculator (
Enter the length of the first cd , the used disc type ( Use '80 ) and set the audio to 192 kbps
Enter the calculated max, and avg rate in the edit windows "2" field
Min rate should be sg. between 800 and 1200 ( I use 800 )
Be sure to keep at least 300 kbps between max and avg
Max rate is 2528 kbps with 1 channel 192 kbps audio ( that's fine )
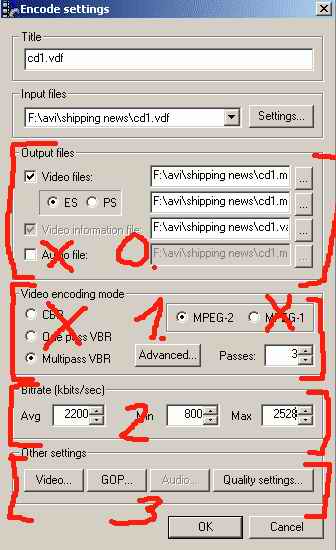
In section "0" you can adjust file settings
If you dont have much space then the name of the first two files should be the same.
Dont check audio, it will be done later
In section " 1" set multipass vbr, Mpeg2, You can choose 1-2-3-4-5 anything above 5 is a waste of time. 3 is the best for the time it takes. ! This will take the longest to finish! 3 pass approx 4 hours on a 2k athlon! so .........
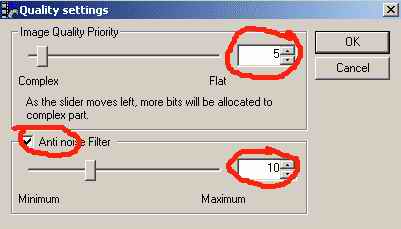
In section "3" under video and quality
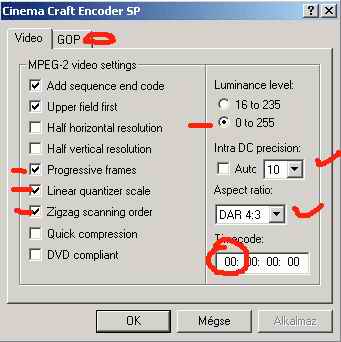
Check progressive, linear, zigzag, Luma level 0-255 (!), aspect ratio 4:3, timecode 000000000. Dont touch GOP unless you know what it is.
Under quality select the motion detection to around 5-15. You can also add some noise reduction.
Hit OK then encode
Sit back and relax a few hours later you'll have something :B
Step 7,
When CCe has finished it 'll produce a .vaf ( delete ), and an mpv (!)
Stop the vdub frameserver.
In vdub under File/save wav save the first parts wav (cd1.wav)
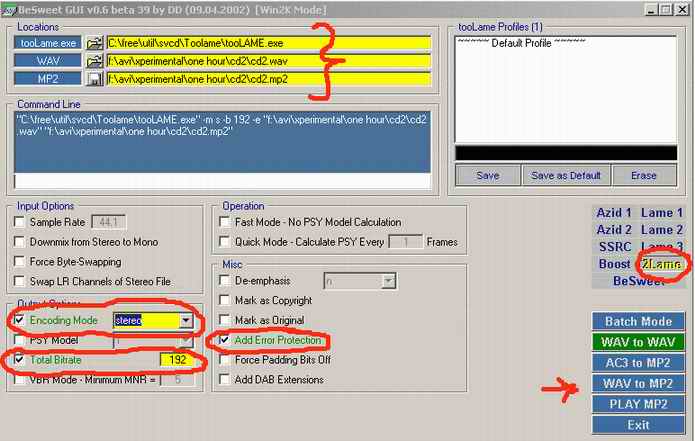
open Beesweet, select the 2lame codec
adjust the GUI as seen on the picture: enc mode: stereo, bitrate 192 kbps, add error
prot.
Set the input and output files.
If somehow your sample rate isn't 44.1 kHz than youll have to convert that also
push the wav to mp2 button and wait a few minutes
Now open avi2mpeg
Hit start encoding, hit seetings
Under input/output files add the .Mpv file ( VS ) and the .mp2 file ( AS )
If you have 2 audios than you can add it here. ( mind that you calculated the bitrate of the SVCD that it has only 1 audio!!!! So it wont fit on a cd this way!)
You need to click on the advanced tab in the bitrate calculator to make a second audio!
this is I think the default ( good )
You will end up with an mpeg file. If you aren't into design too much than you can burn this mpeg with nero SVCD but I think you should keep going ......
Step 8,
Start VCDeasy
Download the cover of the movie your working on from
www.cdcovers.cc or www.imdb.com
There are good guides for VCDeasy on this site, I'll write down my version to complete the guide
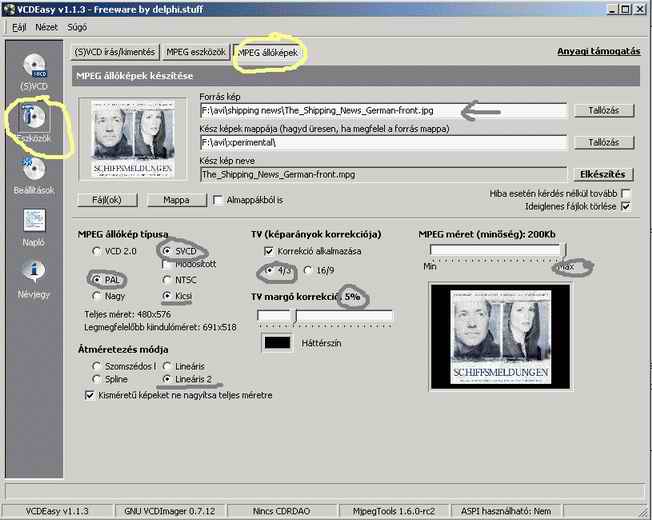
Convert the downloaded .jpg files to .mpeg with the VCDeasy/ ttols/mpeg stills tool
For my set of tv/dvd 5% correction is needed for small Pal images.
Try out each setting, its pretty selfexplainitory
Mind the best input file size/resolution!
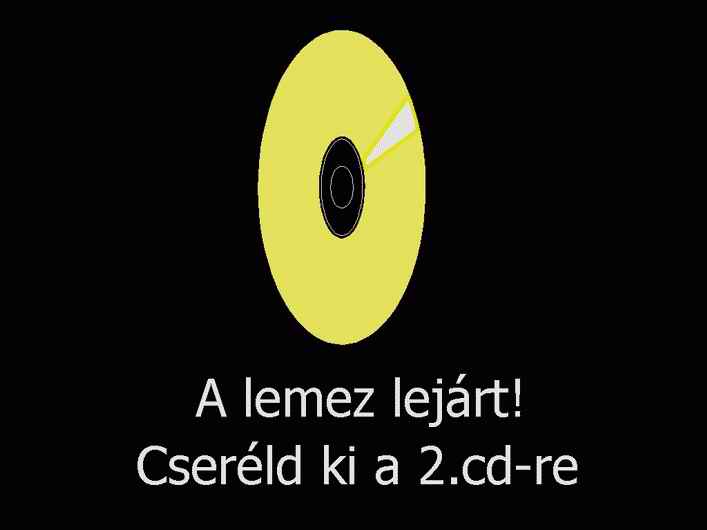
Make some kind of change disc picture in for example paint
Here's mine:
Do the conversion for this also
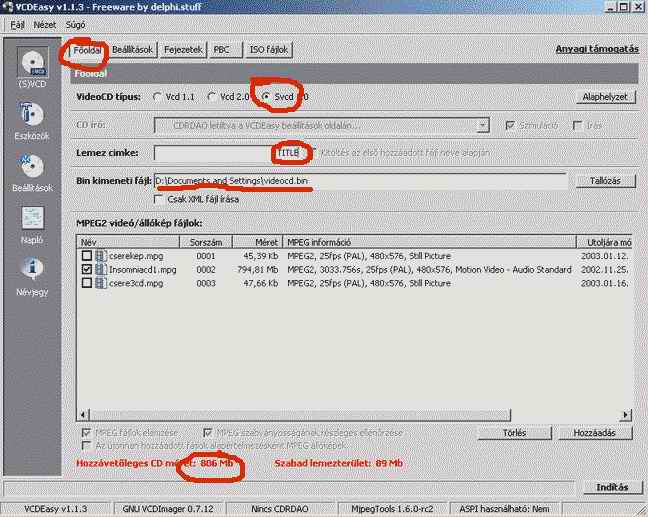
In VCDeasy's main window add the movie.mpg and the created pictures.mpg files
Mind the order : cover.mpeg, movie.mpg, change disc. mpeg!
Enter the title of the movie and the output file path, also check svcd
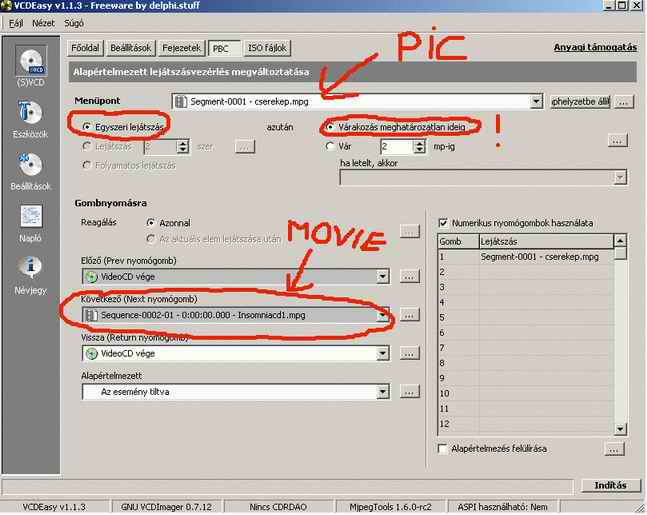
Under settings mark the two options in PBC ( this is a common source for errors!!)
In older versions there is only one option under PBC!
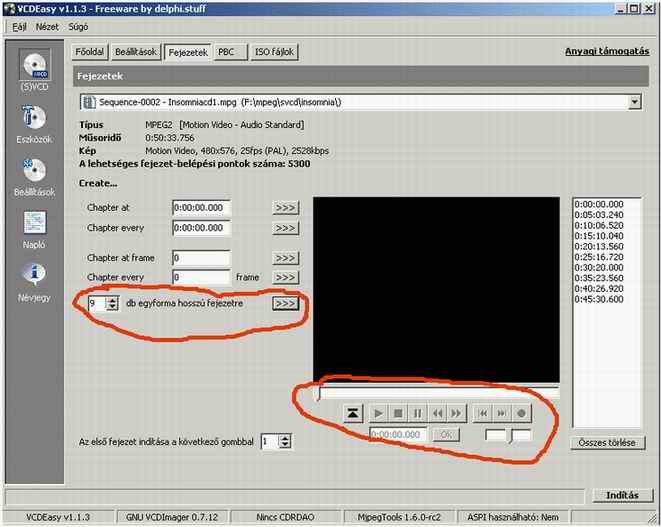
On the third page set the chapters
I usually add 9 automaticly generated chapters
You can also manually add chapters of your desire or at key momonts of the movie. Play a bit.
The fourth is PBC
For the first and the last pictures do the same
Play once then wait infinite
For the "next" button the movie should start
Hit start
A few minutes later you'll have a Cue/Bin to burn. Hopefully It will be the right size to fit on a '80 CD ( note that 808 M of SVCD will fit on a 700 M disc)
Before burning you should check that everything is in order.
With Daemon tools ( phantom cd drive ) mount your cue/bin image file.
Open the virtual disc in forxp windvd . The movie should start with the cover , the picture is paused untik you push the next button. When the first cd is over a change disc still will pop in and pause until you eject the disc.
Hopefully this covers everything. Do the same procedures with the further discs also.
If you feel that something is messed up or needs more xplanation than post your messages freely.
Try StreamFab Downloader and download from Netflix, Amazon, Youtube! Or Try DVDFab and copy Blu-rays! or rip iTunes movies!
+ Reply to Thread
Results 1 to 30 of 39
Thread
-
-
It's a great job. I have some points.
I think you could reduce the number of resizes in VDub. You can reduce with one resize and use cropping of that filter. I didn't understant why you made a resize to 320 x 240 and another to 480 x 576. I think it will decrease the overall speed and degrade the quality. The real resolution of your video will be 320 x 240, despite you resize to 480 x 576. The quality was lost when reducing to 320 x 240 and you cannot recover it by enlarging to 480 x 576.
Congratulations for your job and your idea of sharing it with us. -
Thanx for your grats
Sorry the picture was wrong, I do only one resize and that's the last. the first resize is only for letterboxing!
Standard pal svcd resolution is 480*576. By adding the last resize filter the produced mpeg will bare this resolution, and the picture on your television wont be anamorphic, blocky or someway bad cause tough the precise bicubic A=1 filter takes the most out of your machine, it will produce the highest qaulity resized image.
Exercise a bit in photoshop to try different resize methods!
Sometimes I also sharpen the image a bit cause enlarging is done by interpolation which causes the picture to be a bit smudgy ( unsharp )
Of course you can add the first resize ( letterbox ) and the crop at once, but this way, I think, its easyer to understand what you're doing. -
Good Guide, Never included any subs in my guide, too much work for some people. However I do have one complaint and that is the recommendation of using the Nimo codec pack.
Yes we have all recommended Nimo in the past, but these days most people would stay away from it as it can cause so many problems, especially when installing the codecs separately works just as well if not better.
Without Subs
 KingJohns Guide AVI 23.976fps to 25fps
-
Yes I totally agree with you KingJohn about the Nimo pack
It screwed up my system, and it took me hours to fix it ( with the help of your guide to codecs thanxx for that
I only added that because this guide is ment for beginners and I think the nimo pack is/was the best codecpack around for starting up.
I would be glad if you could recommend sg. to replace that line in my guide with a pack that might be uptodate and working.
And yeah subs are great deal of help to the people living in a non english speaking country, or for those who are studying the languge.
Thanx for the grats -
Perhaps just say "make sure you have the correct codec's"
I realize its not possible to include all these things in a guide, the guide is very good, there is no question about that.
But it can be looked upon as being the cause of the persons problem, now that they installed Nimo Play it safe.... 
With the release of Xvid, its been a nightmare sorting out problems with codecs, so I now only recommend the separate codecs and those that have been used by millions and are proven to be good. Heck you could even quote my codec guide
There has been a few comments about subs in my guide, so now I will pass them over here
Oh and What size screen are you using, default is 800 X 600 try to fit those images in, crop out what you don't need... All the scrolling
-
Edited again according to KingJohn's advice.
Please dont pass the sub topic totally on this guide cause I'd gladly see some CVD sub on SVCD guide out there. That's much more "DVD style".
I'll try to correct the picture problem ( next week ), but I'm running on 1600*1200 and the whole thing fits for me fine.
Thanks -
A great guide. Takes you from a-z instead of linking to other guides (that link to other guides).
But I don't have much use for it, since my TV is 16:9 and it understands NTSC.
BUT, it seems you have solved the problem of adding black borders to a movie so you can place the subs in the "unused" screen-space.
Could you perhaps make a mini-guide about that small subject ? With a few more examples, and with a 16:9 movie and a 2.35:1 movie ? "Do the math" and 1 example is not enuff for a bonehead like me.
thx
/jim -
There is no need to use CCE 2.50 anymore. As of version 2.66 CCE now accepts all AVIsynth and Virtualdub project files.
ASHY -
Hi Mategal,
Nice job, indeed but I found some things too complicated.
For example for the same task I use only 2 filters in vdub.
Not 4, not 3, just 2. The first one is resize, and the second one is TextSub.
In my method, there is no need to make corrections in the subtitles file.
(i.e. one program less)
What I do is serving from vdub with the original framerate and encode with tmpgenc with the new framerate and "no framerate conversion" checked.
I don't know about the way you describe but it sounds very strange to me that vdub inserts frames.
The way I use - no frames are inserted - just the same frames are played faster or slower (depending on which direction you convert). So it simply cannot be jerky. I can even convert a movie with 10fps from my still camera to 29.97 and it will not be jerky ! It will run just 3 times faster)
Best wishes,
UP -
ok, soonOriginally Posted by jimA
-
I was trying to explain how to convert sg. to a standard SVCD disc. This standard requires 25 fps.Originally Posted by Umen Pich
However I mentioned, that if you dont want PAL you can skip framreate conversions.
I'd be interested to hear how you sqeeze all those filters into 2?
I can imagine 4, maybe 3 but 2?????
Mind that in cce you dont have templates like in tmpeg. So there is no "fairy" who converts your picture to 480*576 at the end. You have to do it manually here.
If your method suit your needs, than I think you'd stick to that.
If you have time maybe you could share it with others on vcdhelp?! -
I know that it requires 25fpsOriginally Posted by mategal I have a PAL camera.
What I said is that you don't need to convert the subtitles. For example - subtitles are for 23.976. Then I open them in Vdub, choosing 23.976 for in textsub, and without changing the framerate of the video. Then frameserve. So both the video and the subtitles are at 23.976 and what is served will be sinchronized. Then in TMPGENC I choose 25fps for the mpeg and in settings - "no frame rate conversion". The name of this checkbox is a little bit confusing - actually it means - change the framerate by using the same frames but for different time. In this case the conversion is smooth, you convert the audio separately, than multiplex and everything is OK. If that box is not checked, it will convert the framerate but the overall time of the movie will remain unchanged. In this case the video is a little bit jerky, because of putting or dropping some frames.
scroll downOriginally Posted by mategal
No need of fairiesOriginally Posted by mategal
vdub will resize it.
I don't have CCE, because I am not a millionaire, but the method will work for any mpg encoder which can read the frameserved file from vdub.
Here it comes (the simple method of Umen Pich)
1) Open the movie in vdub
2) look at the information - what is the pixel size - in my case 624x272
3) start the program "roco" (http://poco.topcities.com/download/poco.zip)
4) enter 624x272 in roco. For the output choose PAL 480x576 (since your guide is about PAL). Roco gives 480x384 as a result.
5) goto vdub video-->filters-->add-->resize-->480x334
/* note - I strongly believe that using multiples of 16 will improve the quality of the final mpeg. So if there is a close multiple of 16, such that the aspect ratio will not be changed significantly, I always put that value. In our example 336 is the closest to 334.
So, better put 480x336 in the filter! */
6) check "expand frame and letterbox image"
7) put 480x576 there and press "OK"
8) add-->TextSub
9) the remaining is easy - choose the subtitles, their position in the black stripe, fontsize and so on... What is important -- if you use a normal font, your text will be too expanded in the final 4:3 screen of your TV.
To avoid this, use a Double Condensed fonts. Any double condensed font will look as its normal version in 4:3.
If you cannot find such a font, please let me know, I will upload one somewhere. BTW, the popular Arial Narrow gives pretty good results.Best wishes,
UP -
Looks lke a nice guide, only .... pictures doesn't show.
Take care -
I'm a MEGA Super Moderator

- Aug 2000
- Sweden


mategal: where are the rest of the images? and I added .png (the fileexentions) to the filename or else it wont work. Click on edit on your post to upload more images.
-
I'm a MEGA Super Moderator
- Aug 2000
- Sweden
-
Okey all pictures are there...I just thought that all were png so I added .png to all but some were jpg. All should work now.
-
I'm a MEGA Super Moderator
- Aug 2000
- Sweden
-
Remember that lot of users are still using 800x600 resolution....so it is best to keep the images smaller than 800 pixels or else they have scroll to be able read.
-
Sorry I was on a skiing trip
For Baldrick:
I'll have time this week to correct the images, but I deleted them so I have to make new ones. I think they'll all be jpg.
Sorry for the delays
For Umen Pich
This is a much more detailed than the last you one of your replies.
thanx for that. I agree what you wrote about subs but for me it doesn't work with .srt and multi .sub. The conversion is failsafe for all types and it doesn't really take much time.
What you wrote about tmpeg is totally right. That's the correct way of doing things in tmpeg.
This guide is for cce, and cce doesn't deal with framerate. You have to do that in vdub.
I dont know this rocco sw. but I'll take a look.
I didn't have double condensed fonts, this way if I use your method with normal fonts I'll get very wide chars on the tv. ( as you wrote )
I've read that the x and y values should be multiples of 4,16 ( I think its only for pentiums ????) anyway I tried it but it didn't make a dramatic effect on the encoding speed
Anyway for my next movie I'll try your ideas ( with a stopwatch in my hand)
If I'm impessed maybe I 'll have another mayor correction!Anyone tired of his old DVD burner? Why put it into the trash? Contact me! :)))) -
Nice guide sir. I wish it had been there when I started
My only additional observation is:
Why not suggest an option to let BBMPEG do the splitting for you - you can let VDub frameserve the entire AVI and encode into a single .mpv, then specify the maximum size of 795MB (for 80Min CDRs) into BBMpeg. It creates several MPGs at around 800MB each.
The only drawback is the additional diskspace requirement. -
to Mr Grumpy
Besides the diskspace, you cant decide the egzact spot you want to cut your movie. This way, I think is a bit better.Anyone tired of his old DVD burner? Why put it into the trash? Contact me! :)))) -
Very true.
I haven't been too concerned with where I split the film - I prefer the 'easier' encode process (because I'm lazy)
I have found in the past that 'errors' in the bitrate calc have meant I needed to reencode the portion again to fit it onto a CD (instead of just losing some of the credits at the end) -
ok stupid question alert. Great guide I've just started using it to convert my .avi's to SVCD, but just one question. In step 3 of the guide BeSweet is used to convert the complete WAV file (created in Vdub step 2) from 23.976 > 25.000. later in the guide you talk about splitting the video into 2/3 parts and frameserving this (Video only) to CCE. Question is this - if you have your video split into 2 parts how do you merge this with the audio which has not been split ??
Thanks.
Lee.
-
I dont quite understand you, but a failsafe method is to A, extract, convert the audio, B, speed up the movie, C,put back audio in vdub and save the part you need as wav ( cut the sound )
You can also use any wave editing sw like goldwave but than mind that some calculation is involved ( some say you'll get better results )Anyone tired of his old DVD burner? Why put it into the trash? Contact me! :)))) -
Hi, orginally posted this problem in the newbie section. Came across this post so thought I would have a better chance to finding a solution here. My method is not the same as above but am hoping you can find where I have gone wrong.
Converted a NTSC avi to a PAL SVCD mpeg-2 with a VCD header trick to mpeg-1 SVCD. Playing through the DVD player I have audio but no picture. It does play on the computer! Have had no problems converting NTSC avi to NTSC SVCD with a VCD header trick to play through my DVD player. Hoping someone can help. My DVD player plays PAL60 and NTSC , VCD but no SVCD.
Source file was MPEG-1 480X352 23.976fps audio 48000hz 192kbps.
1 Virtualdub...extracted the audio converting to 41000Hz, full processing wav file.
...extracted video converting to 25fps.
2 Converted wav to 25fps using Beesweet.
3 Inserted new wav and avi back into Virtualdub.
4 Cut video in half. Extracted audio, 1st half. Added filter changing size of video to 480X576. Started frameserver.
5 Ran TMPGenc. Turned off wizard. Under video source selected the frameserver file.
Streamtype=ES
Under settings, video I changed the following
Streamtype to MPEG-2 video
Aspect ratio to 4:3 625 line (Pal)
Bitrate to 2530
video format to PAL
Motion Search to Highest Quality (very slow)
Under advanced, video, arranged method to 'no margin (keep aspect ratio)
Clicked START. Saved file as m2v.
6 Converted via Beesweet, Toolme, the audio file to a 25fps, 192 kbps, mp2 audio file.
7 Opened TMPGenc mpeg tools. Simple Multiplex. Choose the mp2 and m2v. Saved. Now should have a pal svcd.
8 Still in TMPGenc under Multiplex added the Pal SVCD and changed type from MPEG-2 to MPEG-1 (non standard) so my DVD player will play the SVCD.
9 Burnt with NERO.
What have I done wrong?????????
Other problems
1 when opening the SVCD PAL without the header trick under TMPGenc it states it is a MPEG-1 and CBR 1150 but I clicked save as MPEG-2 with 2530 bitrate. Confusing.
2 Also TMPGenc cannot opened the SVCD modified with the VCD header trick.
2 When in simple multiplex having created the SVCD I get an error message WARNING 2 s packets cause buffer underflow The mpeg file might cause error when played.
Both mpeg files do play on the computer.
Cheers. -
I dont think I can help you but a few suggetions:
1, If your player only supports vcd's than why mess with svcds? They wont give you so much bwetter quality esp if you are doing shit .avi to svcd.
From a good source you can get a reasonable quality vcd and it takes about the quarter the time.
2, Computers play everything, standalones don't. Try to experiment with a 5 minute clip. convert it with different techniques. burn them on one disc as and choose which one plays best ( or plays at all)
3, try authoring your discs with vcdeasy. I'm not sure what will it prompt for this bogus mpeg file, but try to author it as vcd. If it modifies the original scan offsets that it should play. I think one of your problems is the vbr encoding, try to avoid that in vcd ( it doesn't support it )
4, and last: get yourself a dvdburner)))))
Hope it helped you but next time please stick to the topic!Anyone tired of his old DVD burner? Why put it into the trash? Contact me! :)))) -
Adjusting audio speed like this will change the pitch of the sound. Try the new audio time scaling utility that preserves audio pitch. More info at http://forum.doom9.org/showthread.php?s=&threadid=49800.
Xesdeeni -
Thanxx fpr the tip.
I'am concerned with quality, but NTSC video=>PAL conversion only produse 4% of pitch change and that's almoast un-audible to an average ear, ( at least for mine it is)
However this conversion you mentioned prooved to be a bit faster.
Try to contact the beesweet team for a new button in their upcoming GUI!Anyone tired of his old DVD burner? Why put it into the trash? Contact me! :)))) -
I've been telling everyone that the pitch shift wouldn't be very noticable, but I just can't stand it myself. The professionals adjust the pitch when they go from 24fps film to PAL:
http://www.disctronics.co.uk/technology/video/video_film.htm
http://isb.ri.ccf.org/biomch-l/archives/biomch-l-1995-05/00087.html
so I decided we needed to be able to do so as well.
The real question is whether the quality is decent. Matt Flax (the original author) claims there are no artifacts. I'm not quite convinced. What do you think?
Xesdeeni -
Far too goddamn old now

- Jan 2003
- Soul sucking suburbia! But a different part since I last logged on.
-


Some of this method seems a little odd, for example cropping the picture horizontally to avoid black bars or something (just when i thought everyone strove for full-width letterboxed films) or using virtualdub to change the framerate rather than the mpeg encoder.... but the only REAL question I have over it all...
Why does it have to be WinXP or WinME, at the very worse 2000? I'm sitting here right now with a NTSC widescreen film, happily converting away to PAL 4:3, in 98.... and although i've never yet had to add subs to a film, there is *one* that could do with them added and i'm confident it wouldn't see me upgrading my OS - though my new 180gb disc might!
- puzzled of cymru-= She sez there's ants in the carpet, dirty little monsters! =-
Back after a long time away, mainly because I now need to start making up vidcapped DVDRs for work and I haven't a clue where to start any more! -
Far too goddamn old now
- Jan 2003
- Soul sucking suburbia! But a different part since I last logged on.
-
pitch adjustment..... well.... i'm perfectly ok with that old 4% tweak, i have sensitive ears as regards frequency range (got a full 20khz+ going on
) but not exactly 'perfect pitch'
however playing around with such things in the past, my ol' favourite sound utility CoolEdit seems to do a fine enough job, you can even adjust it for superfine quality or good-enough with speed.
After all it's a case of speeding it up, and that doesn't cause half as many artifacts or problems as slowing a sound down and keeping the same pitch, as many a techno DJ record will show.-= She sez there's ants in the carpet, dirty little monsters! =-
Back after a long time away, mainly because I now need to start making up vidcapped DVDRs for work and I haven't a clue where to start any more!


 Quote
QuoteSimilar Threads
-
Prolem with 23.976 FPS AVI file
By ho1 in forum Video ConversionReplies: 3Last Post: 22nd Oct 2009, 11:50 -
To synchronize 29,970 audio fps for 23.976 fps
By DruidCtba in forum Newbie / General discussionsReplies: 1Last Post: 27th Sep 2009, 12:01 -
Sync 29.970 FPS audio to 23.976 FPS video?
By LCO1971 in forum Newbie / General discussionsReplies: 3Last Post: 13th Sep 2008, 15:23 -
Difference between 23.976 fps and 23.98 fps ???
By wasimismail in forum Authoring (VCD/SVCD)Replies: 5Last Post: 27th May 2008, 00:42 -
Difference?? 23,976 pics/s or 29,976 fps
By twanbaten in forum Authoring (DVD)Replies: 1Last Post: 6th Nov 2007, 11:29