


This guide is for PAL 16:9 to NTSC 4:3 only! Not for NTSC 16:9 to PAL 4:3!!!
First you need to understand the "virtual" & real aspect ratio. PAL 16:9 = a virtual aspect ratio, NTSC 4:3 also.
Real aspect ratio is:
PAL 16:9 = 5:3
NTSC 4:3 = 3:2
5:3 is a little bit "wider" than 3:2. I'm going to cut the left and right parts between the blue and lime line.
Lime = NTSC 4:3
Blue = PAL 16:9
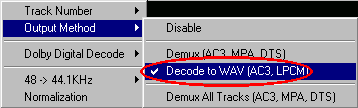
1. Open a PAL DVD 16:9 (*.vob) with DVD2AVI.
Set "Decode to WAV" in the audio submenu.
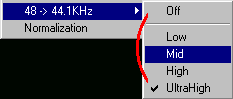
If you want to downconvert the audio to 44.1 Khz set "Ultrahigh" or just leave it off.
Save the project as *.d2v.
Now you're able to see if the source is 16:9. And yes, it is!
Wait untill the project is finished. If everything is alright your folder would be like this:
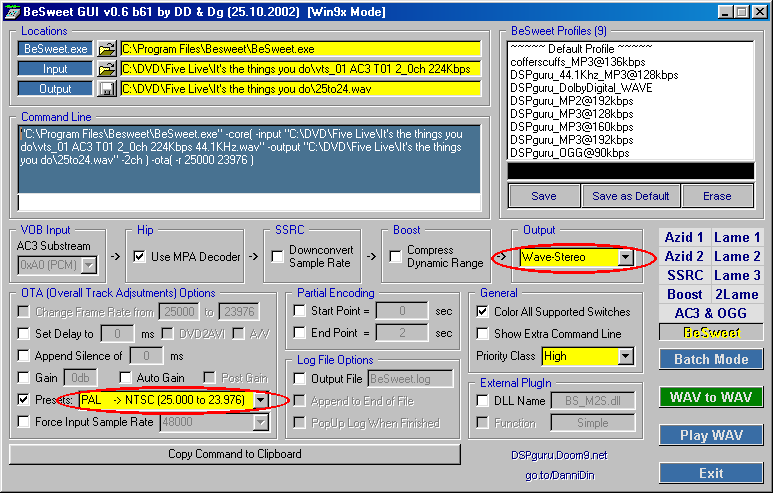
2. Framerate convert your audio with Besweet.
Be sure your output has a different filename then the input. Or you'll might get confused.
I recommand a "Wave-Stereo" output. You must be sure that the "presets" is set at: PAl -> NTSC (25.000 to 23.976).
To start conversion, click on "Wav to wav". The process will take some time.
3. Encode with TMPGEnc.
Open your *.d2v file under "video source" and open your audio converted by Besweet under "audio source". The output is your choice.
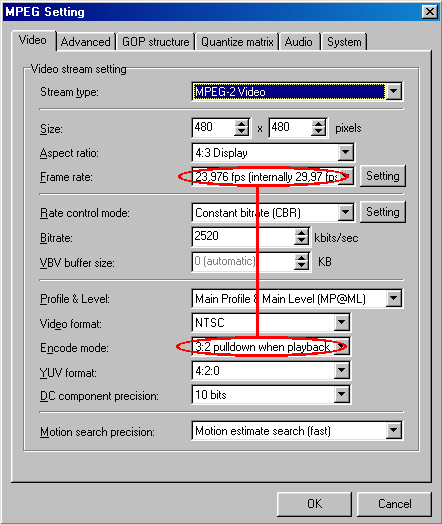
Under "settings" you must have this:
(You can also do this with CVD or DVD with CVD resolution you only have to change the resolution to 352x480)
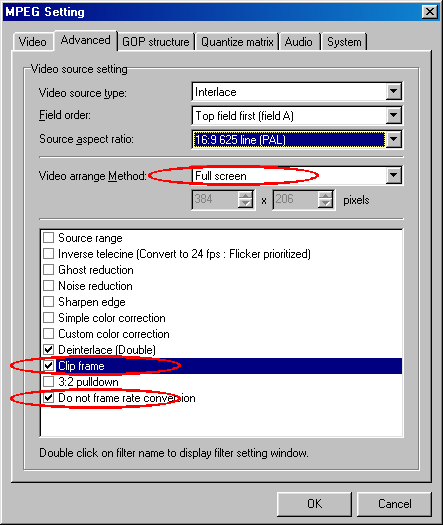
Under advanced you must select "Clip frame" & "Do not frame rate conversion". If your source is interlace you must deinterlace them. Because 3:2 puldown when playback only supports progressive.
"Clip frame"

Be sure 36 is set in both left & right. Now you're losing 10% of the image.
You can see the source is interlace... The jpg compression makes it hard to see!
Then hit the "OK" button.
"Deinterlace"
Be sure the filter is enabled! Use your preferred deinterlace method. Push the "OK" button. Push the "OK" button again in the settings window.
Click start to let TMPGEnc Encode. When encoding is done you have a SVCD NTSC 4:3 complaint file. Without any distorbed picture.
Try StreamFab Downloader and download from Netflix, Amazon, Youtube! Or Try DVDFab and copy Blu-rays! or rip iTunes movies!
+ Reply to Thread
Results 1 to 10 of 10
Thread
-
-
Why on earth would you deinterlace an interlaced source?!?!?!?
-
Because 3:2 pulldown only supports progressive frames... Or you'll get a very strange result!
-
TMPGEnc Plus 2.5 says the .d2v file is unsupported when I try to put it as video source? any ideas?
-
Use VirtualdubMOD. Click then on "auxsetup.exe". Install handler. Open you MPEG-2 Video with VirtualdubMOD. Do not touch the settings! But you can use a Deinterlace or resize filter. Then go to "File ---> Start frameserving". You must save the frameserve file as a *.vdr. Then open it with TMPGEnc. Everything should be alright.
-
Help....I can't get the framerate setting right. the 23.976fps (Internally 29.97 fps) I don't have that in the pull down and tried messing with the settings tab as well.
thanks
casba44@hotmail.com -
maybe I got ahead of myself....The only files after doing the first step... the only files I have are 2....mat AC3 T01 3_2ch 384Kbps 48KHz.wav 1,492,075kb and mat.d2v 571kb.
Was trying to convert Matrix pal to ntsc -
@casba: It's possible you have only the files outputted by DVD2AVI. Cause you might select another folder then the foldere where the vobs & ifos are stored. Add me to your msn: freezethemoment@hotmail.com.
@ Ericnord: Put "DVD2AVI.vfp" in the TMPGEnc folder! You can find it in the DVD2AVI folder. -
This is a good guide and extra useful for those converting from PAL to NTSC for the first time but it's not really necessary to clip the original source frame as S-VCD recording will automatically play back a 16x9 recording in 16x9, letterbox or 4:3 pan & scan according to the menu setting on a DVD player.
Before anyone asks yes I have done it, quite often. I've also converted 4:3 NTSC programmes to allow them to be played back on a 16x9 PAL TV without geometric distortion using TMPGEnc by adding blackbars to the left and right hand sides. The TMPGEnc setting for this is Centre (Custom Fit) 384x576 pixels.
In some cases I have had to convert from 60hz with 2:3 pulldown to 24fps non-interlace before demuxing, (do not frame rate convert) to 25fps (intelaced) then remuxing with the correct 25fps audio track. This avoids the unnecessary jerkyness when trying to convert from 60hz with 2:3 pulldown to 50hz. In some cases the finished S-VCD version was less jerky than the DVD original although I could only fit one TV episode per disc rather than four.
Most of the technical information which allowed me to achieve these results came from Chicken Man's web-site in Australia. -
There are only a few DVD-players that support 16:9 letterboxing on formats like SVCD/CVD & VCD! Fullscreen is also nice to have without distorbtionOriginally Posted by ntscuser


 Quote
Quote
60gb maxtor 7200rpm
512 PC2700
Geforce4MX 440
Philips DVD 724
TDK 420n
DFI Lan Party NFII Ultra (This thing ROCKS!!!)
On board Firewire")

Similar Threads
-
Pls help! Best way to convert NTSC VHS (captured using PAL VCR) to NTSC DVD
By rairjordan in forum CapturingReplies: 33Last Post: 28th Nov 2013, 11:33 -
Convert NTSC DVD and rewrite to PAL
By murihikukid in forum Authoring (DVD)Replies: 3Last Post: 12th Sep 2011, 07:48 -
convert pal dvd to ntsc, but different
By atomicrabbit in forum EditingReplies: 5Last Post: 12th Jan 2008, 03:48 -
What programs convert a DVD from/to PAL/NTSC?
By Des in forum Video ConversionReplies: 10Last Post: 14th Nov 2007, 10:00 -
How to convert PAL DVD to NTSC?
By tomterrifk in forum Newbie / General discussionsReplies: 3Last Post: 18th Jul 2007, 15:35