


Transcoding a DVD-9 to DVD-5 using DVDShrink
Creation Date: 5/12/2004
Complete Date: 6/12/2004
I know that there are tons of guides out there that show you how to successfully using DVDShrink in backing up your DVD-9 to DVD-5 but I have yet to find a guide out there that shows you how to remove unwanted features but still keep using their favourite transcoding software, maybe I have actually…cough...cough. Anyway, well, since I finished high school a few weeks ago and since I have plenty of free time, I decided to publish a guide for those who don’t want to use other programs such as CloneDVD, but rather still stick to DVDShrink. This is my first time in creating a guide so please be easy on me. . And please before you say something like “You spelt favorite wrong”, remember that I’m from Australia and we spell it with the extra hint of “u”. lol……
Tools you will need: All tools used will be freeware, isn’t that nice
DVD Decrypter 3.5.1.0
VobBlanker 1.5.1.0
DVD Shrink 3.2.0.15
I will use the DVD “Bad Company” to show you how to do the process. Remember to respect privacy laws, and that you should only copy DVD’s that you “own”.
Part 1: Ripping the DVD to your hard drive.
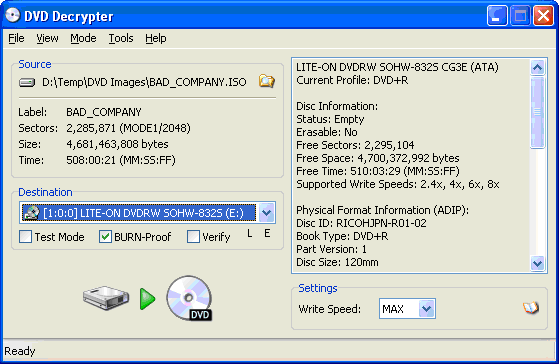
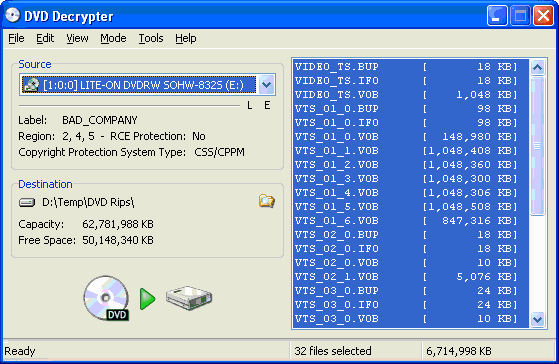
Once you have the DVD in your drive, go to DVD Decrypter. Click on “Mode” and make sure “File” is selected. Also take note where the DVD files will be decrypted to, in my case, it will be copied to D:\Temp\DVD Rips\. Your screen should look very similar to the one shown here. Click the “big” button to start decrypting the files.
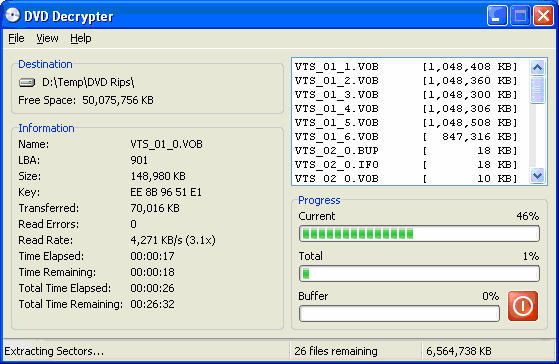
Depending on the speed it may take as quick as 25 minutes to as long as 50 minutes. The screen should look very similar to the one shown below.
Once the files have been copied to your computer, you will receive a message confirming that the process is complete, press OK and exit the program. Also take out the disc.
Part II: Removing Unwanted Features.
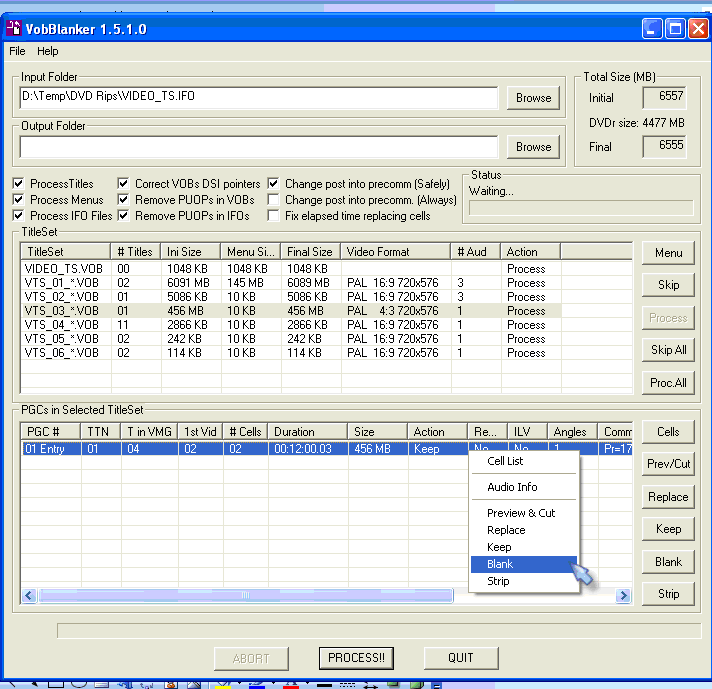
Now for the fun part. Go to VobBlanker and just in case you don’t know, VobBlanker can be used to “remove” features on the DVD you do not want by replacing the file with a blank screen that lasts for about 2 seconds but remember there will still be an “index” to the file but of course a blank screen will replace that specific file.
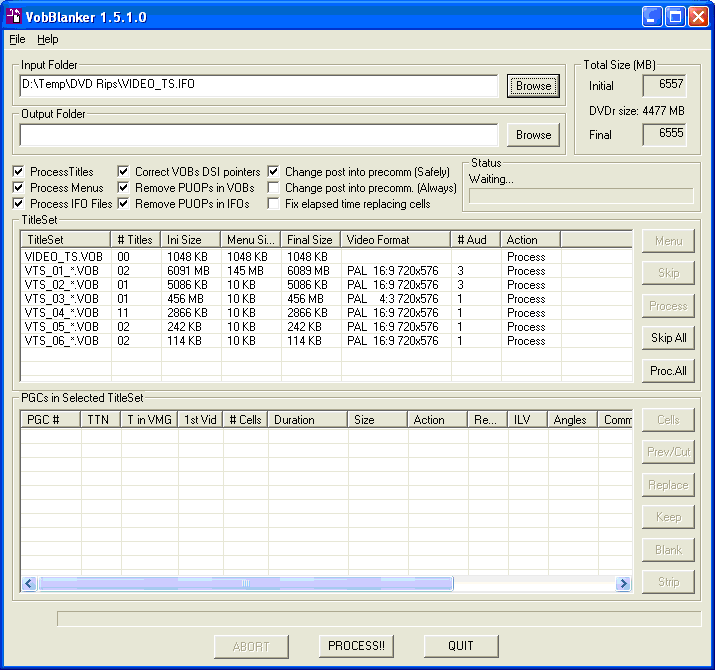
Now, let’s stop talking and get onto the program. In VobBlanker, click browse (next to where “Input Folder” is). Locate the location to where the DVD files were copied. One file should only appear which should be called “VIDEO_TS”, click on it. Now, the screen should look similar to the one shown below
Now, this is a matter of your own decision to as which files you want to remove. Remember do not blank the file with the largest file size as this most likely will be the movie.
To know what file is what, click on one of the files located in the TitleSet and a list of files will be shown on the bottom, as shown below.
Well the files that appear in the PGC# Column can be previewed easily, just right click on it and click “Preview and Cut”. A new window will appear and there will be a slider on the bottom, you can slide this to any position to preview the file. Once you are done, just exit that screen. Also I forgot to mention, also another window with “Preview and Cut” will appear, just click OK after you have closed the other window. If you are satisfied that this is the file you want to blank, right click on it and click blank as shown in the screen above.
There are files that you can blank such as the warning screens, or those enchanting Dolby Digital intros, but I like to keep them…don’t know why but just do.
When you have finished blanking the files, click browse, next to the “OutPut Folder” and choose a location to where you want the files to be copied. It will basically copy the whole DVD again except replacing those features that you have wished to be blank with different vob files, about 300kb. Also, make sure you choose a location different to the original files you copied to your computer.
After choosing your location, click Process. After some time, the processing will be complete, exit the program.
Part III: Transcoding the DVD files
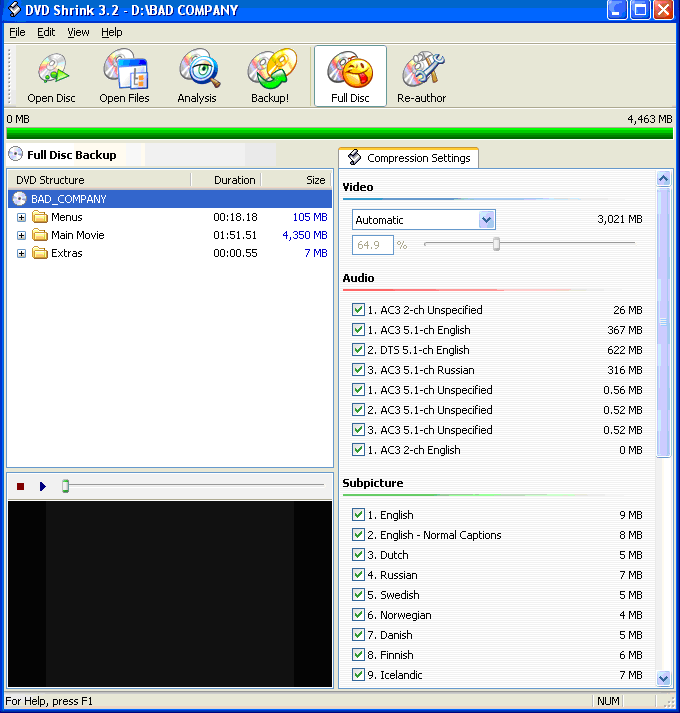
Now for the second last step, go to DVDShrink. Click on open files and locate the folder to as where you saved the files in VobBlanker. It should like similar to the screen shown.
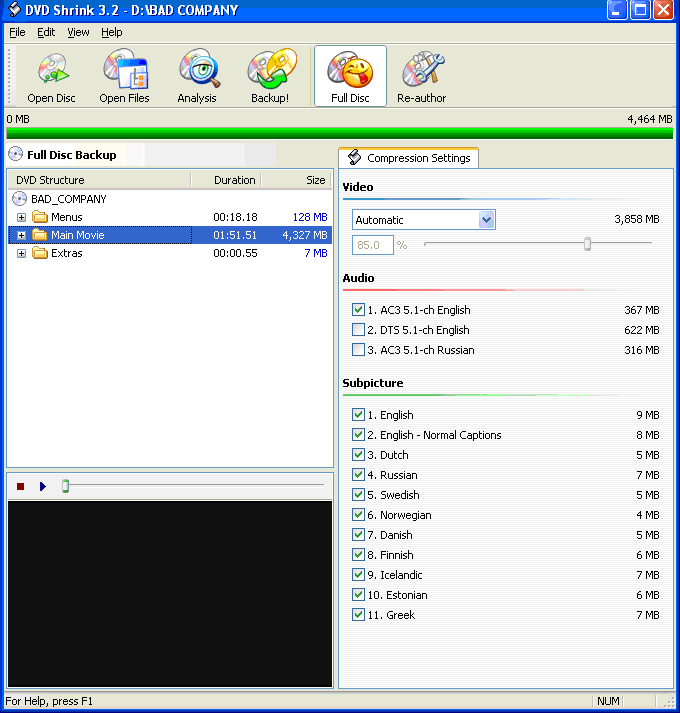
Now for the easy part. There are three folders as you can see. There is a total of 64.9% compression for this DVD, but I am not quite happy with the results yet. There is a solution, by removing unwanted audio. For each folder, excluding the menus, click on each folder and choose the audio that you do not want. In this example I decided to only keep the first audio track as you can see.
Now I am happy with the results. I have achieved the least compression I needed. Also you could have removed some of the subtitles but I decided to keep them all as they do not take up much space.
Now for the final part in DVDShrink. Click Backup. In the first tab, make sure in “Select backup target”, ISO Image File is selected; also choose the destination to save the file.
On the next tab, make sure “Region Free” is selected.
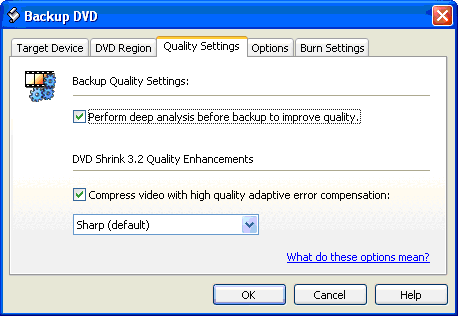
On the next tab “Quality Settings”, make sure “perform deep analysis….” is selected; this will be grayed out if there is no video compression. Below that you have the option for quality enhancements known as “Adaptive Error Compensation (AEC)”. Ticking this will improve the quality, but encoding time will take longer. In my example, I have chosen it and chose “Sharp (default). I cannot tell you which option is the best as it varies from movie to movie and everyone will have their own opinion so it is best for you to experiment the different settings.
In the next tab, “Options”, make sure none of the boxes are ticked. And finally press “OK”, and the encoding will start. Depending on the speed of your computer and the type of options you have chosen, after some time a screen will appear, telling you the process is complete, press OK.
Part IV: Burning the ISO File.
Now for the final part, burning the ISO file you have just created, or should I say DVDShrink has created. Go to DVD Decrypter -> Mode -> ISO write. Click the browse icon and locate your file. The screen should look very similar to the one shown below; click the “big” button to start burning. Horray! After some time, the burning should be finished. Now you can start watching your backup copy of your DVD movie.
Try StreamFab Downloader and download from Netflix, Amazon, Youtube! Or Try DVDFab and copy Blu-rays! or rip iTunes movies!
+ Reply to Thread
Results 1 to 30 of 50
Thread
-
Last edited by dvdx_925; 4th Sep 2011 at 05:59.
-
Please feel free to post any comments, opinions or suggestions in this thread.
-
Many thanks for an excellent tut m8
 Really useful.
-
Add this to the 25,000 other DVDShrink guides

***
Firstly let me say it's good to see a few more aussies corrupting the forums

***
A couple of issues:
Originally Posted by vkd_auPerhaps you could explain in greater detail - ie. "Go to the Mode Menu ...." or actually have a screenshot of the Mode Menu that shows the File option, or circle these buttons in your screenshots ...Originally Posted by Typical NOOB No. 1
***
Perhaps go into greater detail with the output options DVDShrink has. What if *I* don't want to output to ISO, or burn with DVDDecrypter for whatever reason ? Are you telling me I can't ?
(being a bit pedantic, I know, but remember, I'm a NOOB )
***
Overall summary:
IMHO, this guide is unique in that it outlines from go to woe the steps required to combine the usage of VOBBlanker and DVDShrink, something that is talked about often, but rarely sighted in guides. Too often, one has to string a couple of different guides together and omit parts here and there to get exactly what they want. I think this guide will fill that gap nicely. Good job
If in doubt, Google it. -
Thanks jimmalenko for the tips. I didn't really spend much time on this guide, but when I find the time I will try and improve this guide. Cheers!
-
I'm using VobBlanker 1.6.0.2 . After removing extras and compressing with DVD Shrink and burning, Then I play the movie(s) and in about 3 different parts of a movie the movie goes back to 3-4 previous chapters. The voblanker version that I'm using does not have the "Correct VOBs DSI Pointers" feature, even though it's a more adavnced version. Can this be the problem?
Danny -
Probably. I'd suggest trying to find the exact same version as used in this guide.Originally Posted by bambamrlIf in doubt, Google it.
-
Just a couple of tips on saving more space.
I use Menu Edit to disable buttons for things like the audio and subtitle menus. Since I'm deleting the extra audio and subtitles there is no reason to leave those menu buttons active. (I usually keep the chapter menu)
In addition once I've deleted the buttons there is no need to actually leave the menus on the DVD so I use shrink to change any unused menus to still image (I usually use just a black image which saves a lot of space), these could save you upto 100 mb's or more depending on the complexity of some menus...
Sometimes I'll even compress the menus a little more to achieve untouched video... -
for a beginner this guide was good for me, because i have been able to do it without any problems. thanks.
-
That is toooooooooooo much work.
-
It's may seem like a lot of work, but by using VOB Blanker to remove title sets, and removing unused menu's with DVD Shrink I save time overall as Shrink will have to spend less time compressing the video because there is more space available to the movie...
Less compression equals less time... -
Whatever floats your boat, I say
This is actually a pretty good method IMO for splitting discs, be they Episodic or Movie + Extras, and being able to retain fully functional menus without really getting your hands dirty at a command level. It all depends on what you're after I guess
If in doubt, Google it. -
jimmalenko,
This is the process I follow except I use TitleSetBlanker instead of VobBlanker. I didn't even know about VobBlanker until less than a week ago. Do you know what the differences are between TitleSetBlanker and VobBlanker?
Also, the thing I like about TitleSetBlanker is that after you backup your movie you can unblank / restore your VIDEO_TS files back to the originals. What this allows you to do, for example, is backup the main movie, restore and then backup the extras. Or, backup fullscreen version, restore and then backup the widescreen version. -
I think VOBBlanker can go way deeper than Titlesetblanker in that it can take out individual cells if required. I'm a bit of a NOOB in regards to both programs, but hopefully someone can corroborate (or shoot down) my storyOriginally Posted by rkr1958
If in doubt, Google it.
-
nobody asked you to do it this way.....Originally Posted by bazooka

it's always nice to read something......at least you should apreciate his work, not everybody is lazy.....

-
i was able to do the last step and when doing the ISO write to dvd+r, i had clicked the option to verify the data. it did for a while and after like 65% it stopped and an error. tried to play the dvd+r but it says that it can't, it showed an error. ( green screen ). i will redo everything but whan could have gone wrong?
Percy -
it could be the media.....What type are u using???
-
u there??? post the answer and i may be able to help you....
-
i've been encoding the original video on tmpenc. I didnt know there was an easier way to shink video to make it fit on dvd5 media. thanks for the guide
-
Thanks for the useful guide! Good job. Very clear and concise.
-- Geo :: I play ALL my * .AVI files on my Philips DVP642 !!!
Save your URLs and share URLs -- FURL your links at http://www.FURL.NET/ -
thanks for all your great comments...glad u enjoyed the guide....but unfortunately i will not have time to update it...[make some parts clearer or add other things], as i will be starting uni soon...
-
that'll give you more time to surf videohelp .... and pron
 If in doubt, Google it.
 -
thanks so much for this. it has been so helpful that i copied it on my desktop to refer to. otherwise, i would simply screw it up!
thanks again -
I swear that VobBlanker is the best program ever written!!! My advice would be, don't even dream of using DVD Shrink without using VobBlanker first.
Maybe I'm a bit biased atm because I'm currently"backing up" a massive collection of music and concert DVDs and VobBlanker is never far from my mouse clicking finger.
Oh it is bliss not having copyright warnings/studio logos/DTS & DD demos/useless menus in Hebrew, Icelandic, Cherokee Indian & Kalahari tongue clicking languages.
The guy who wrote VobBlanker is a GOD. That's all there is to it I'm afraid. -
vdk_auOriginally Posted by vdk_au
Enjoyed the guide, but I have one question. What is the advantage of saving the DVD Shrink output to ISO and burn with DVD Decrpter rather than burning with Nero?
Thanks,
JW -
Member

- May 2004
- wrong side of the tracks


Decrypter is free to everyone.Originally Posted by ruraltexan
Working with one file (ISO) is simpler than working with a group of files (VIDEO_TS directory).If God had intended us not to masturbate he would've made our arms shorter.
George Carlin -
so am i wrong, or can't you just eliminate the features you don't want in dvdshrink anyway. i'm confused why with about 10 dvd's backed up for my little girl to ruin the copies, the quality comes out fine, and i just eliminate the extras, menus and whatever else i don't want....
-
You can't retain a working DVD structure with fully functional menus, etc. if you try to use DVDShrink for this. VOBBlanker can just get rid of things like the FBI warning, without removing anything else, while keeping everything else untouched and fully functional. With DVDShrink you have to use reauthor mode, which means you lose menus, and you only get extras if you add them as well as the main feature, and even then, the extras are only accessible by advancing to the next title, instead of having a menu to access them.Originally Posted by beechum1If in doubt, Google it.
-
... is there an easier way???
I am looking for a cheap, easy solution to rearrange content... but if there really is no EASY way, I'm willing to use whatever works... just need a guide! I want to reauthor and rearrange DVD title sets, and maybe edit menus...
What do you suggest??? Is this guide the way to do it? Or, is there something simpler, and yet still FREE? I bought Nero, but it sucks...
>>> moved this to a new thread :::
https://www.videohelp.com/forum/viewtopic.php?p=1316937-- Geo :: I play ALL my * .AVI files on my Philips DVP642 !!!
Save your URLs and share URLs -- FURL your links at http://www.FURL.NET/ -
LOL...I haven't checked out my own guide for ages, I was just reading that the part "I'll be going to Uni soon", and now I'm already half way through my first yr of Uni, damn it's being fast...anyway back to the topic. Sorri fellow's for leaving you here

Yea, but unfortunately it will cost money, if money isn't an issue then go ahead and follow this advice. I'm not quite sure on other tools, cos these are the steps I usually follow. The only tool I can recommend off my head is CloneDVD, it will basically do the same thing's as I mentioned here. You also need AnyDVD which allow's you to decrypt the copy-protected DVD.... is there an easier way???
I am looking for a cheap, easy solution to rearrange content... but if there really is no EASY way, I'm willing to use whatever works... just need a guide! I want to reauthor and rearrange DVD title sets, and maybe edit menus...
What do you suggest??? Is this guide the way to do it? Or, is there something simpler, and yet still FREE? I bought Nero, but it sucks...
Try doing a search on how to use these tools, but to tell the truth, it is very straight foward with those tools, as it is basically a "click and go" program. That is all!
In relation to my Guide, I'll probably quickly do an update out of the top of my head with this guide, sorri but I'm currently in my exam period, and my next exam is like 2 days away.
1. DVD Decrypter is now no longer bein updated, and as a result, any new dvd copy protection's that are added, DVD Decrypter may not be able to do the job anymore. If you try to decrypt a DVD, and somehow it won't be able to decrypt it, you will have to find an alternative tool, my recommendation would be AnyDVD, but if any of you fellow's have suggestions, feel free to post.
hmm...that's about all, I don't think there is anything else to say. Anywayz, thank you guyz and gurls for all the support, hopefully I'll be able to update sometime, but since I'm doing a double degree, I don't find as much time as before. Thanks again, cya all! I'll prob check this thread soon again, to see how's everything goin![/quote]
 Quote
Quote


Similar Threads
-
DVD Ripping...DVDShrink, DVD Fab question...
By nharikrishna in forum DVD RippingReplies: 9Last Post: 28th Feb 2011, 05:08 -
SVCD2DVD when going to DVDShrink & DVDShrink Re-Author Problems in Vist
By pcandmac2006 in forum SVCD2DVD & VOB2MPGReplies: 2Last Post: 23rd Jan 2009, 19:33 -
Can't PlayBack DVD after using DVDShrink
By NatJm429 in forum Newbie / General discussionsReplies: 5Last Post: 19th Jun 2008, 22:22 -
dvd srambled using dvdshrink, not a newb
By lapoza in forum Newbie / General discussionsReplies: 4Last Post: 21st May 2008, 10:18 -
DVDshrink problem with a new DVD
By mvp in forum Newbie / General discussionsReplies: 3Last Post: 26th Feb 2008, 13:01