


16Gig Memory
Asus X370 Prime")
Music Video Captures - Replacing the Audio with CD Audio with Sound Forge V2.3
Why ?
Well some of my tapes from the 1980`s had very good picture quality , but the sound - aye carumba , it was terrible , enough hiss to fill the snake pit at a zoo . And some videos I just wanted in stereo sound - due to being broadcast in mono back then . If a video soundtrack is beyond decent repair with cleaning up , then my tutorial could be for you .
Introduction
Whilst in theory very easy , I wont kid you , the initial process of doing this can be mentally labour intensive and technical , but the end result gives a great polished music video at the other end . Some of the ideas can be used for other uses but primarily this tutorial is for music videos . Some of the points made are obvious , but are still made to put everything in context should you get stuck . In some ways its not a noobie tutorial , but I hope to explain it to the degree that it can be read by all . After you do a couple of replacements though , you will get an ear of how much things are out , the process will then become much much quicker .There are several ways of doing this , depending on what software you own , or the problems you have . This guide isn`t to bring in other objectives like cleaning up the video , its just to replace the audio , no more no less .
Problems
You have a capture of an old/new video and you wish to replace the sound with your cd`s version of it . Firstly there are a few obstacles to overcome
1. tapes especially older ones are prone to stretching , this makes the soundtrack longer as well . Before you record on a VHS tape you should fast forward and rewind it about 3 or 4 times to take out the initial stretch .
2. tapes can have snarlups which can mess up the sync between the video and the sound , most of my captures nowadays are done via my DVD recorder which helps keep it all synced .
3. music videos sometimes have different intros and outros - elongated/shortened
4. the video is captured from a "pop show" , mimed but with audience interaction , the lack of clapping can make it seem weird
Software Needed (Ive Tried To Mention FreeWare Where Available)
1. a wave editor that can stretch audio and preferably load two samples at once - I use Soundforge 6 (which will also allow the video to be imported) , the advantage here is you can open 2 waveforms and stretch the new one and then replace it for the old on attached to the video and see instantly if the audio and video sync properly - this guide is for Sound Forge , Im sure other editors are capable of loading two samples at once .
2.depending on what wave editor you have you might need TMPGenc Free or BeSweet to convert the finished wav to MP2 or AC3 , TMPGenc (Tools) can also remultiplex your new soundtrack into the video of course
Before Commencing Any of the Technical Stuff
In all cases there are the same first steps to be taken
1. you need to rip the audio track from your original cd in Wav format
2. you need to demux the sound and video from the music video in a demultiplexer (eg TMPGenc Tools)
3. load the video cap file you have into VirtualDub MPG2 and note down its information on the video and audio file specifically their lengths (down to the milliseconds)
4. keep that notebook handy - you`ll need it later on...... and a calculator
How ?
Some people have made comments on how to do Soundtrack Replacement by saying "just stretch it" . Mmmm... well that just doesn`t do it sorry , an error of 0.1seconds can show on lip sync on a video . So the question then is "Stretch it , but by how much?"
This way your spanking new cd quality soundtrack will be a perfect match for the old one .
It revolves around maths basically , it has worked for me for about 45-50 videos and I need to commit it to paper before I forget it (40 next birthday) .
The Operation
1. Load up the demultipexed audio from the video into your sound editor , again check on its Information selection as to its length , (to check against VirtualDubs answer) ,
2. Load up your ripped cd audio as well , then convert that to 48000khz before you do anything else (if you are making a dvd with it of course).
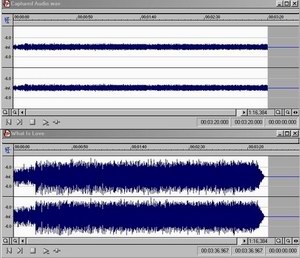
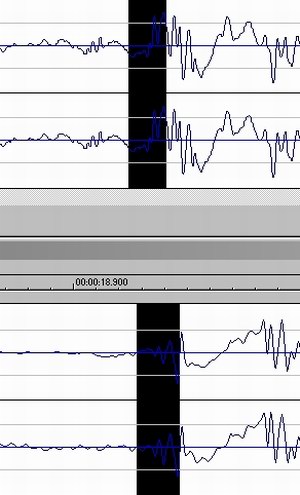
The two waveforms loaded up with totally different lengths (note the vhs cap has a very poor sound) .
You firstly need a datum point - a snare drum , a bass drum or vocals in a recognisable point in the music . You find this roughly by listening to it , then zoom in on those two areas (start with the CD Audio , any drum beats etc will be much more easily seen on its waveform , they are very distinctive ) .
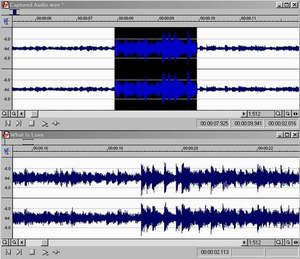
3. If your sound is poor then either side of this point Normalize it (as in top waveform in picture above - locally Normalizing it helps keep everything visually in place) , then it will be easier to relate to the cd waveform .
The two sections of the 2 waveforms look quite similar now (see above) , zoom in again , narrowing the highlighted section to the start of the drum you can see kicking in . Zoom in as much as you can and still see the waveforms .
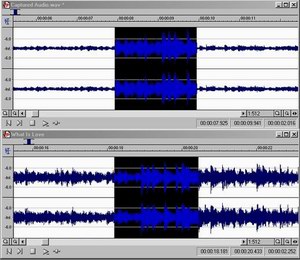
4. You can see the datum point to make - at the start of the drum beat (see above and below for zoomed in ) , click on the bases of the drum beats waveforms and note the times down on the two waveforms .
This pic above shows the same section , normalized and , ready to click on the start of the first peaks to get the times .
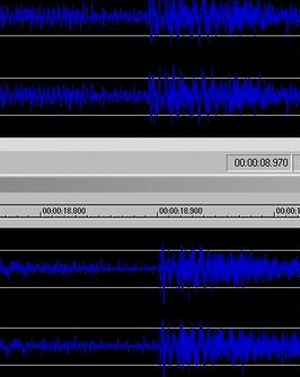
5. Go towards the end of your waveform and find another datum point and note it down on your pad , its best to make this as close to the end as possible as it makes any error smaller and therefore makes the replacement soundtrack fit the best it can . It is best and easiest to have a sound editor that will load 2 samples at once or two editors shrunk so you can see what is happening in both .
6. Load the cd waveform into the editor and find those datum points on that waveform (the waveforms will be be much more peakier though)
7. Now comes the "interesting" bit , subtract the one from the other , I`ll make up some figures to make the example work .
Captured Audio
Datum One 0:24:590
Datum Two 3:26:340
CD Audio
Datum One 0:35:650
Datum Two 3:32:750
6. Right erm.. subtract Datum 1 from 2 - believe me , convert the minutes to seconds , it stops your head exploding
Captured Audio
206.340
-24.590
181.750
CD Audio
212.750
-35.650
177.100
The time differential between those two points is :
181.750
-177.100
4.650 seconds
7. Now you need to work out the stretch %
Stretch % = 181.750/177.100 = 1.02625 % This is decimal to show it has stretched by 2.625 %
NB this is how I do percentages , I convert to decimal ie if I wanted to know what increase a 5% pay increase would give me , I multiply my wages by 1.05 , its quicker and you know it makes sense
8. Get from the info function in your wave editor the total length of the CD Audio
9. For this example lets say its 4.03.450 minutes
10. Convert to seconds = 243.450 seconds
11. Multiply it by the stretch % in decimal
1.02625 x 243.450 = 249.840 seconds This is to be the new length of the CD Audio waveform
12. So go to your wave editor and select the whole waveform and select Stretch from the tools and enter the new length or percent if that is what it asks for .
13. Right , you now need to top and tail the new cd waveform , so the datum points line up correctly , so you need to find where Datum One has got to - you can do it by maths
ie CD Audio Datum One x Stretch %
35.650 x 1.02625 = 36.585 seconds (new point for datum one after stretch)
14. That point was at 24.590 on the original sound so if we subtract the Original Datum One point from the CD Audio Stretched Datum One (from above) it will tell us how much to cut off from the waveform .
ie
36.585
-24.590
11.995 seconds
So cut off 11.995 seconds from the beginning of the CD Audio Stretched waveform
15. If you are using a video editor to do this (like Vegas) or Soundforge then you`ll have loaded the video as well and you can now see if the video syncs properly with the new audio if you wish .
16. Get the audio length from your notebook and make the CD Audio Stretched waveform the same length (by cutting the end off) .
17. Turn your wav into an mp2 or a ac3 file and remultiplex it back with the m2v file you have from the start .
Returning To The Problems Section
1. if the video has stretched in a non-linear fashion ie the percentage of stretch is not a constantish percentage then it has to be done by another method - Method B . The percentage will never be 100% the same throughout the length of the pop video , but will hopefully mostly stay within an acceptable tolerance band , most of mine have been , even capturing from videotapes recorded back in 1983 .
2.tape snarlups - causing loss of sync , stuck frames etc . Again Method B is the answer to this as long as the video has been captured dont worry to much about the sound being in sync .
3.different intros and outros - mmm... you`ll have to cut these out and paste them in ideally overlaying them , Method B will also help with this
4.taped from a pop show with the audience clapping etc - with no clapping and a perfect cd sound it makes the video look a little surreal really , I taped a clean section of clapping and noise reduced it and by fading it out for the intro overlayed it onto the finished stretched wave , Ive used this same clapping wav again and again , it can be faded in and out for the outro as well . You can of course use the clip from the original and overlay that , but I personally don`t like doing that .
5.the singer not lip syncing properly - luckily nowadays with the technology available it rarely happens , but most of my tapes are from the 80`s which I want to work on , when lip syncing properly was a bit more hit and miss (by the artiste themself) , Method B will also sort this problem out .
Method B will be posted at a later date . It primarily consists of ripping the video to bits – scene by scene and reassembling it , its still being written along with a guide to removing watermarks 100% by cheating .
All of the above Method Statement once understood can be condensed down to a straight formula
ALL TIME IS IN SECONDS
Captured Audio Datum One = A
Captured Audio Datum Two = B
CD Audio Datum One = C
CD AudioDatum Two = D
Distance between the two datum points on Captured Audio = R
Distance between the two datum points on CD Audio = S
Stretch % as a mulitplying figure to find out final total stretched length = U%
Length of CD Audio = V
Length of Captured Audio = X
Length of Stretched CD Audio = V2
New Position of Datum One on Stretched CD Audio = C2
Amount to delete from beginning of Stretched CD Audio = Y
Amount to delete from end of Stretched CD Audio = Z
1. B - A = R
2. D - C = S
=> R / S = U%
=> U% x V = V2
=> C x V2 = C2
=> C2 - A = Y
3. V2 - X = Z
Try StreamFab Downloader and download from Netflix, Amazon, Youtube! Or Try DVDFab and copy Blu-rays! or rip iTunes movies!
+ Reply to Thread
Results 1 to 6 of 6
Thread
-
-
Pictures are the wrong size , I need to resize them later
-
resized and a few mistakes corrected - up to v2.3 from v2.2
-
I tried to get Virtualdub to open some files and it can't open a vob, an mpg, or an m2v. So how am I supposed to get the info about these files with that program as described in your tut if it can't even open them???
-
Its not Virtualdub , it says VirtualDub MPG2 - the latter is a variant of the original (the forum automatically highlights the word VirtualDub but not the MPG2 in the text in the tut above) . I wrote it in about 2004 or something , bit foggy on it to be honest .Originally Posted by adidasos
https://www.videohelp.com/tools?toolsearch=virtualdub+mpg2&s=&orderby=Name&hits=50&conv...uthorfeatures= -
I do most of my work in Audacity now as I just find it easier and a few of the steps are uneeded when I now read it back . Basically -
Get the (front end) two points to align (by deleting from the CD audio) to make the alignment points line up on the two waveforms .
Find the second alignment point on each waveform and note it down .
Select the area between the two points on the original waveform and note down the length the program says it is .
Select the area between the two points on the replacement waveform and then select Stretch (or whatever its called in your editor) and then input the length you got from the paragraph above and the editor will either stretch it or shrink it .
 Quote
QuoteSimilar Threads
-
Replace Audio in SWF
By just_kim_usa in forum Newbie / General discussionsReplies: 1Last Post: 11th Nov 2011, 03:56 -
Replace audio on .vob
By Flugplatz89 in forum Authoring (DVD)Replies: 18Last Post: 25th Sep 2011, 09:16 -
Replace audio on a DVD
By danielmak in forum MacReplies: 7Last Post: 31st Oct 2010, 22:40 -
Replace audio DV AVI
By Abas-Avara in forum EditingReplies: 11Last Post: 19th Sep 2009, 16:54 -
Replace audio
By quxote in forum Newbie / General discussionsReplies: 9Last Post: 9th May 2008, 01:04